Quantcast
Channel: Media Storage – IKEA Hackers
Viewing all 194 articles
Browse latest View live

Fridge top cabinets hacked into TV console

$
0
0

I just wanted to share an IKEA hack I did a few years back. I needed a stereo cabinet that could hide my large surround system so it needed to be deeper than 43 cm. It did not exist anywhere, therefore I made this out of 4 fridge top cabinets (60 cm wide, 34 cm high, 55 cm deep) 2 fridge free sides and a plinth in grey.

Fridge top cabinets hacked into TV console Close up of fridge top cabinets Fridge top cabinets for media storage Fridge top cabinets for media storage Fridge top cabinets for media storage Fridge top cabinets hacked into TV console Fridge top cabinets hacked into TV console

~ Med venlig hilsen

The post Fridge top cabinets hacked into TV console appeared first on IKEA Hackers.


The Arcademicke

$
0
0

Light arcade cabinet using the MICKE desk by SIN Tchan

Materials:

- MICKE desk $49.99
- Samsung monitor 24” hdmi with speakers $150
- Arcade stick motherboard $30 (type ”arcade stick pcb” on amazon.com)
- Buttons + joystick (brand Sanwa) $40
- Stainless steel panel $30
- Black stickers $15
- stool $50
- a xbox or playstation system

This is a very geek creation: a real but light arcade cabinet. the console and the button wires are hidden inside the desk drawer.

1. Drill the holes on the stainless steel for the buttons and the stick.

2 .Drill 2 rectangles on the work surface to be able to insert the stick and the button.

3. Put the black sticker on the stainless steel panel. Use a lighter directly on the sticker to evacuate the air bubbles if needed.

4. Connect each button and the stick to the PCB (it’s very easy – tutorial on youtube)

5. Screw the stainless steel panel to the top of the work surface.

6. Screw the two screen holders in metal on the work surface (at 6cm from the back of the desk).

7. Install your console inside the IKEA drawer (for a better airflow, you can also drill some holes on the back/side of the drawer)

Thank you !

~ SIN Tchan, Interior Designer from Paris (France)

The post The Arcademicke appeared first on IKEA Hackers.

IKEA Kallax to Mid Century Modern HiFi Console

$
0
0

IKEA Kallax to Mid Century Modern HiFi Console

I did a hack on the Ikea Kallax shelving unit, to give it a more of mid-century modern Hi-Fi cabinet vibe. The legs are from Lowes. The stain is from Home Depot, Ebony colored wood stain by Minwax. It matches the dark color of the Kallax very well.
I found out about that here.

I attached the legs to a panel of plywood, to make sure they were more secure than going directly into the semi hollow Kallax. I was able to secure the plywood securely to the Kallax, no issues with weight or stability. A painless project. Fun stuff.

IKEA Kallax with tapered legs

IKEA Kallax with tapered legs

It was my attempt at this look, from Atocha Design, which I think is beautiful. Mine is about $5,000 cheaper.

IKEA Kallax to Mid Century Modern HiFi Console

The mounting hardware is available separately from the legs.
There are six legs in total. I bought four angled mounting plates for the corners to give the mid-century modern look, and two straight mounting plates for the middle. I bought a plywood panel and cut it just shy of the dimensions of the Kallax. The plywood is attached with just three screws, running the length of the board, down the middle. It was secured to the Kallax firmly and I didn’t want to over do it with the screws, knowing weight / gravity would be a big help when the records were in the Kallax. The legs and the plywood have two coats of the ebony minwax. The mounting hardware felt securely attached to the plywood.

Here’s a link to the doors. I cut a square in two doors for the speakers and covered them with speaker fabric.

I attached the plywood to the Kallax using 1″ screws. For the leg mounts, I think I used the screws that came with package. 1/2″ screws probably.

Final touches on the HiFi cabinet. My Totem Dreamcatchers are rear ported, so I wanted to have the back of the speaker cubby open. I removed 2 sides of the Kallax door insert and just left a bit of the 3rd panel so I could still attach the door to the Kallax wall. To help out with echo / vibration, I lined the cubby walls with Sonex Audio Tiles, cutting a bit out of one tile for the speaker. The speaker sits on 4 Square Fat Dots from Herbie’s Audio Lab. I didn’t like how during the day the light shined in through the back of the cubby and out the front speaker grille cloth, so I built some wood frames and lined them with some black Acoustone Stretch Fabric. This way the light is kept out but the rear ported Totems have some room to breathe. The frames just pop in, the fabric gives it a snug fit. So, if I’m going to keep the speakers inside the cabinet, I think I’ve done what I can. It sounds real nice.

Speaker Cubby with No Back

Speaker Cubby with Fabric Back

Speaker Cubby Back

I believe I’ve put in about $500 total, for legs & hardware, plywood, Panyl Rosewood door adhesives, speaker fabric, handles. The Kallax & doors from Ikea run about $200. So $700. Which is a very substantial sum for me. It was something I really looked forward to trying and the kinds of consoles I love being made now are in the thousands, like Atocha or Madison.

~ Chris Kennedy

The post IKEA Kallax to Mid Century Modern HiFi Console appeared first on IKEA Hackers.

Living room home cinema: My stylish projector mount and hidden surround receiver

$
0
0

Stylish film projector mount and bookshelf

I have been looking for a way to integrate my home cinema projector into my living room.

I wanted it to be a stylish way, maybe a way to hide it away… Then I came across the Mandal headboard.

Mandal headboard

Photo: IKEA.com

IKEA Mandal holds the film projector for my living room home cinema

By putting three of them together I got the perfect projector mount and a cool looking bookshelf.
It was easy. I only needed to align the three headboards and make an extra shelf for my projector.
People seem to love it and it brings a nice warmth to the room too.

Hidden surround receiver

BISSA 2-compartment shoe cabinet

Photo: IKEA.com

BISSA 2-compartment shoe cabinet

Photo: IKEA.com

I got inspired from this site to hide my stereo… So I bought two Bissa 2-compartment shoe cabinet. I cut it down to one compartment and moved the bottom plinth to get a new design. I bought two because I needed an extra top to make the bottom look like the top. My pioneer receiver was a perfect fit. I have a google chrome cast, Apple TV, and WD TV mounted to the unit.

Surround receiver hidden in an IKEA BISSA shoe cabinet

Surround receiver hidden in an IKEA BISSA shoe cabinet for my living room home cinema

An IKEA hack for movie lovers. I hacked a stylish projector mount and hidden surround receiver to create a living room home cinema set up.

Thanks IKEA Hackers, cool to get inspired…

~ Kim Berge-Hansen

The post Living room home cinema: My stylish projector mount and hidden surround receiver appeared first on IKEA Hackers.

The “WAF friendly gaming center”

$
0
0

Today, I’d like to share with you my solution to make a clean looking media center unit from wall mounted METOD kitchen cabinets. I was looking to house my AV receiver, and everything video game related, for “cheap”, but I wanted something with a nice sleek look. I previously used a KALLAX 2×2 with added wheels, but it was beginning to be a bit crowded, and dust was an issue.

First, I’ve laid out all the possibilities using Sketchup and the vast library of free 3d models of IKEA furniture available online.

Sketchup plan of a WAF friendly gaming center

I went for the bigger one thanks to a sound advice from my wife “You always buy new stuff,  you should make sure you could house ‘em all.” She’s right, I do, so I listened to her.

My WAF friendly gaming center made from IKEA METOD kitchen cabinets

The unit is basically two wall mounted 80x37x60cm METOD kitchen cabinets stuck on top of each other using 6 screws. I bought 3 40x60cm EKESTAD doors and used one as the top for a more coherent finish. It was screwed from underneath.

I was relieved to see that even by sticking two Metod units together, the hinge for the doors (which are taller than one Metod unit, they overlap to the middle of the top unit) still lined up perfectly from one unit to the other. So no tinkering with additional holes here. I used UTRUSTA hinge damper for ease of use.

I made a hole for cable between the two units by using a FIXA hole set, and two additional holes so I could add fans at the back (the closed doors make the temperature inside rise quickly when playing video games). I plugged them on the usb port of the game console so they start when I turn it on, and when the door are closed they are dead silent.

WAF friendly gaming center

The finishing touch was to secure it to the wall and add a set of 15 cm chrome legs, so I could use the space to hide my robot vacuum cleaner underneath (you can see it in the picture)

The hole on the back for fixing it to the wall are especially useful for cables management (I used a power strip that I put on the lower bottom shelf, so there’s only one power cable sticking out of the unit).

Using the Fixa hole saw, I cut 3 half circles holes (as seen on top of the fan picture) on each shelf for added cables-related versatility.

Overall it took me less than a day to put the whole thing together, trip to Ikea included.

Hope you like it !

~ Yann BOYER
a.k.a. “Icha”

The post The “WAF friendly gaming center” appeared first on IKEA Hackers.

The Stealth Projector Cabinet

$
0
0


Materials:

MALM chest of drawers

Basically I like my place neat and tidy, and hated having a big white projector box and all the cables messing the place up…

This hack was done having had the drawers for some time, so first I had to disassemble the top drawer completely, to allow for a fixed shelf inside, big enough to house a projector and all cables, then turn the drawer front into a bracketed hatch so that, when not in use, the drawers look exactly like those on the other side of the bed. Took about an hour to complete, had to purchase an MDF sheet for the drawers, plus additional timber for support. 2 small hinges for the hatch and a magnetic catch to keep the thing shut when not in use. Because of the drawer design, no handle was necessary.

In fairness, it looks a little rough when it’s open, but that’s fine with me for now..may tidy it up later on.

bedside projector cabinet closed

bedside projector cabinet open

~ Ben Brewster

The post The Stealth Projector Cabinet appeared first on IKEA Hackers.

Raspberry Pi retro gaming table built from IKEA furniture

$
0
0

Spencer (spannerspencer) has documented his build of a Raspberry Pi retro gaming table over at the Element 14 community. He used the IKEA LACK side table, hollows it out and embeds an LCD monitor, arcade controls and a Raspberry Pi 3 into the carcass of the table. The controls are hooked up to an Arduino Leonardo and the player’s commands are fed into the Pi via USB. A piece of acrylic added to the top of the table covers the LCD monitor.

Raspberry Pi retro gaming table built from IKEA furniture

See the complete tutorial on Element 14 (via Recantha.)

~ Micha

The post Raspberry Pi retro gaming table built from IKEA furniture appeared first on IKEA Hackers.

TOMNAS TV Unit with sliding doors

$
0
0

Items used:

  • Ikea TOMNAS TV Unit
  • Doors – 3mm hardboard
  • Paint of your choice – we used Dulux Feature wall Sapphire Salute – although we think we will use a vinyl sticker next time we decide we want a change of colour
  • Wide Masking Tape
  • Rail – Wire/Cable trunking 16mm wide. I got MK White mini trunking from B&Q
  • Right Angle Clip / Angle Brace – I bought from Toolstation for £0.40 for a pack of 50, 19mmx19mm. Item number 34919
  • White paint (optional) – to camouflage the clips
IKEA TOMNAS TV unit

Photo: IKEA.com

We wanted to be able to use our storage space at the bottom of the unit properly without making it look cluttered, so we set about creating some doors for it. In the end we settled for sliding doors.

TOMNAS TV unit open storage

Step 1 – Doors
I measured two equal sized boards of 86 cm x 46 cm. I chose this length so that the boards would always overlap each other, and also allowed for some space in height as the rail and its sticky adhesive pad use up a few mm.

Note: If you want different sized boards, be careful when measuring as not all four of the section are equal lengths.

Step 2 – Design
Painting the boards – I used wide masking tape to create stripes. I painted on the non-taped areas with two coats of paint.

Designing the sliding doors

Designing the sliding doors

Designing the sliding doors

Designing the sliding doors

Designing the sliding doors

Designing the sliding doors

Designing the sliding doors

After removing the tape I painted the whole section with one coat of paint, using a diagonal stroke action

Step 3 – Rail
Creating the rail for the doors to slide on.

Top Rail – Cut the trunking to length and stick into place using the self adhesive tape already on the trunking for the top rail.

Bottom Rail – Paint 4 clips white and glue them perpendicularly onto the rail (1 clip for each storage unit, I used 4)

You will be able to screw the clip onto the TV unit and thus securing the bottom rail onto the TV unit without using the self adhesive pad (but don’t do this step without reading ahead !)

Adding the sliding door rails

Sliding door rails

Step 4 – Assembly
Tuck the doors into the top rail
Whilst the doors are held in, position the bottom rail onto the doors
Position the bottom rail onto the TV Unit
Screw the clips on the bottom rail onto the TV Unit

TOMNAS TV unit with sliding doors

The reason I used clips for the bottom rail and not the self adhesive pad was so that I could remove the bottom rail in the future without any mess of the adhesive ripping off. The main aim is so I can change the door design / paint work in the future.

~ Starburst

The post TOMNAS TV Unit with sliding doors appeared first on IKEA Hackers.


IKEA FRIEL TV hacked!

$
0
0

IKEA items used: FRIEL (only TV cabinet)

IKEA FRIEL TV unit hacked into sleek oak unit

1. Dismantle the metal feet (5 legs) of the furniture.

IKEA FRIEL

2. Legs screwed to a new wooden oak board.

Legs screwed into oak boards

3. We attached the sides, always drilling and using markers, then introduce wooden cylinders, not use metal brackets in this composition.

Attach the sides

And back

No metal screws were used

4. We put pieces of wood cross to support the weight of the TV.

Melamine panels to conceal the legs

5. We put up the top board oak melamine.

Melamine panels to conceal the legs

6. We covered the legs with 3 pieces of white melamine.

IKEA FRIEL TV unit hacked into sleek oak unit

Oak board for the top

IKEA FRIEL TV unit hacked into sleek oak unit

IKEA FRIEL TV unit hacked into sleek oak unit

7. We used USB LEDs connected to the TV to give light up our creation.

LED strips to light up the TV unit

~ Josep Enríquez

The post IKEA FRIEL TV hacked! appeared first on IKEA Hackers.

RIBBA photo frames for retro video games

$
0
0

IKEA Ribba frames for retro video games

IKEA Ribba frames for retro video games

Michael Rosskopf emailed me about the retro video games system they’ve made. What’s cool is that it lives in two RIBBA frames.

From their site, it says it “is an open-source gaming system powered by an Arduino Mega 2560. The games are displayed on a 32 * 32 RGB LED panel which fits perfectly into a picture frame. The idea behind this intriguingly simple concept is to pare the game play down to its very essence without compromising action, speed, and fun.”

Michael and Thomas even gave it a cute name, LEDmePlay.

You can play retro games inspired by Pac Man, Space Invaders, Centipede and a few more. Now I wish I understand all the Arduino stuff to make one.

pacer - pac man inspired retro video games invaders - space invaders inspired retro video games

They have presented their creation several times at different Maker Faires in Germany and met with great success. People seem to love the look and feel of this gaming system, which throws back to the good ol’ days of dot-matrix screens.

View the construction manual.
View the games.
Visit the site.

The post RIBBA photo frames for retro video games appeared first on IKEA Hackers.

Hide your electronic devices behind the TV

$
0
0

I wanted to get rid of the devices around my TV (decoder, router, hard drive, Android box, and of course cables!); so my TV stand (or the furniture I’m using for it) would seem to be more clean.

Materials:
- PRÖJS Desk pad
- Fish line
- VESA mounting screws

Idea:
Because my TV is in a stand, I used the VESA mounting holes (mine has two) to hang the desk pad and (of course) the devices attached with fish line to it.

Procedure:
1.  Take the desk pad and do measures to highlight the location of the screws
2.  Mark with a ball pen the space needed for the devices (NOTE: leave some space for cables)
3.  Make holes for VESA screws and to pass the fish line

Hide your electronic devices - Step 3

4.  Attach the devices and tighten the fish line
5.  Be sure everything is OK
6.  Attach the desk pad to the TV using the VESA screws

Hide your electronic devices

7. Connect all cables
8. Test everything is up and running

Hide your electronic devices

To me it was really good to have all this stuff ‘out of my sight’, and the desk pad is good to manage and heavy to attach all electronic devices (not all I have, unfortunately!).

Regards from Belgium!

-Iñaki P.

The post Hide your electronic devices behind the TV appeared first on IKEA Hackers.

BESTÅ living room storage goes custom width

$
0
0

Right after I finished installing 3D decorative panels on my living room’s TV wall I went on a hunt for a piece of furniture that would fit into both pillars. Some slick, modern and that offered plenty of storage, yet keeping the new wall as focal point. Most modern/contemporary storage units range from 900 up to 2K. BESTÅ solution seemed to suit my needs better.

To fill the entire wall’s width (99,5″) I needed at least 2 BESTÅ frames (47,25″ each). Both frames together (94,5″) wouldn’t be enough to cover the entire width. I came up with the idea of extending the storage 2,5″ each side, that would keep the frames centered giving it a look of custom design solution.

Materials:

  • 2 wide BESTÅ frames (47 1/4 x 15 3/4 x 25 1/4″). Plus high gloss black doors/drawers and black smoked glass doors for media IR devices.
  • 1 color-matching BESTÅ door picked from IKEA’s As-Is section.
  • 1  2″ X 1.5″ wood stood
  • Wood screws
  • Gorilla glue

Drafted the intended design to define addition specs.

Initial draft

Extension is formed by adding L-shaped frames on each side of the storage. Using the 2″ x 1.5″ studs, cut at 45 degree angle and glue them together, screw them too for max strength.

Frame

Building extension frames

According to the specs, cut the color-matching door to create the 3 pieces (Front, top and visible side) that would cover each extension. Then glue them to the L-shape stood frames and if possible, screw them from the inside since doing it otherwise would mess up the finish.

Covers added to the extension frame.

Covers added to the extension frame.

Once all the pieces are put together, let the glue dry thoroughly (For at least 24-hr).

Attach each extension to the side of the BESTÅ frame with glue and screw it from the inside of the storage unit. Then place both storage frames side-by-side and using provided screws, firmly join both frames.

Assembled Assembled 2

Project turned out exactly as planned, 99,5″ wide to fit snugly into the available space.

BESTÅ living room storage - Final Width

Then piece together all components (Shelves, doors, drawers..). Since glass-top sold by IKEA did not cover the whole width of my new storage, I had it custom-cut by a glass store. It was delivered on grey smoke color so I had to coat black the underneath.

BESTÅ living room storage finished

Besta TV storage finsihed – Front view

BESTÅ living room storage  - Sideview Finished

BESTÅ living room storage finished – Side view

Besta living room storage front


Finished 2

The post BESTÅ living room storage goes custom width appeared first on IKEA Hackers.

IKEA Lack Stereo System – Full Range Speakers and Integrated Amplifier

$
0
0

After the round IKEA Salad Bowl Speakers, here are the slim IKEA full range LACK speakers, built using two 110 cm shelves from the LACK family.

IKEA Lack Stereo System - full range speakers and integrated amplifier

Integrated amp and its power supply are made from LACK shelves too.

Lack speakers chart

To make the speakers, you need:

  • 2 IKEA Lack shelves – 110 cm
  • 2 small full range speakers, less than 5 cm large
  • 4 binding posts
  • 4 plexiglass bars – 25 cm each. I used those with squared section, 2 x 2 cm
  • 2 woodden bars – 4.5 cm large, 2 m long, 2.5 cm thick
  • a foam or polystyrene sheet – 4.5 cm thick ( you can take thicker sheets, then cut a slice )
  • copper wires
  • 4 long screws for the feet and screws to connect the drivers
  • little adhesive bumpers

speaker material IKEA LACK Stereo system - speakers front and back

To make the integrated amp, you need:

  • an amplifier board, whatever you like but no more than 4 cm high
  • a Switching Mode power supply, no more than 4 cm high ( you can also use an external one, like the wallwarts )
  • 2 IKEA LACK shelves – 30 cm
  • 1 switch, wires, connectors: 2 RCA, 4 binding posts, 4 banana plugs, 1 stereo potentiometer 20 Kohm

amp inside

IKEA Lack Stereo System - amplifier back

IKEA Lack Stereo System - amplifier front

Steps:

1. Dig the shelf. It’s enough to take off the first piece of plywood ( less than 1 inch ) by making 4 holes with a drill at the corners of the rectangle you want to take off, then cut from one hole to the other with a handsaw.

2. Take out the folded paper that fills the inside, it’s easy using the handsaw.

3. Connect by screws the PSU and amp to a wooden board, with some holes on bottom to let cooling air to go around . If you are interested in using more powerful stuffs, then it’s better to use an aluminum sheet, better for cooling and thinner than wood, so the useful space is larger

4. Connect the base and the connector strip using a piece of L aluminum profile

5. Put wires and a LED with a R ( 820 ohm if with 12V PSU )

Tips:

1. While working, protect the edges of the shelf with paper tape, to avoid hurts and dents

2. Mind the height: the base board + the components must be less than 4.3 cm ( 1.7 “ )

If you are interested in more information about the speakers, there’s a step by step building manual here.

More pictures about the amp ( and its evolution in time ) here.


~ Hacked by Luca Pessina – Monza, Italy

The post IKEA Lack Stereo System – Full Range Speakers and Integrated Amplifier appeared first on IKEA Hackers.

LACK TV Stand at twice the length

$
0
0

Lack tv stand at twice the length

IKEA items used:

  • 3 LACK TV Stands (3rd one for extra parts only)
  • 2 Maximera Drawer frames – one 80 width x 60 depth, and one 60 width x 60 depth.
  • 2 Veddinge drawer front 80 x 20 yellow white (as LACK TV Stand is more off white than white!!)
  • 2 Veddinge Plinth yellow white
  • Capita legs – 2 packs of four
  • 3 Malm glass top – transparent 160cm, 80cm and 40 cm.
  • Metod legs

Steps:

LACK TV stand

Photo: IKEA.com

Before following the LACK instructions, you will need to mark and drill the fixings for the drawers on 3 of the side panels that will be on the left hand side of the stand. (Following the instructions in the drawer pack for this.)

Also mark and drill appropriate holes in one of LACK stands – top and bottom- to fix the 3rd side panel (taken from the 3rd LACK unit) in the middle – approx 80cm in (this will be the left hand side of the first drawer and the right hand side of the second drawer.

Adding drawers to the Lack tv stand Lack tv stand at twice the length

You will also have to make holes in the appropriate place in one of the drawer fronts to attached the drawer front, as the second drawer frame is 60 wide, but will be fixed to the 80 wide drawer front to cover the gap between the two separate stands.

Build two of the LACK TV stands as normal now – (remembering to put the extra side panel in the extra drilled holes,) but instead of using the LACK legs use 4 of the CAPITA legs at the edges – mine are 7 cm in to allow for the plinth to be back from the bottom edge of the cabinet. (The screws can go straight in – no need to drill for this).

The remaining 4 of CAPITA legs should now be used to join the two stands together – the extra legs in the middle will also add stability to the stand.

Add glass top to the top and the top frame from the third LACK.

~ Hacked by Charlotte Lemom

The post LACK TV Stand at twice the length appeared first on IKEA Hackers.

Equip a LACK coffee table with a built-in USB charging station 

$
0
0

00_final

Our extended family has grown quite a bit over the years to include Cousin iPad, Auntie iPhone, Grannie Kindle, and that crazy Uncle Android. It’s a full house, and they’re hanging out on the kitchen counter, in the home office, and especially in the living room. Our wall plugs are always at their limit, jammed up with our smart “relatives”. We want more space for ourselves yet don’t want to be without our beloved family of devices.

Our Idea: a cool LACK coffee table with a charging station for 4 family members
We all have a soft spot for charming furniture with a used-look. This gave me the idea to create a coffee table with an integrated charging station and a fresh, shabby-chic paint job.

Our solution: I did my research and came across the tizi Tankstelle Toploader USB charging station, which could charge 4 gadgets simultaneously, manufacturer independent. I was over the moon with excitement! Now nothing stood in the way of my idea. I wanted a table with wheels, to make it more mobile, and saw that the LACK series from IKEA were cheap, easy to put together, and robust enough for my construction project. A shabby-chic look can be easily accomplished with a smidgen of skill, a touch of creativity, paint, and some sandpaper. Here’s how it went down…

You’ll need the following materials:

01_you_need_jpg

• LACK coffee table, LACK Sofa Table, or a LACK TV Unit
• tizi Tankstation (Toploader) 4x USB charging station
• drill and a hole saw adapter (2 inches)
• some sandpaper
• colored varnish
• metal brackets and nails
• a hammer
• wheels (optional)

STEP 1: Preparation and painting 

02_grint
To get started, before you put it together, use the sandpaper on all surfaces of your coffee table to help give off the shabby-chic look and to make it easier for the paint to stick.

03_paint

Then, paint all sides of the table with your chosen color of varnish. Now let the varnish dry overnight. Once the varnish is dry, the table can be assembled. I’ve added wheels to my table.

04_mount

STEP 2: Preparation for the USB charging station into the LACK table
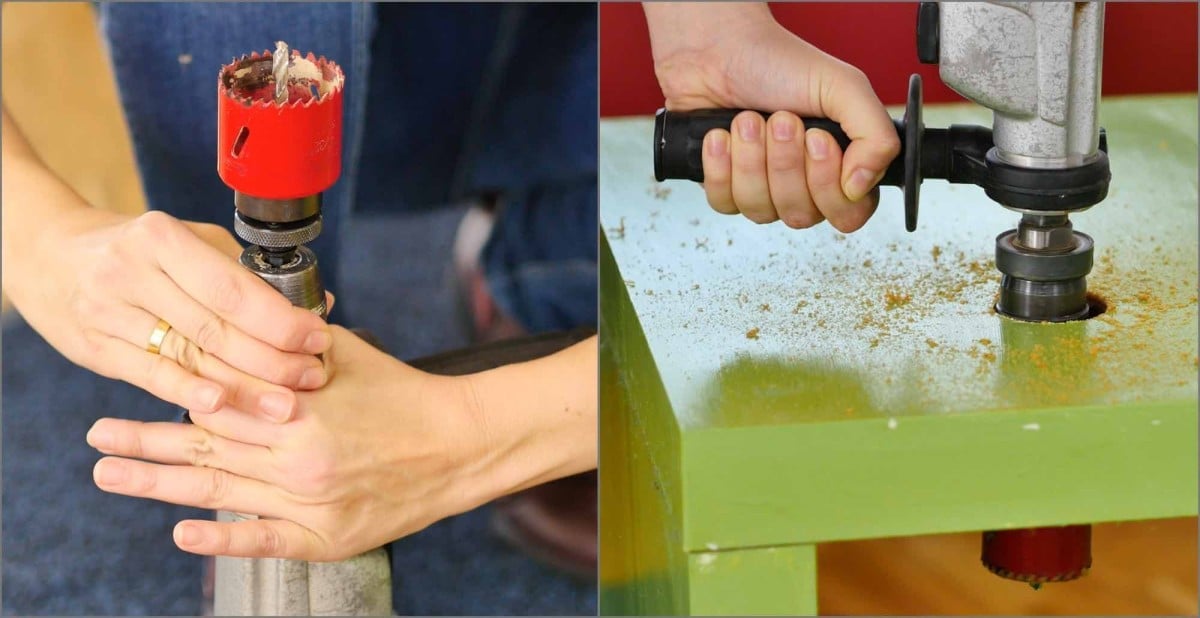
With a regular drill, drill a simple hole where you want your charging station to be located, so that you get a feeling for the drill.

Then attach your saw adapter (2 inches), and with a light, circular motion, drill a hole completely trough the surface of your LACK table.

05_drill

Caution: Make sure to leave enough space from the hole to the edge of the table for better stabilization.

STEP 3: Finishing – a futuristic, retro, table with a charging station 
Now you can roughen up the surfaces of your LACK table, to your liking (if you’ve decided for shabby look), using the sandpaper.

06_used_look

Then attach the metal brackets with the nails. Place the 2 inch adapter ring into the newly drilled hole (comes with the tizi Tankstelle Toploader).

07_insert

Finally, plug your Toploader into a wall socket, and you’re ready to start charging 4 USB gadgets as you chill!

Summary: Now the whole family can comfortably relax and recharge in our living room without having to bring their own chargers. Visitors are totally impressed by the cool table and even more blown away by the power hidden within it.

08_done_02

If you’ve got the creativity bug, you’re sure to come up with many more clever ideas using IKEA furniture and the tizi Tankstelle Toploader USB charging station. I’ve even installed a Toploader into our IKEA kitchen counter!

08_done_01


The post Equip a LACK coffee table with a built-in USB charging station  appeared first on IKEA Hackers.


A video projector stand that won’t screw up your wall

$
0
0

  A video projector stand that won't screw up your wall

IKEA items used:

  • KALLAX 1×4 shelving unit (could probably work with EXPEDIT too, but they had stopped selling it by the time we made our hack)
  • 6 brackets – I am not sure which ones we used, I think it was the EKBY, but you can probably pick whatever brackets you like the most – as long as there aren’t too many decorations, and are sturdy.
  • screws for the brackets (no longer than 1.5″ – the thickness of the Kallax top shelf)

Why this hack?
We have a video projector and wanted to put it behind our couch. We could have put a shelf on the wall, but a video projector can be heavy so we’d have needed a strong shelf/bracket. We weren’t sure it would stay safely on the wall (and above our heads!). We would rather avoid making holes in the wall, and also wanted to be able to move our furniture around in our apt. Therefore we needed a video projector stand.

We just couldn’t find one with the proper height or without large feet that wouldn’t have fit behind our couch, so we came up with this hack.

How to do it?
You mount the Kallax partially (following IKEA’s manual): you only need the top and the bottom shelf (the thicker ones) of the Kallax, and one side (one on the 2 long boards).
You reinforce the structure with brackets, just to feel safe. You screw 3 brackets to the top shelf, and 3 brackets to the bottom shelf.

A video projector stand - brackets

You’ll end up with a C shaped piece of furniture. What is normally the side of the Kallax is the back of your stand. The lower part of the “C” goes under the couch (not visible on the picture), while the video projector stands on the upper part of the “C”.

A video projector stand that won't screw up your wall

We kept the other boards of the Kallax, but haven’t found any use for them yet.

~ Hacked by Emilie

The post A video projector stand that won’t screw up your wall appeared first on IKEA Hackers.

Lack Hifi Rack

$
0
0

IKEA Hifi Rack in use

Built with: 3x Lack tables, 8x Ekby Stödis bracket, 4x Rill casters, Fixa screws, (still to come: cable management with “fixa cable management set”.

1) Assemble two Lack tables.

2) Stack them and glue them together with a third table top as the base.

3) Place 10-20 kg weight on the construction and wait for the glue to cure.

4) Screw 8 Ekby Stödis brackets at the points where the table legs were glued to the next table top.

5) Turn the construction upside down.

6) Screw the 4 rills casters at each of the four corners.

7) Turn it in the right position again and it’s ready to use.

Remark: The legs of the third table are not needed.

IKEA Lack Hifi Rack

~ by Frank

The post Lack Hifi Rack appeared first on IKEA Hackers.

A pegboard cable management tray to keep cords off the floor

$
0
0

I have an old Ikea TV Bench (something like a Besta?). You could do this with a Besta or something similar. My bench holds a number of 90s hi-fi components. I wanted to find a way to tidy up the cords. This would also make it easy to sweep dust from behind the unit. Besides the cords from the hi-fi system itself, there were cords from the internet modem and wireless router components. I wanted to have my internet connections right by the entertainment system for streaming television or music.

Here’s BEFORE:

IKEA TV bench

Here’s what it looks like AFTER:

Cable managed - after

And the key is BEHIND the unit – I’ve circled in red the drawer on the right side. You can see the wires and modem, etc. secured to the pegboard with the whole drawer pushed in. The one on the left is extended, and you can see the wires and power bars in the process of being fastened.

Look at the mess

The idea was to add a frame underneath that would RAISE the entire unit by about half a foot. That extra 6-inches of clearance would create the space to put in some drawers. From the front and sides you have a beautiful wood finish panel, and the TV is perched 6-inches higher. The drawers would be made of pegboard so that components could be securely fastened, cords tied down. Push the drawer in, and everything is out of sight.

Ingredients:

-Besta TV Bench, or something close to it

The TV bench is ~57.25 inches wide by ~17.75 inch deep; below notes provide cut pieces of lumber and pegboard.

You should take your own measurements, as my TV bench probably won’t be quite the same as yours. But if it is, the below should work.

measurements

First, I sanded and shellacked the cuts of pine:

Shellac

I turned the unit upside down and laid out the pieces that would assemble into the frame. There were five existing wheel casters I had to remove from the bottom. I kept those. Those wheels (except for the middle one), would have to be secured to the completed frame. For the replacement wheel in the middle of the unit, I purchased a thinner mount. In retrospect I should’ve bought thinner wheels for all four corners, too. Ultimately I could get three out of four screws into the four outside corners of the assembled frame, and that was strong enough.

Raise the bench

I tried out the pegboard pieces to make sure they would fit inside the frame measurements. Remember to leave enough room for the drawer slides. The lumber cuts I’ve indicated should provide a 3/8 inch gap of space, leaving room for the slides.

Make the pegboard shelf

I assembled the frame using pegs. To get the pegs to fit properly along the lengths of pine frame, I used a piece of wood with holes pre-drilled. This was a guide for ensuring when I drilled into (i) the frame or (ii) the bottom of unit, that the correct hole separation (for pegs) was achieved.

the new front

8-Tinu-TV Bench

the new base

It was a bit of a process to drill holes for the dowel joints. Once the frame was assembled, I also decided to screw in some 90-degree brackets at the corners. Then I inserted the pegs into the holes along the frame, for attaching to the unit’s underside. You could wood glue the whole frame to the bottom of the unit for added strength.
I attached the drawer slides to the frame (outside slides). I attached the inside slides to the pegboard.
I fastened the wheel casters back onto the frame. (As I mentioned before, I could get three out of four screws into the wood at the corners of the frame. The wheels attached securely, but it might be best to use mounts that better match the 1.5 inch width of the frame… like the wheel along the mid-centre)

Add casters

Then I turned the entire unit right side up. Inserted the pegboard drawers.

A pegboard cable management tray to keep cords off the floor

Attached the components and cords to the pegboard:

Attach cords to pegboard

Done. No more jungle of wires behind the unit. Simply roll the unit away from the wall to sweep dust.

~ by Tinu

The post A pegboard cable management tray to keep cords off the floor appeared first on IKEA Hackers.

Fighting Frame – Picture Frame Arcade Stick

$
0
0

Due to the relatively high price and low quality of commercial arcade sticks available here, I decided to put together an affordable custom case which provides a high quality look without requiring much technical skill, all while maintaining my personal style of completely hidden screw heads (if an art layer is installed). The Ikea Ribba 50x23cm frame provides a pre-finished outer case, while the styrene sheet found in the cheapest of Ikea picture frames provides a smooth and durable replacement for the clear protective acrylic layer.

Finished_Diagonal

Materials:

  • Ikea Ribba 500 x 230mm frame (can be substituted for other frames like the lovely 400 x 300 Stromby)
  • Styrene sheet from second cheaper frame (a damaged Fiskbo from the reject section is perfect!)
  • 1x hobby-grade 7mm Plywood sheet
  • PVA/Woodworking glue
  • 6x 20mm M6 timber screws with countersink heads
  • Your choice of arcade hardware, with snap-in style buttons (I used full Sanwa kit, and a Wii CCP PCB)
  • A splash of spray paint and/or polyurethane clear coat

Kit Pieces

The kit, cut from a sheet of 7mm ply. The walls are all 50mm high to accommodate the internal joystick depth, and are inset 30mm from the edges to allow for the Wiimote install down one side. The button 24/30mm holes were cut using spade bits, with the top panel buttons being placed in a classic Vewlix arcade layout. The stubby posts are scraps of 18×18 Oak I had lying around after my OaKallax build; I’m using them to anchor the timber screws, but they could easily be replaced by triangular ply gussets.

Clamping_2

Clamping_1

Clamping_3

With a little PVA, the walls are clamped into position and cured. The thickness of the plywood is enough to keep them square. Then the posts are glued into place while a spare clamp handles the Wiimote spacers (more on that later), which are attached to the underside of the top panel. I left the plywood sticker in place for future reference, and because i couldn’t peel it off without it tearing. :p

End_Wiimote

A test fit for the Wiimote shows how the Ribba frame locks it in place. You can reach all of the buttons and unplug the stick controls, but it can’t fall out or move around! I also love the incidental “floating” look produced by the inset walls, one of my favourite architectural features from design school.

End_Buttons

The other end houses three recessed buttons which take care of the system tasks (start/select/home). You don’t want to be able to accidentally hit these, but reaching them is as easy as operating the paddles on a pinball table.

Case Drilled

The mounting holes are then drilled into the top panel. To achieve the countersinks i installed a very large bit into the drill, set it to reverse, then applied pressure. This makes a hardened indentation without risk of the bit biting and tearing through the very thin ply. Six screws fix the top panel, while four M6 bolts attach the joystick. The art layer goes over the top, with the clear styrene panel on top of that.

Wired

Once the glue was dried I applied a couple of layers of black paint to the outside, some white to the inside, then sealed the lot in some polyurethane clear coat. It’s all optional, but the urethane provides good durability and lap-grip.

Built_Wiimote

The Wiimote installed into the finished piece. The spacers close it in from the top, and it sits snug between the end plates. Once the outer frame is dropped on it’s entirely secured.

Built_Front

And we’re ready to play! I was meaning to install a printed sheet of relevant gaming art, but that takes me far longer than building one of these. It’s easy to install later, and the raw ply looks good enough for now.

The post Fighting Frame – Picture Frame Arcade Stick appeared first on IKEA Hackers.

Complementary Small LACK Entertainment Centre from LACK Coffee Table

$
0
0

So: I live in a very small house. When I moved in I needed a small entertainment centre to fit between the heater in my lounge and a wall. All the ‘off the peg’ designs were too long for the space, so I decided to create my own to match the LACK coffee table that I already owned. This project requires a bit of DIY skill, but is fairly easy and can be achieved in an evening (3-4 hours).

Things you need:

  • 1 Full size LACK Coffee Table.
  • 4 Additional long-ish screws.
  • Piece of wood that fits inside the table top for reinforcing (see step 4)
  • Additional brackets for extra shelf (Optional)
  • Tools (Saw, Drill/Driver, Pilot Wood Drill, Large Paddle Drill, Screwdriver, Glue & Clamps)

Method:

1. Our finished table is going to be the width of the end of the original table: that is a given from the design. The depth of the table is adjustable, up to half of the original length of the full size table. I plumped for a measurement that fitted my Hi-Fi best. Whatever measurement you choose: Mark this measurement from either end of underneath of the table top (the bit in the middle is waste). If you wanted to, you could create a very long and narrow version of this unit by turning all the instructions through 90 degrees!

01

2. Do the same to the shelf piece. I knocked about 3mm off the original measurement so that the shelf is a little recessed into the unit, just for aesthetic reasons really: to my mind it looked a bit odd when is was flush. (Again: the middle bit is waste).

02

3. Cut both pieces carefully to ensure that the new pieces all match.

03

03a

4. The top is constructed like a cheap internal door, with an expanded cardboard honeycomb filler sandwiched between two sheets of veneered hardboard. Push this filler backwards into the space to create a recess for your piece of re-enforcing wood. (The reinforcing could be skipped if you have an even load to put on the top of the finished item, but as my TV is quite heavy, with a small stand, I decided to do this as a precaution).

04

04a

5. Measure the location of the pre-drilled holes in the underside of the table top at the front of the cut pieces.

05

6. Transfer this measurement to the back of the cut piece so that you have the location of the back legs. Drill holes of an appropriate size to match the pre-drilled holes at the front, taking care not to go right through the top.

06

7. Run glue around the edges of the wood and seat it into the recess you made in Step 4, making sure to seat it so that the centre of the wood is roughly in line with the holes from Step 6. I clamped the board down to make a good bond between the hardboard and the new wood.

07

8. You should now have a miniature version of the original table top. Drill pilot holes in the new wood to accept the legs using the same drill & holes as in Step 6.

08

9. Fit the legs as per the IKEA directions using the double ended screw.

09

10. You should now have a small table.

10

11. Cook dinner.

11

12. Eat dinner.

12

At this point, if you are feeling lazy (or you want the table to be exactly the same height as the standard coffee table), you could just fit the middle shelf as per the IKEA instructions. For the finished article with the base fitted: continue below.

13. Mark the centre of the bottom of the legs of your new table and drill a pilot hole of the appropriate size for your 4 chosen additional screws.

13

14. Mark the bottom of the spare piece of top (hereinafter called the base) with the same dimensions as in Step 5 for the screw holes into the bottom of the legs and drill right through. Drill the pre-drilled holes out so that the go right through.

14

15. Using a larger drill, drill these out to be big enough to accept the heads of your chosen screws so that they are recessed into the void in the body of the base, taking care not to go right through the top of the base.

15

15a

16. Place base on top of upturned ‘table’ and attach using 4 screws.

16

17. You should now have this:

17

18. Fit the shelf as per the IKEA instructions, setting it at the correct height to accommodate whatever you want to put under the TV. You have 2 shelves if you need them, but I only needed one.

18

19. Admire your handiwork!

Complementary Small LACK Entertainment Centre from LACK Coffee Table

Complementary Small LACK Entertainment Centre from LACK Coffee Table

20. The finished article in situ.

Complementary Small LACK Entertainment Centre from LACK Coffee Table

~ by Richard

The post Complementary Small LACK Entertainment Centre from LACK Coffee Table appeared first on IKEA Hackers.

Viewing all 194 articles
Browse latest View live