Quantcast
Channel: Media Storage – IKEA Hackers
Viewing all 194 articles
Browse latest View live

Hickory Trickery

$
0
0

besta tv stand

IKEA items used: Besta TV Stand with lacquered drawers and mesh panels, wooden feet and stainless recessed door handles.

Hickory faced 3/4 inch thick plywood was purchased and cut to size in a specialty wood shop. Red oak edge strip was used for finishing edges. 4 panels were necessary to cover all sides.

We sanded, stained with a Grey shade of Saman product.

3 coats of bees wax to give it a natural mat finish

We removed drawers and panels with some brackets to ease screwing the panels from the inside.

The wooden feet were recycled from a very old IKEA unit! We don’t even know where it came from. We mounted those on a plywood screwed to increase the height of the unit.

We’re thinking of adding a glass, recessed between the raised side panels to protect the surface. We’re thinking maybe a smokey semi transparent glass to allow the wood grain to be seen. We’d love to hear what people think.

besta tv stand

~ by Carol and Fred

The post Hickory Trickery appeared first on IKEA Hackers.


Gaming PC invades Galant drawer unit

$
0
0

IKEA items used: GALANT Hurts/ drawer unit
(In Sweden “drawer unit” = “Hurts” so I guess that “Gaming PC invades Hurts” would be a more correct name)

The project began in October 2015 with version 1.0; while the original design had many flaws the idea of a Gaming computer in a drawer unit survived until the summer of 2016 when version 2.0 was constructed.

The work on version 2.0 began around the 18 December 2015 with writing down everything that was wrong with 1.0, most of the problems came from using PCI-E extensions for the GPUs to create a double story design which made it so that something as simple as switching a cable took at least two hours. After it was clear what had gone wrong with 1.0 some time was spent with looking at other similar ideas and some professional Modder’s work to try and improve the original design. When February came around the drawing began, first on paper and then in Sketchup.

cad_1

cad_2

cad_3

The design prioritized airflow for the GPUs (while the images show two GPUs I actually have 4), low sound levels and “hot swap” to make it easy to switch cables/components. The motherboard was mounted with the IO away from the back of the drawer unit since this meant that the GPU and CPU blow out all of their hot air against the openings on the side where the fans move it out of the room. While the CAD drawing shows 4 fans on each side (total of 8) I later decided to only mount (3 total 6). The SSD was mounted differently IRL since I needed holes to route cables. The fan filters do not appear on the CAD model but they are crucial.

When the basic design was finished I started making a list in Excel of everything that I needed to buy to make the project a reality. Early calculations showed that it would cost around 900 USD (8000sek) to buy everything needed including some power tools. On the 18 mar 2016 the first order was made for the project and two weeks later items started showing up in the mail. This went on until the 27 of July when the construction began.

gaming pc in drawer -1

gaming pc in drawer -2

gaming pc in drawer -3

gaming pc in drawer -4

gaming pc in drawer -5

gaming pc in drawer -6

gaming pc in drawer -7

The construction took 3 days where I worked 10h a day. I built the drawer unit, made all of the heavy wood work like cutting holes for the fans and then did the smaller stuff like mounting the motherboard and PSU (DON’T MOUNT THE MOTHERBOARD DIRECTLY AGAINST THE WOOD, lift it up from the wood using standoffs). Some plywood + duct tape was used so that the warm air from inside the computer wouldn’t move to other compartments inside of the drawer unit since I use the other parts for storage. Once that was done I installed the motherboard and fans with standoffs and anti-vibration pads, routed the cables for the IO and fans, installed the PSU and routed the cables using the fans as mounting points and finally clicked in the GPUs. Since the SSD was really small I mounted it last; while the mounting was very easy it took a while to get the SATA cable in the motherboard since there wasn’t a lot of room to work with. Once everything was mounted I connected a monitor, mouse and keyboard and booted it up for the first time. The computer started fine but some of the fans did not get power and one of the GPUs was not plugged in right. I later ordered some more stuff on eBay that I had missed, mounted them a week later and it’s been running ever since.

gaming pc in drawer unit

gaming pc in drawer unit

While the project wasn’t a failure I do have some comments:
1. 6 fans is probably way overkill, use 4 or even 2. Just make sure to have fairly balanced airflow so that slightly more air is going in than out.
2. Don’t route all of the cables for the IO, start with a few and then add more as needed.
3. If you have a pet, use a different power on button.
4. In computer terms this is a very small case; if you build one remember that you won’t have a lot of extra room so plan the cables carefully.

gaming pc in drawer -10

~ by TheStar19

The post Gaming PC invades Galant drawer unit appeared first on IKEA Hackers.

Small wood server closet

$
0
0

IKEAHackers-Wood_server_closet_01

IKEAHackers-Wood_server_closet_02

IKEA items used:
MOLGER (35,99€)

Beautiful, well aired and wood solution for small server closet
(for wifi spot & small hub: 37x37x37cm / 14,5×14,5×14,5” )

Ikea Molger is a seat with storage for bathroom, but it’s perfect to combine in birch or light wood environments.

Normally the server boxes/cabinets are cold, big and made with metallic parts.
This hack offer a properly aired, elegant and soft/warm solution.

IKEAHackers-Wood_server_closet_03

IKEAHackers-Wood_server_closet_04

IKEAHackers-Wood_server_closet_05

IKEAHackers-Wood_server_closet_06

How it’s made:

First at all, cut the legs ( around 10cm. / 4” ) to create a square box.
Later follow Molger instructions to assemble this furniture.

After, take the piece that makes background seat, and create a intermediate shelf with small screws on desired position.

Then, with the cover piece, fix it with two hinges to create the closet door.

At last, and optionally, embed and fix with wood glue two magnets in corner (opposite the hinges) to maintain closed the door.

At the end, put the cabinet fixed on the wall with metal angles.

Materials:
- 1 Ikea Molger furniture
- 4 small screws
- 2 hinges
- 2 angles (fix to wall)
- 2 small magnets (optional)
- wood glue -for fix magnets- (optional)

Difficulty: 6/10

~ by abeldb

The post Small wood server closet appeared first on IKEA Hackers.

BESTÅ + MORIK Wireless Charging Station

$
0
0

Ikea Items used: BESTÅ unit (1200 x 400 x 740), MORIK Wireless Charger, GLIS box with lid (optional)

BESTA wireless charging station-1

As part of a wider plan to redecorate my lounge in August of this year, I decided I wanted to add a charging station (including wireless charging pad) to satisfy the growing number of devices in my house which regularly need charging. IKEA currently offers a number of lamps and bedside tables which contain wireless charging pads – none of these I felt were appropriate for my lounge so instead I decided to buy the MORIK wireless charging unit. The description of the MORIK suggests it needs to be completed with a SELJE or NORDLI bedside table, but I intended to install it on my existing BESTÅ  unit (which has been pressed into service as a TV unit).

BESTA wireless charging station-2

First drill a 56mm diameter hole in the top of the BESTÅ unit (I set the hole at 200mm from each edge of the BESTÅ to avoid existing screws and support strips).

BESTA wireless charging station-3

Once I had drilled my hole it became apparent why Ikea recommend the MORIK only be used with the suggested pieces of furniture. The charging pad was sat too deep in the top of the BESTÅ unit to do any charging whatsoever (I already knew this would be the case as I had previously measured the depth of the unit).

BESTA wireless charging station-4

To get the MORIK to work I would have to cut away the underside of the existing unit – this proved easy as the unit top is hollow and the material used to make the underside was thin enough to be cut with a very sharp Stanley knife (watch your fingers!). Once the shape was cut (and the cardboard webbing removed) I padded out the inside with some offcuts of 18mm skirting board, inserted the MORIK unit and attached it to the skirting board offcuts with some 15mm screws.

BESTA wireless charging station-6

The finished result looks great, a wireless charger which sits seamlessly in my unit underneath my wall-mounted TV. The MORIK also has an in built USB port underneath it which is still accessible from within the BESTÅ unit – I complimented this with a GLIS box full of USB cables for charging devices that currently don’t have wireless charging.

BESTA wireless charging station-5

~ by murfilicious

The post BESTÅ + MORIK Wireless Charging Station appeared first on IKEA Hackers.

Ekby Valter brackets as legs for a chest

$
0
0

I am so pleased with this hack! I was looking for legs for this G-Plan style chest of drawers which had been part of a Ladderax-type system.

I decided to use some Ekby Valter shelf brackets that I had spare.

ekby valter brackets painted

Simply fill the screw holes on the down post that you would use to attach the bracket to the wall. Sand and paint however you like.

Attach to chest

Attach the legs using the screw holes that would usually hold the shelf in place. Place them so that the unit will balance.

ekby3

They also look cool from the side.

exby2

Et voilà!

The post Ekby Valter brackets as legs for a chest appeared first on IKEA Hackers.

Industrial, Steampunk hack to the Lack, TV Stand

$
0
0

Processed with MOLDIV

Ikea items: Black LACK TV stand, Black bed legs BRATTVÅG 10cm

We are going for an industrial/steampunk look in our new apartment and were trying to find the perfect TV stand. Needless to say we found nothing.

So we thought to keep it simple and just get the black LACK TV stand, but we weren’t sure if the Denon receiver would fit in it. Things didn’t look promising.

Then I found photos online of people that had already hacked this TV stand to create more space and the idea of the Industrial LACK TV stand got born.

We found a used LACK TV stand for 1/5 of the original price, in case we screw up, and got to work.

Things used:
1. Lack TV stand, black
2. Brattvåg bed legs, black
3. 2x1m threaded rods 12mm
4. 22 bolts 12mm
5. 10 square washers 13mm
6. 12 round washers 13mm
7. Copper spray mat

1. With a 12 mm drill bit I drilled through the 4 already aligned holes in the two boards. (You might need to move the drill around to make a bit of extra space for the 12mm rods)
2. Drilled two 12mm holed in the middle, back of the lower board for better TV support. I aligned these with the 2 holes on the side/back.
3. Cut the rod in ≈33cm pieces resulting in 6 identical pieces.
4. Sprayed all rods, bolts and washers with the copper spray.
5. Screwed the 4 bed legs into the existing holes under the lower board. (kept 2 of the 4 round plastic discs that came with the legs to use them later)

steampunk TV LACK rack-4

steampunk TV LACK rack-5

6. Used tape and newspaper to make a rectangle shape on the top board and proceeded to paint it copper with the spray.
7a. Started putting together the 4 rods with bolts and washers. I used the square washers between the two boards to make it hold the TV weight better, since this is where the most pressure will be.
7b. Adjusted all bolts around the stand to create 21.5cm space in between. The space is adjustable if you need less or more. (if you need more you should cut 4 rods to 35cm and two to 30cm)
8a. Inserted the last 2 support rods in the middle, and adjusted them to support the upper board tightly. I used the 2 round black plastic discs that came with the bed legs on the top of the rods to hold the upper board.
8b. I sawed off the two leftover bits that extended under the lower board.

And done!

steampunk TV LACK rack-6

steampunk TV LACK rack-7

steampunk TV LACK rack-8

steampunk TV LACK rack-1

steampunk TV LACK rack-2

steampunk TV LACK rack-3

~ by Dimitris & Martina (MjW)

The post Industrial, Steampunk hack to the Lack, TV Stand appeared first on IKEA Hackers.

Papa went to… WOoD StoCK

$
0
0

For a long time I wanted to thank Jens from Stuttgart … So, thanks Jens! Your stone wall / BESTÅ hack spent many month on my mind to the point it turned to a ‘fanatical’ have to reach goal…

Papa was a ... BESTÅ stone hack

4 years later, I finally made my own version.

BESTÅ media center with wood panels

Guidelines: Must be ‘WAF’ (Wife Approval Factor)

Wife wanted warm materials to be used / Must add warmth to the room for long evening cuddle (plaid + fireplace + hot chocolate etc…)
Have to ‘blend in’. We have a big opened space (kitchen/dining room/living room) with mainly black and white stuff… a bit ‘cold’/ ‘need colors’ according to my wife. :)

I also ‘improved’ the whole thing by combining other hacks found on this great site.

Such as:

« BESTÅ Floating Media Center », so my cleaning robot easily goes under the cabinets.
« BESTÅ/Utrusta flipdown drawer» inspired by this hack.
« Coffee table» from this hack with the top painted with high gloss white (Finally I had to remove the wheels. Thanks to my 6yo twins using it as a skateboard. :) )

All the ‘wirings’ are integrated, lights are remotely controlled and the HTPC (+keyboard) is hidden behind the ‘flip down drawer’.
USB dongle for the keyboard has found its place next to the TV decoder so no need to constantly open/close the HTPC hatch.

How it’s done?

Basically, I followed to the letter Jens instructions and used quite the same materials. More info here.

IKEA materials used to build this:

  • 1x BESTÅ Burs rack, white
  • 1x BESTÅ Burs rack, black
  • 2x BESTÅ cabinets, white (120x40x38cm)
  • 3x BESTÅ Tofta Doors, black
  • 1x BESTÅ Tofta Drawer, black
  • 1x BESTÅ cabinet (60x40x64cm)
  • 1x BESTÅ Tofta Door with black wooden and a glass-part in the middle
  • 1x Utrusta hinge
  • 2x BESTÅ Glass top Panel

Non-IKEA materials:

  • Screws + Screw anchors
  • Dimmable LED spots
  • Wood for the frame
  • Wood planks (3 different width)
  • Wood coating (3 different colors)
  • Nail Gun + Nails

The most tricky part was to cut into the Utrusta plastic cover (without breaking it)

Time spent on the project : Couple of evenings + we had a lot of fun with wife & kids building/assembling cabinets, wood frame, etc…

More shots:

BESTA media center-7

BESTA media center-6

BESTA media center-3

BESTA media center-1

BESTA media center-2

BESTÅ media center with wood panels

BESTÅ media center with wood panels

~ by Stephane Martin, Belgium

The post Papa went to… WOoD StoCK appeared first on IKEA Hackers.

Oddvald piano stand

$
0
0

Oddvald piano stand

Materials:
2x Oddvald Trestle
Wooden board (and if necesssary black lack paint)
Threaded bar and a few screw nuts (M5)

Since we moved to our new house, we finally have room enough for a piano stand for my wife’s Yamaha P-35. Everything I found in various online shops was either cheap (and cheap looking) or simply too expensive. Yamaha is offering a “official” stand for ~ 120 EUR. 120 EUR for 3 wooden boards and a few screws. They are crazy! So I decided to build my own out of the Oddvald Trestle.

At first you’ll need to shorten the Oddvald top beams as they are too long. I shortend mine to 50,5 cm, as you need room for the sustain pedal and we also wanted to add a wooden board on top. It’s possible to shorten the beams even more, but then you need to drill new holes for the Oddvald legs.

Oddvald piano stand-2
Oddvald piano stand-5

The next thing is to shorten the legs. Therefore you need to measure the ideal height for you to play comfortably. I shortend the legs to a final height of 63 cm, which suits a body height of 165-170 cm. I recommend doing this with a circular saw, just to have a straight cut and prevent the stand from wobbling around.

Oddvald piano stand-9

Oddvald piano stand-4 Oddvald piano stand-3

After assembling everything, you can drill the holes for the piano into the top beams. Be aware, that the top beams are ~ 6 cm thick. Because of that we needed for the Yamaha P-35 a M5 threaded bar (sawed in 10 cm long sticks). Depending the piano you have, you may need other kind of screws / threaded bars. Then put the piano on the Oddvald trestles, and bolt the wooden board behind the piano. Just to perfect your work, add a few small hooks for the cables and a big hook for the headphones.

Oddvald piano stand-7 Oddvald piano stand-1

It’s a very robust and cheap solution (total costs are below 40 Euro).
You can find a more detailed description (in German) on my blog.

Oddvald piano stand-8

~ by René, Munich, Germany

The post Oddvald piano stand appeared first on IKEA Hackers.


Bamboo Arcade Controller

$
0
0

Bamboo Arcade Controller

Materials:

VARIERA Box with handle, bamboo (IKEA #702.260.53)
APTITLIG Chopping board, bamboo (IKEA #802.334.30)
FIXA Stick-on floor protectors (IKEA #241.556.00)
Electrical Tape
Wood Stain Varnish
Sandpaper (for example: P60, P120, P220)
Piece of cord, 20-25cm long
Wood screw, for example 4x(13mm x 4,8mm) + washers, 12x(20mm x 3,5mm), 2x(12mm x 2,5mm)

Arcade components:

SANWA Joystick with cable (ZERO DELAY KIT)
USB Cable (ZERO DELAY KIT)
10 x 2Pin Cable for Push button (ZERO DELAY KIT)
USB Encoder (ZERO DELAY KIT)
2 x 24mm Push button, snap-in (ZERO DELAY KIT)
8 x 28mm Push button with nut, screw-in (ZERO DELAY KIT)
Printed “Button_Layout” A4 paper (www.BambooArcade.com)

As a project I wanted to do something that involved design, 3d modelling and illustrations. I came up with the idea to design a retro looking arcade controller. I decided I wanted to use bamboo as base material for the controller and started investigating where I could easily obtain it.

Briefly, what I did was take the IKEA VARIERA box (without the handle) and cut it down to size, so it becomes a shallower box. Then I made a cover for the box from the APTITLIG Chopping board, again measuring and cutting off the excess.

I punched holes in the APTITLIG Chopping board for the control buttons. I used a 24mm wood spade bit. After sanding, I stained the pieces with wood stain according to instructions.

I attached the arcade components to the chopping board, connected the components to a power source and placed the lid on top of the VARIERA box.

Download the milo_assembly_instruction_v1.00.

For more information on the build, please visit my site.

~ by Fredrik Setterberg

The post Bamboo Arcade Controller appeared first on IKEA Hackers.

Lamplig DIY Hi-End Speaker

$
0
0

DIY Hi-end Speaker hacked from LAMPLIG chopping board

I’ve been DIYing speaker for a while. All along I’ve been using MDF or plywood but never used solid wood. One day I walk around Ikea and saw Lamplig chopping block that can be used to make solid speaker cabinet. It has good thickness and big enough size. So I made some plan on the cabinet size and the required quantity.

Lamplig chopping block

Glueing the pieces together

Gluing the chopping blocks was quite tricky because of wood dimensional stability. The glue broke apart after the first gluing because the wood slightly warped and changed size. It’s not a big deal for standalone chopping board but it’s not good if the woods are to be joined together. I was frustrated and left the cabinet alone for at least couple of months while I was busy with other projects. I revisited the project. I trimmed the wood and glue again. This time I added few screws to keep the cabinet intact.

Made cut outs for the speakers

DSC06219b

A pair done

DIY Hi-end Speaker hacked from LAMPLIG chopping board

So there it is, my first solid wood speaker using Ikea Lamplig chopping blocks.

~ by Yusuf Apsoro

The post Lamplig DIY Hi-End Speaker appeared first on IKEA Hackers.

IKEA METOD cabinets into AV unit

$
0
0

8-ikea metod TV unit

9-ikea metod TV unit

I have recently completed an AV unit hack based on METOD kitchen cabinets and ideas I saw on this site for similar types of units. Like many others who have done something similar, my main challenge was to find a unit that could accommodate an AV amp that was too deep for normal TV units due to its depth and the various cables attached at the back. I opted for 4 60cm wide METOD units and a 40cm wide unit in the centre. The outer units are for general storage and equipment and the central unit is for my centre speakers and subwoofer. The doors are RINGHULT high gloss white – the centre door has been routed out and covered with white acoustic cloth to allow the sound to pass through.

1-ikea metod TV unit 2-ikea metod TV unit

The doors have UTRUSTA hinges with soft closing attachments and push openers. The feet under the cabinets are CAPITA legs.

The total unit width is 2.8 metres so I was unable to use an IKEA worktop as these were 2.4m in length. Instead I used a 3m length of oak worktop from a company that could pre cut and drill the holes I needed before delivery. I had two 100mm ventilation holes for the AV equipment plus one central hole for the cables to go in to the TV. I covered the ventilation holes with metal grilles and the cable outlet with a cable guide cover to keep things looking neat.

3-ikea metod TV unit 4-ikea metod TV unit

It was a fairly simple build – the only modifications I had to make at assembly time was to cut out the base and side pieces of each unit to fit over the skirting trunking I have behind the units housing the plugs, telephone sock, TV socket etc. I also made some holes between the units on the insides for various cables to pass through. I also drilled some holes in the shelves and side panels where the hottest equipment sits to help with ventilation. Inside the unit to cool the devices I have used fans and controllers from AC Infinity which are temperature controlled so only come on when required. The fans extract the air upwards to the ventilation holes in the worktop.

5-ikea metod TV unit 6-ikea metod TV unit 7-ikea metod TV unit

I started with the central METOD unit and worked outwards. I needed to get the TV and equipment cabled up as quick as possible to placate my family, so I installed all of the equipment once the three central units were assembled. I didn’t have the worktop at the beginning so this helped with getting all the equipment in place and neatly cabled as I had access from the top down. I also installed a Philips Hue Lightstrip underneath for more ambient lighting effects (as I already have some Hue lights in the house).

I am very happy with the finished product and would like to thank IKEAhackers for inspiring me to try this project and save myself a lot of money!

~ by Mike

IKEA METOD AV unit

The post IKEA METOD cabinets into AV unit appeared first on IKEA Hackers.

Wood you like to give your IKEA BESTÅ TV unit a new look?

$
0
0

IKEA BESTÅ TV unit wrapped in cypress wood

Materials:
2 IKEA BESTÅ TV units, screwed together, with drawers and doors.

I love my IKEA BESTÅ TV units but it was a little too much white for my taste. I purchased several planks of cypress, ripped them down to about 6 1/2 inches each, and edge joined them with the help of my pocket hole jig.

cypress wood cut to size cypress wood

I ripped the complete piece down to a width 18″ and then cross cut 2 pieces that would be the skirts for the sides of the TV unit. I attached the skirts, sanded all of the exposed sides, and then sealed the wood with an oil based sealer.

Attach the sides to the planks Waterfall joint

IKEA BESTA TV cabinet wrapped in cypress

~ by Ian Keith

The post Wood you like to give your IKEA BESTÅ TV unit a new look? appeared first on IKEA Hackers.

NORDLI Agricultural Industrial Hack

$
0
0

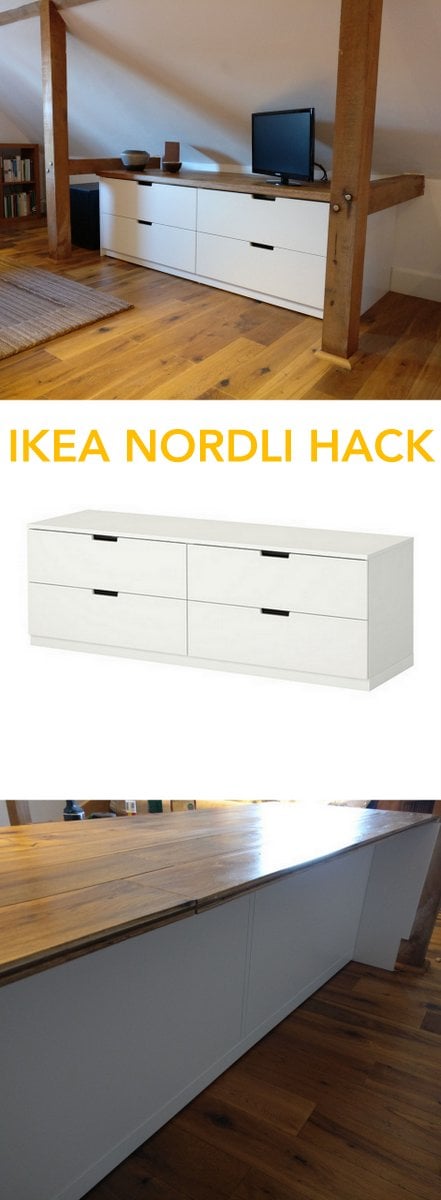
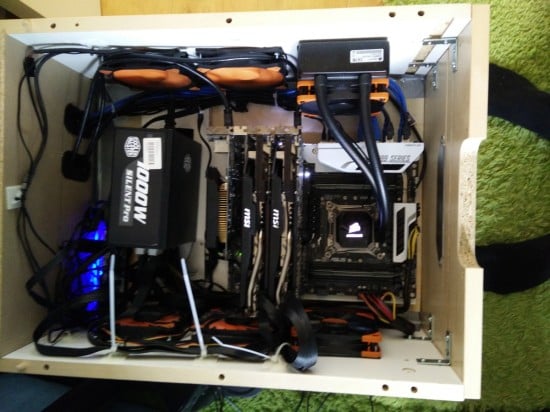
On first seeing the NORDLI range I was instantly drawn to the design. But on seeing them in the flesh there was an annoying gap as the top piece does not properly cover the drawers. I also wanted the piece to fit under the eaves in my loft space with some storage space for electrical equipment behind. It had to fit into the room’s design and look more like a piece of furniture rather than a modular section. It needed a hack.

Items Used:

  • NORDLI 4 Chest of Drawers (390.213.46)
  • FÖRBÄTTRA cover panel x 2 (402.978.86)
  • Spare Oiled Oak Flooring
  • Oak Decor Strips

ikea-nordli-industrial-hack-10

First the drawers were assembled as per the instructions.

The unit was put roughly into place and leveled with the floor.

The top used some spare pieces of the flooring in the room. However even if you have to buy a pack of flooring it will be a lot cheaper than a solid wooden top.

ikea-nordli-industrial-hack-11 ikea-nordli-industrial-hack-12

ikea-nordli-industrial-hack-9

The sections were put together and glued on top of the NORDLI top. Note they were not fixed to the unit at this point.

The ends of each plank were not perfectly lined up as they would be cut down later. Just make sure that the top is larger than you need.

ikea-nordli-industrial-hack-7

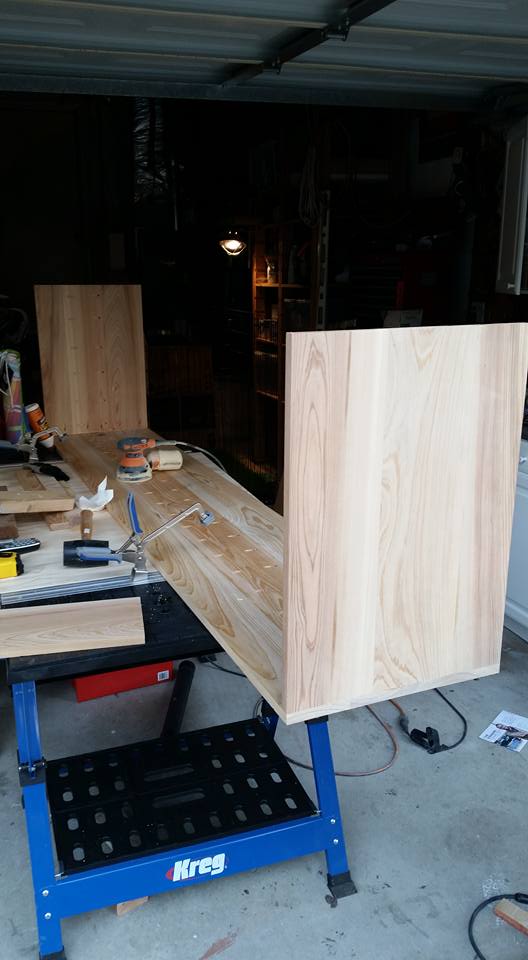
To make it look more like a single piece of furniture two kitchen side panels were added (the FÖRBÄTTRA white is a good match for the NORDLI white).

ikea-nordli-industrial-hack-4 ikea-nordli-industrial-hack-5

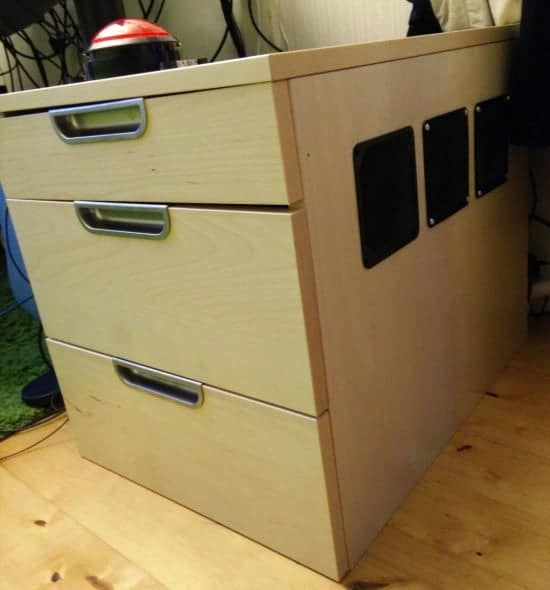
These were cut down to match the height with a circular saw. The original 62cm depth was kept to provide a hidden recess behind the unit for cabling.

Notches were cut out to enable the sides to fit around the skirting board.

The sides were placed against the NORDLI unit and it moved until the sides were flush with the front of the drawers. This was easier than trying to measure it!

The side position was then marked as shown. The sides where then attached to the NORDLI using the screws provided. Remember to clamp the sides to the unit as you screw them on.

Holes were drilled through the NORDLI top to enable the wooden top to be fixed later.

ikea-nordli-industrial-hack-6 ikea-nordli-industrial-hack-8

The oversize top was placed on the unit to determine a pleasing overhang. This was about 2.5 cm each side.

The flooring was then cut upside down using a straight line template made from a piece of ply and timber. This ensures a perfect straight line. Cutting upside down ensures a clean finish with no ripping of the good side.

The finished top was then screwed on through the holes drilled previously through the NORDLI top

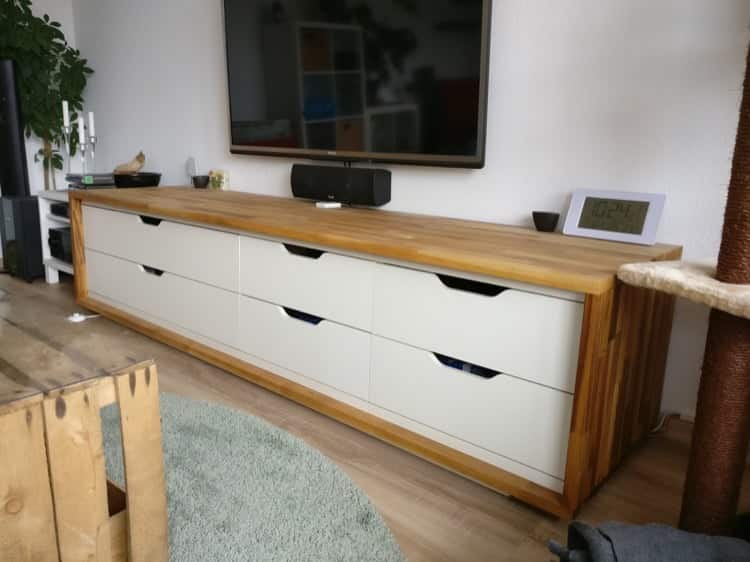
To finish an oak trim piece was mitred, pinned and glued to the front and sides. This is deep enough to cover both the flooring top and the original NORDLI top. I creates the illusion that the top is solid wood.

ikea-nordli-industrial-hack-1 ikea-nordli-industrial-hack-2 ikea-nordli-industrial-hack-3

A quick wipe over with some Tung Oil completed the piece.

A small gap was left at the rear of the top to feed the cables down. Alternatively a hole could be cut over the hidden area.

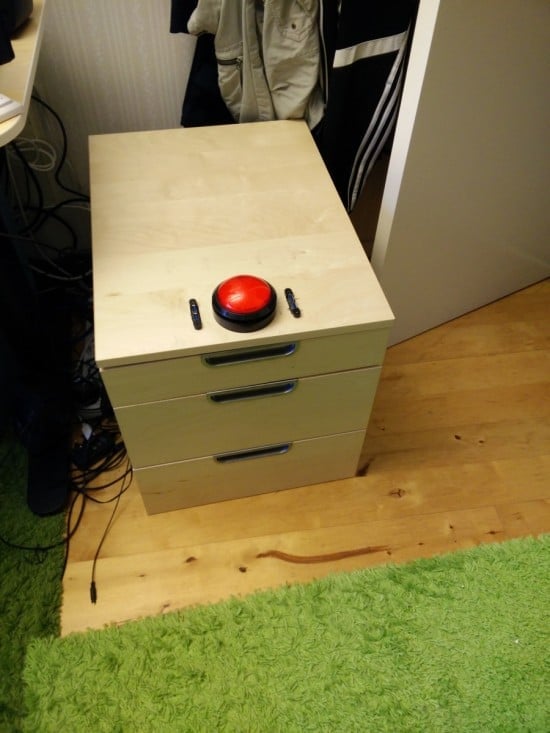
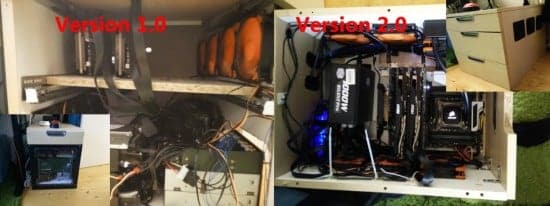
The finished unit looks much more expensive than the original – yet even if you needed to purchase a pack of wooden flooring it is a really inexpensive enhancement.


ikea-nordli-industrial-upgrade-hack

~ by Simon Scotland

The post NORDLI Agricultural Industrial Hack appeared first on IKEA Hackers.
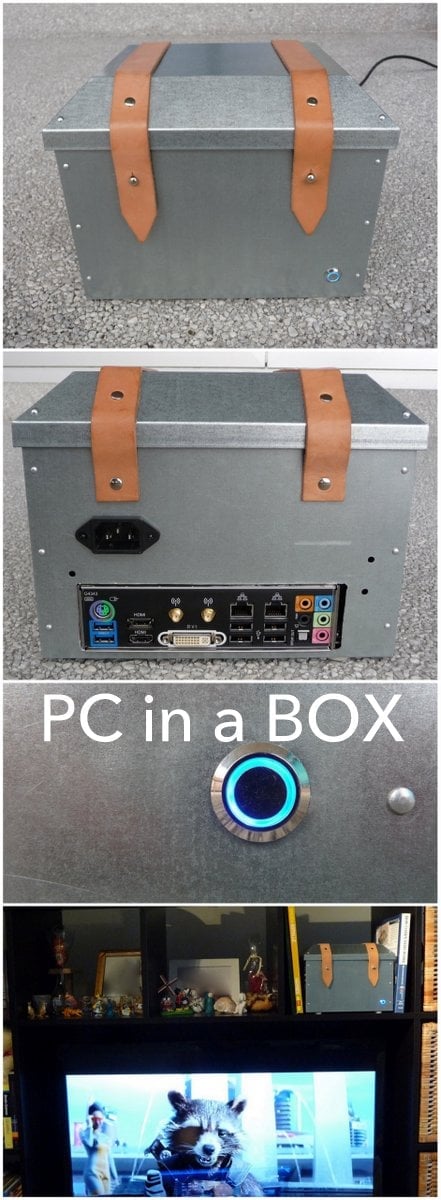
NORDLI hack: Drawers hiding useful tables

$
0
0

NORDLI hack: Drawers hiding useful tables

IKEA items used:
IKEA Nordli modular drawer chest

A simple hack for IKEA Nordli modular drawer chest. Now each drawer not only has storage space it can also hide a useful table.

IKEA NORDLI hack: Drawers hiding useful tables IKEA NORDLI hack: Drawers hiding useful tables IKEA NORDLI hack: Drawers hiding useful tables

Follow the instruction and make your own by laser cutting a wood panel.

What you need:

  • Wood panel 6mm thickness, at least 320×390 mm for the short drawer and 320×790 mm for the long one. I’m using poplar panels, you can use any material that can be cut by your machine.
  • Access to a laser cut machine to cut the wood panel. Fablabs are a global network of local labs and they provide access to tools for digital fabrication: fablabs.io/labs/map
  • Design files, you will find both the designs files for the short and the long drawers: IKEA-Nordli-hack.zip
  • Wood glue

Instructions:

Use the downloaded file to cut the panel with the laser cut machine.

how-to-glue laser cut pieces fixed with glue

Fix the hooks to the table using the glue

You’re done!

See it in action.


Made in Fablab Torino

See the project page.

~ by Giovanni Bindi

The post NORDLI hack: Drawers hiding useful tables appeared first on IKEA Hackers.

Ikea Ryssby 2014 PC box

$
0
0

ryssby-pc-10

I took an Ikea Ryssby 2014 box.

ryssby-pc-1

ryssby-pc-2

First drill a hole. Then insert a nibbler into the hole to start cutting an opening for the first fan.
I used a nibbler tool to cut the opening for the 120mm fans, with a cardboard template as guide. However the cardboard didn’t allow for a nice cut. I used a wooden “template” for the other side. That was a lot better.

Sketched the holes for all kinds of connectors like USB (two on each side), sound, main switch, etc.

ryssby-pc-9

ryssby-pc-5


All these openings were drilled, or cut with a dremel.

The power supply was mounted on the bottom side of the lid.

It is held in place by 4 screws. The heads of these screws are hidden underneath the leather belts of the box.

The mother board was mounted on the bottom on standard standoffs (M3 / M3). The SSD is stuck on the back wall.

You have to figure out how to do cable management in the best way. I admit, I wasn’t too good at this. It is a mess inside the box, but it works!

ryssby-pc-7 ryssby-pc-6 ryssby-pc-3

The fans are protected by a fine mesh. The mesh is from a (new) trash bin. It was very easy to cut it to shape with the nibbler. I have used the fan itself to be the template. The right fan was also fitted with a standard fan grid to give some stiffness to the mesh.

Both fans are PWM controlled, to make it quiet when the PC is not loaded. They provide a constant draft through the case. No other fans are needed.

The rear is cut to fit the I/O shield. (The hole is somewhat bigger due to my mistake, oops). The power connector is also placed on the back and connected to the supply by custom wiring.

ryssby-pc-8

It fits fantastic on a book shelf. Only the blue LED notifies you that there is some kind of magic in the box :-)

ryssby-pc-4 ryssby-pc-14 ryssby-pc-11

My system configuration is listed below:
The GA-H77n-WIFI board has all the connectivity and power to play some fullHD stuff with 7.1 audio; CPU: Intel Celeron G1620; RAM: 4GB (dual channel); HDD 120GB SSD; Data has to come from a external HDD, or streamed from internet, or your NAS as there is no big HDD inside.

ryssby-pc-13

However, you are free to choose your own. The Ryssby box can fit any standard mini ITX board you like.

~ by Peter Gogola

See more of the IKEA RYSSBY PC.

pc-in-a-box

The post Ikea Ryssby 2014 PC box appeared first on IKEA Hackers.


Expedit media unit transformation

$
0
0

mediastorage

As you can see I removed a divider to make space a while ago. And added shelf on rails. Now I was getting a bit tired of its big and bulky look, so I decided to completely upgrade.

The Ingredients:
1) Expedit TV storage unit.
2) Expedit (box of 1×1) – IKEA stopped offering it in the new Kallax series.

expedit-box

The work:
First I disassembled both and then I mixed them to build 2 units:

2-units

a) The top piece, I use it as a stand up 1×4 book storage (length 150cm)
b) The one below is the base for the new media unit (length 180cm)

Instead of 5 compartments like the old one, I decided to merge the 3 middle compartments to 2 larger ones, in order to fit my receiver, which is longer than the Expedit compartment size.

So I drilled new holes for the divider to fit in the middle.

I decided also to raise the media storage and created 4 legs from the leftover panels of the original. And so my cleaning robot will be happy to clean underneath.

legs

Bought from IKEA sale section, some melamine white shelves and cut them be the middle section doors, bought flat hinges and fixed them so it will open downward.

expedit-media-unit

The door handles are also IKEA Blankett.
Then I installed drawer rails to the shelves, so I can put my equipment on shelves with easy access. Now I am happy with my setup.

final-open

~ by Assaf

expedit-media-unit-transformation-featured desktop30

The post Expedit media unit transformation appeared first on IKEA Hackers.

Never to old to Rock ‘n Roll

$
0
0

I repurposed an Ikea Tockarp TV Unit to accommodate my turntable and amplifier so that I could play my ’70s vinyl record collection.

tockarp-tv-unit-brown

Photo: IKEA.com

1. Check that your record player and amp can fit in the shelf space provided with a little room to spare so that you can slide them out without difficulty. The backboard can be cut to accommodate the depth of the record deck, if required.

2. Buy 2 drawer sliders from a carpentry shop (should cost about € 5)

3. If sliders are white paint to match color of unit, paint does not have to be a perfect match as they are not seen most of the time. (In my photos I have left the sliders somewhat visible for demonstration purposes. They will now be touched up)

4. Buy a “D” handle to pull sliding shelf out and form “rail” in front of equipment.

How to hack a turntable stand from the IKEA TOCKARP TV unit

5. Remove one of the shelves and its supporting studs.

6. Measure the thickness of the two sets of drawer sliders and trim the shelf by this amount plus 3mm.

7. Fix the component parts of the drawer sliders to either side of the cut shelf and as low as possible to either side of the cabinet.

How to hack a turntable stand from the IKEA TOCKARP TV unit

Hack the IKEA TOCKARP TV unit into a turntable stand

8. Drill and fix the “D” handle about 10 mm in from the front edge of the shelf.

9. Place the record deck on the shelf and mark hole to be cut in backboard (if required)

IKEA TOCKARP TV unit IKEA TOCKARP TV unit

10. Cut holes in the backboard to accommodate the extra leads or the back of the record deck.

11. Assemble record deck/amplifier/speakers and time travel back to the ’70s.

~ by Patrick Brady

The post Never to old to Rock ‘n Roll appeared first on IKEA Hackers.

Stereo System Stand from 12 shelves

$
0
0

Stereo System from 12 IKEA EKBY shelves

Ikea items used: 12 pieces of white EKBY ÖSTEN shelves (79cm x 19cm x 1.8cm)

IKEA EKBY OSTEN white shelf

Photo: IKEA.com

I used 12 pieces of IKEA white EKBY ÖSTEN shelves to make the pair of speakers and the center unit to house the old car stereo system and PC power supply.

Step 1
I cut the EKBY shelves to match the width of the car stereo. I used 2 full EKBY shelves to hold the cut pieces together. Same for the speakers, I cut the EKBY shelves to size, cut holes to fit the speaker drivers.

DIY Stereo System Stand from 12 IKEA EKBY shelves

Step 2
I drilled holes on the edge of cut pieces and the 2 shelves and fastened them with wood dowels and glue. Same process for the speakers.

IKEA HACK: Stereo System Stand from 12 shelves

Step 3
This unit was assembled to house the car stereo on top and PC power below. I used a plastic polystyrene sheet as backing for the center unit. I ran a power cord to connect the car stereo to the PC power supply.

IKEA HACK: Stereo System Stand from 12 shelves

Step 4
Final assembled IKEA Stereo System with shelving.

Stereo System Stand from 12 IKEA EKBY shelves

~ by Terence Loh Tze Kok, Singapore


We have more DIY stereo system boxes and designs.

Check out the links below:

- House a pair of full range speakers in LACK shelves.
- Car stereo system built into a HEMNES chest of drawers (for kids’ room!)
- How to make a boombox for a car stereo system.
- Spherical speakers from wooden Blanda bowls


The post Stereo System Stand from 12 shelves appeared first on IKEA Hackers.

Long TV stand from IKEA Stolmen

$
0
0

Long wooden TV stand IKEA Stolmen hack

When moving to a new flat often some (all) things change. “I have all furniture I need” mostly costs around 1k Euro….

I had a black Stolmen with black topping for years and wanted things a bit brighter in my new flat. So I searched eBay for the old Stolmen …

I ended up lucky with enough parts to build this TV Stand, a wardrobe and a cat scratching post and tree.

Here we used one wide and two narrow Stolmen drawers. The frame is built from wooden counter tops which I did not buy from IKEA. To keep things movable the drawers are only screwed tho the frame. And the frame itself is also only held together by wooden lamella anchors. But the top countertop is heavy enough to keep things in place.

To bring the TV stand up a bit from the ground we screwed two old wardrobe doors from IKEA I had left over underneath it.

Long wooden TV stand IKEA Stolmen hack

The hack was build by my sister and my brother-in-law.

~ Thomas, Germany


Other ways to build a TV stand with IKEA STOLMEN

- Hang it for a floating effect

Hanging TV stand

- Mount a projector for the at-home-cinema experience

Stolmen projector mount

- With poles apart for your flat TV

Floating TV stand

- Industrial style with plenty of storage

Industrial style STOLMEN media unit

- As a multimedia rack

Stolmen multimedia rack


The post Long TV stand from IKEA Stolmen appeared first on IKEA Hackers.

Modern TV Stand from KALLAX + FROSTA

$
0
0

I made a modern TV stand combining the KALLAX shelving unit with legs from the FROSTA stool.

Modern TV stand hacked from KALLAX and FROSTA

IKEA items used:

  • 1 KALLAX 1 x 3 unit (42 x 111cm)
  • 1 FROSTA (legs)
  • 2 KALLAX doors
  • 1/2 Kallax drawer

Modern TV stand IKEA hack with KALLAX and FROSTA

Photo: IKEA.com

Other items / equipment used:

  • 1 plywood board birch 38 x 103,8 x 0,6cm
  • 1 plywood board birch 38 x 33,6 x 0,6cm (maybe painted in white)
  • wood glue
  • short screws (4x25mm),
  • 4mm wood drill, cordless drill and a table saw with fence

Total costs: circa 100€.

Modern TV Stand from KALLAX + FROSTA

Saw the FROSTA legs at a length of 18cm.

Glue and screw the wide plywood board at the bottom of the KALLAX shelving unit.

Adjust FROSTA legs at the bottom (like at a 60° angle).

Drill 4mm holes into the plywood board and KALLAX bottom at the hole positions of the feet.

Screw the truncated FROSTA legs with supplied screws.

Put the KALLAX on the FROSTA legs.

Mount the two KALLAX doors and the half KALLAX drawer (one drawer, saw through the drawer – mount at half height).

Slope the drawer in the fence and lay the smaller board on the drawer beam.

~ by Falko Holzförster


Other modern TV stands you may like:

clean and minimalist TV stand IKEA hack

A clean and minimalist TV stand. This was hacked from the IKEA LACK shelving unit but you can easily do the same with the KALLAX.

BESTÅ TV unit IKEA Hack with stone wall panel

One of our all time favourites – the BESTÅ TV unit with stone wall panel.

BESTÅ TV stand with speaker cloth

Another BESTÅ TV stand but we like this for letting us control the gadgets behind closed doors.

TV unit mid century orange

This one we really love for the pop of color inside the TV unit.


The post Modern TV Stand from KALLAX + FROSTA appeared first on IKEA Hackers.

Viewing all 194 articles
Browse latest View live