Materials:
1 x Pallet cage that held wood for wood burner – Free
1 x Ikea BESTÅ TV bench – £40
4 x Hairpin legs – £25
Glue, panel pins, stain, beeswax etc – £15
Total:
£80
Time:
16 hours approx
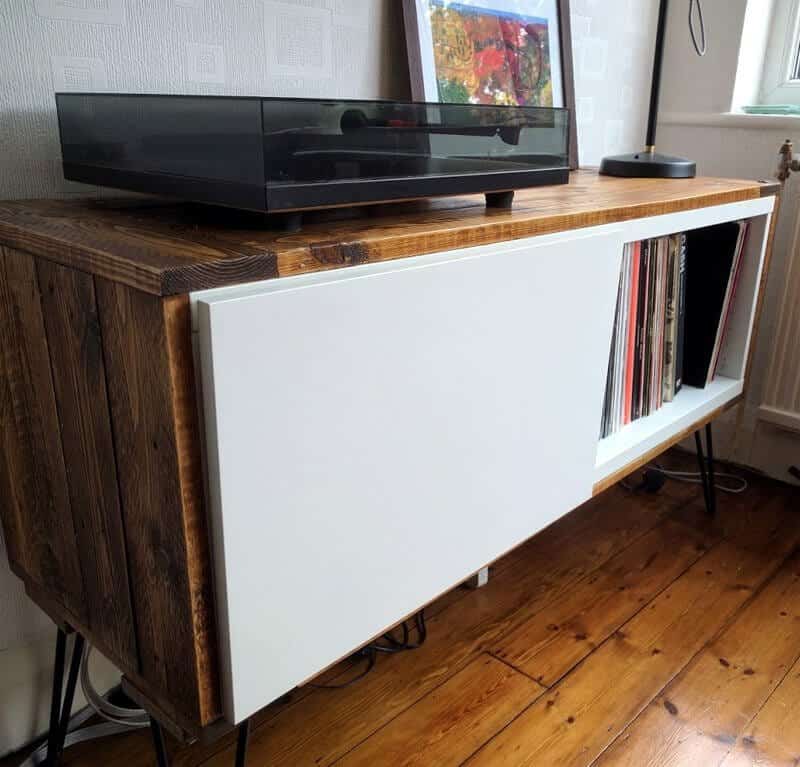
We had an ugly pine cabinet that held our amp, cd player etc that HAD to go.
I dismantled the pallet wood cage, removed the nails and sorted it into same lengths.
Measured the BESTÅ unit and cut the wood to length.
Stained using Medium Oak then Dark Oak Colron Danish Oil then beeswax.
Image may be NSFW. Clik here to view.
I put 4 heavy duty hairpin legs on and put it in place to make sure it was level.
For the time being I have used the BESTÅ door but I am making a door from pallet wood with a grill in it to allow air through onto the amp.
But it doesn’t look that bad with the BESTÅ Door.
The other door was cut down to make the shelf.
Image may be NSFW. Clik here to view.
Image may be NSFW. Clik here to view.
Image may be NSFW. Clik here to view.
I put a plug board on the back and cable-tied all the cables up as well so very little was visible underneath the cabinet. Drilled some access holes for the cables in the hardboard backing. Popped amp, cd player and records in and Bob’s your Uncle.
Image may be NSFW. Clik here to view.
Just got to tidy those cables up and replace the skirting board.
What would I do differently next time?
Have a 2cm overhang on the top at the front so the door is flush
Get the OTTEBOL door and cut it into 4 pieces like shown on the graphic:
Image may be NSFW. Clik here to view.
Be careful with the cut edges. They tend to break after you cut it. This was the hardest part.
2. Making the shelves:
After that, you just take the oak plank and cut 3 pieces of 20 x 36.4cm for the base, and two inner shelves.
Lastly, cut the top with a little overhang (if you want to). I did it at 20 x 42cm.
3. Mesh for IT equipment:
Cut the mesh plate to 41 x 20cm. Smooth the edges after cutting to prevent sharp edges.
Now take both side panels (right & left), be sure that the nice side is facing front. Mill two slots (5mm deep, 20,5cm high) on the inside. That’s the spot where the mesh plate will sit.
Image may be NSFW. Clik here to view.
4. Assembling the unit:
Frame:
For the top and bottom planks I used wooden plugs. Drill them in, add some glue and assembly them.
Now add the mesh plate, because it is thin, you can slightly bend it to insert into the slots.
For the two shelves, I used a small L-profile (I’m lazy), but you can also do it with wooden dowels.
Image may be NSFW. Clik here to view.
Fortunately, OTTEBOL comes with predrilled holes for the hinges. But because of the cutting, you have only one left on each side. But that’s no big deal. Measure the existing hole and copy it to bottom section of your new door.
To cover the existing holes on the inside, I just mounted the hinges over the inner holes.
For the rest of the holes, IKEA did us a favour and added some white plastic covers you can use.
5. Installing the IT sideboard:
Because I wanted it to float, I used three brackets for the wall mount. Why three? At first I also just used two on the top, but because of the weight of the door it got a little bit wonky while using the door. So I just put a third at the bottom and the problem is gone.
Image may be NSFW. Clik here to view.
That’s pretty much all there is to it. Of course I did some touch ups and sanded down the edges of all shelves, as well as cut small slots at the back of each shelf (even the bottom and top) to allow for some air flow for the IT equipment.
First hack
- BRIMNES headboard with storage
- MOSSLANDA picture ledge
- Screws
- Saw
Our bedroom is not that big, so the BRIMNES that we had in there was not that useful. We couldn’t access the side shelves and it was a bit deep. We still needed the shelf but didn’t want to spend to much money on something new. I had two left over picture ledges that I could use as a bed shelf, but it would be nice to have a head board. So, in comes my first IKEA hack.
Image may be NSFW. Clik here to view.
I removed everything except the front of the BRIMNES and then I measured and sawed off the MOSSLANDA so both of them were the same width as the BRIMNES. I then screwed them on to the BRIMNES, up side down almost all the way to the top. I liked the little edge so things like frames don’t fall off so easy.
I attached the left over piece of the picture ledge, right way up, a bit further down on the MOSSLANDA so that it stays straight when the bed is pushed in. It doubles as a shelf for the power plugs.
I don’t really have a good photo of this one, didn’t think about taking photos during the build…
One problem with this hack, it is now too narrow for my NORDMÄRKE wireless charger. Besides, I don’t like that I sometimes miss the center with the phone leaving my phone uncharged. So, I had to do another IKEA hack.
I decided that I wanted a vertical holder for the NORDMÄRKE wireless charger. We had a DRAGAN soap dish that we didn’t need. Bamboo is very easy to cut and it was sort of the right size.
Image may be NSFW. Clik here to view.
I cut one of the bars so that the whole construction got a bit loose (it helped that it was used for a while). Now I could disassemble it and cut pieces so it fitted my phone (width and depth) as well as the chargers depth. I needed to sand down the depth of some pieces and used a bit more glue between some other pieces to get the right fit.
Image may be NSFW. Clik here to view.
Once everything was glued and dried I sanded it down a bit and filled the gaps with some more glue.
I don’t have a picture of the phone being charged, it’s hard to take a photo of the phone that has my only camera! Image may be NSFW. Clik here to view.
I became the owner of a Raspberry Pi late last year which was going to be used for casual retro gaming. I like my AV setup quite neat, so wanted somewhere I could keep the Pi whilst it wasn’t in use, and away from my toddler’s hands! I’d seen the LACK hacked for storage a few other times, but was inspired by an old hack I’d seen years ago whereby the LACK had a sliding top. Due to the space it was going in, I needed a hinged top to make the contents accessible.
In addition to the LACK tables, I also used:
Wooden batons x 8 (about £8 at my local timber merchant)
Gas dampers (50NM) x 2 (approx £4 on eBay)
Small door hinges x 2 (about £1.50 at my local timber merchant)
Optional:
Soft self-adhesive fabric (£5, eBay)
Shadowfoam (about £25)
White gloss spray paint (One can, local shop, £4)
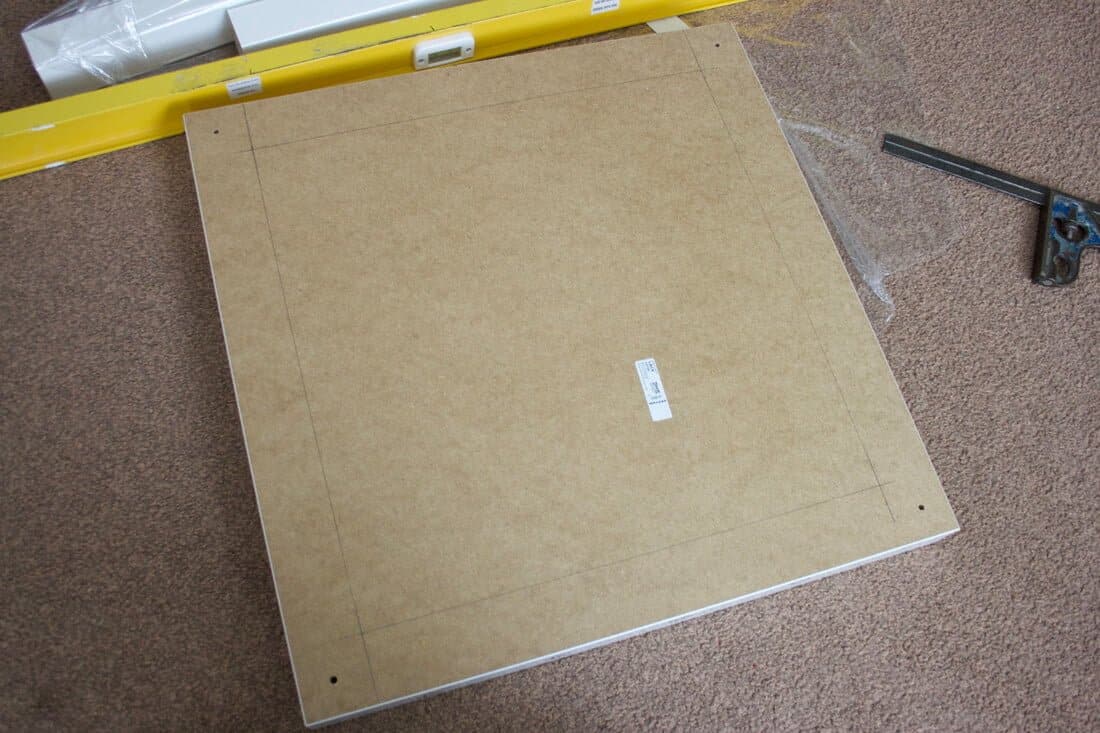
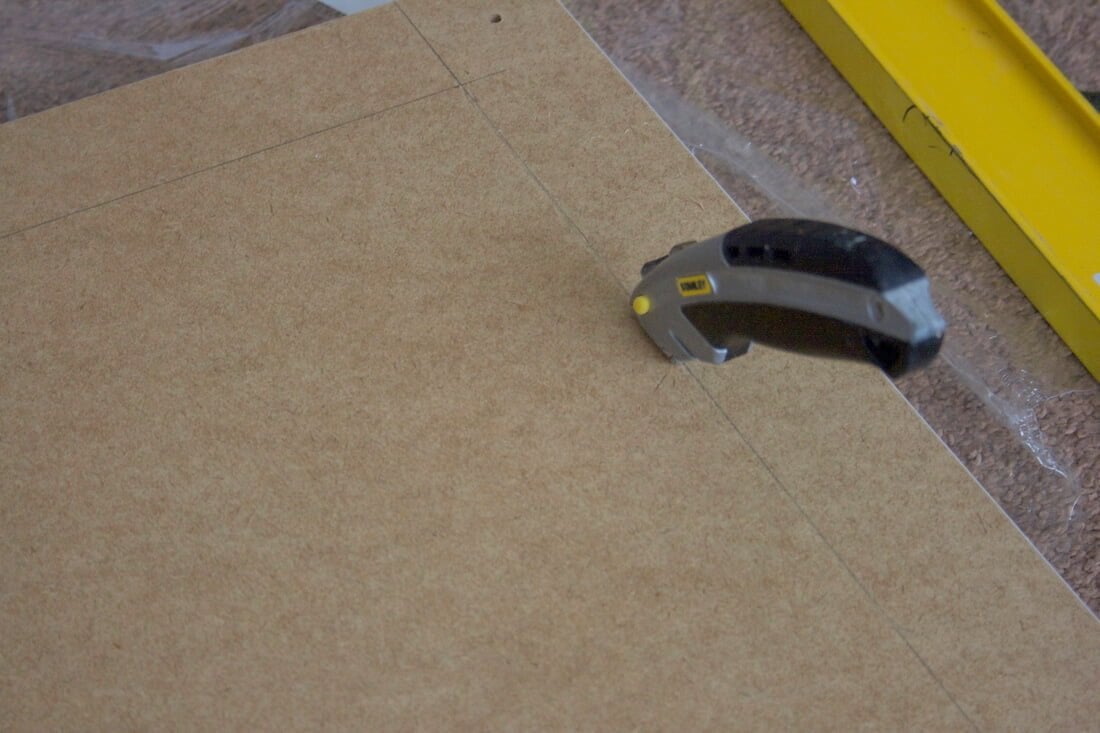
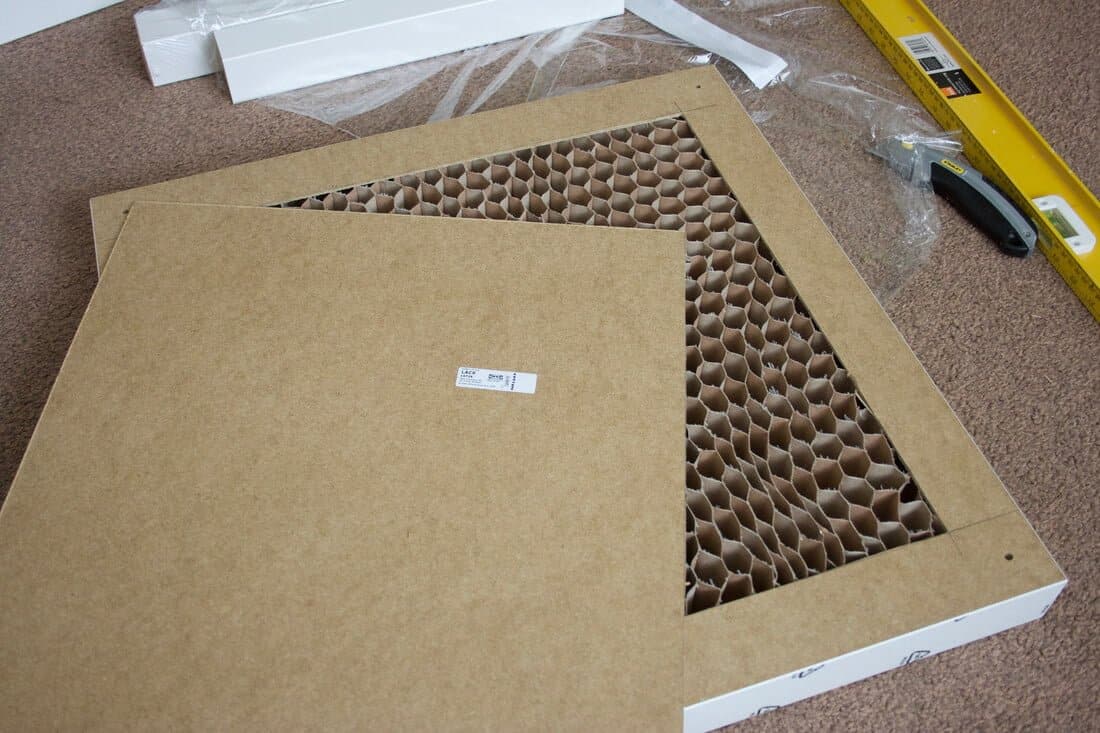
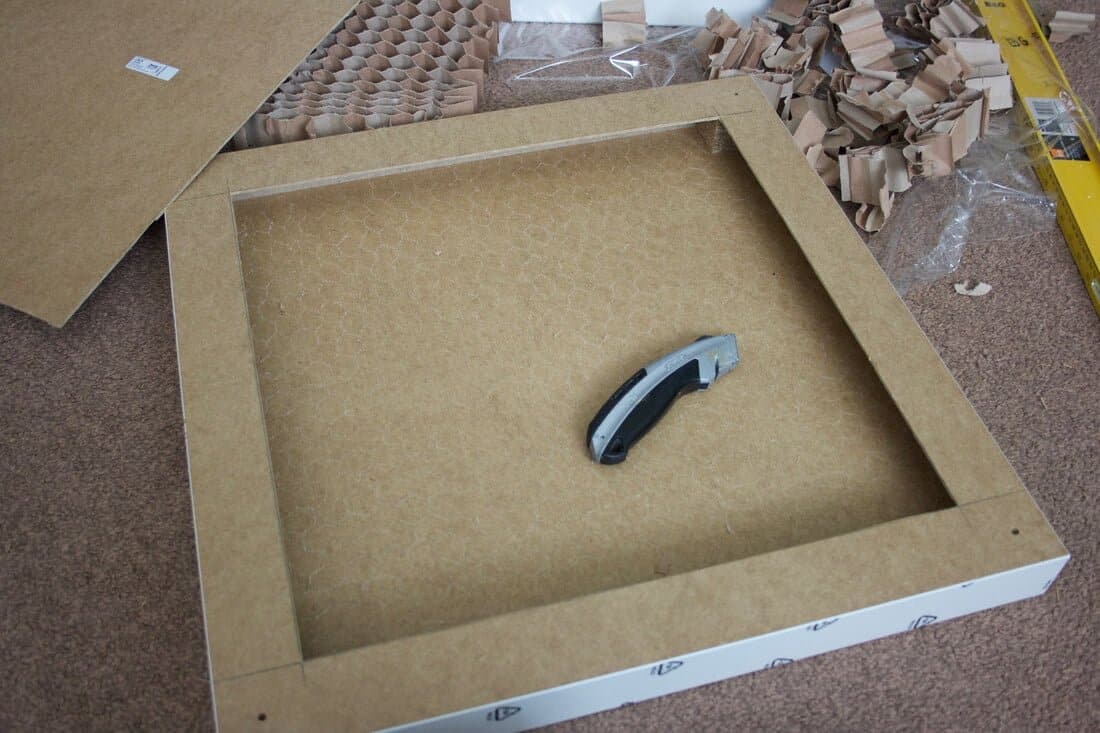
I started by taking the wooden batons and drawing around them on the underside of both tables. These are to strengthen the table top as the innards were coming out. I measured an extra 10mm over on what was going to be the bottom table as I wanted a slight overhang once the batons were pushed in to place. Once marked up, I cut the square out very carefully with a sharp Stanley knife. It’s important to keep the edges straight as these will be on display when the table is open, but it is also important to keep the section whole as you’ll be needing this later on. Once cut out, remove all the honeycomb filling making sure that the surface is as flat as you can make it.
Image may be NSFW. Clik here to view.
Image may be NSFW. Clik here to view.Image may be NSFW. Clik here to view.
Image may be NSFW. Clik here to view.
Once removed, cut your batons to size. I squeezed some wood glue all around the innards of the table and pressed the batons in place (the wood I purchased was the exact fit for the gap — I did a trial on an old LACK a few days before so I didn’t mess this one up!). I did the same for the other table top, but as you can see from the picture, this one has the slight over-hang. Once pressed in place, I squeezed loads more wood glue into the centre and put in the piece of the table I’d cut out (this is to strengthen the table top). I left it over night with weight on it to ensure it glued properly. I did this to both parts.
Image may be NSFW. Clik here to view.
Image may be NSFW. Clik here to view.
Image may be NSFW. Clik here to view.
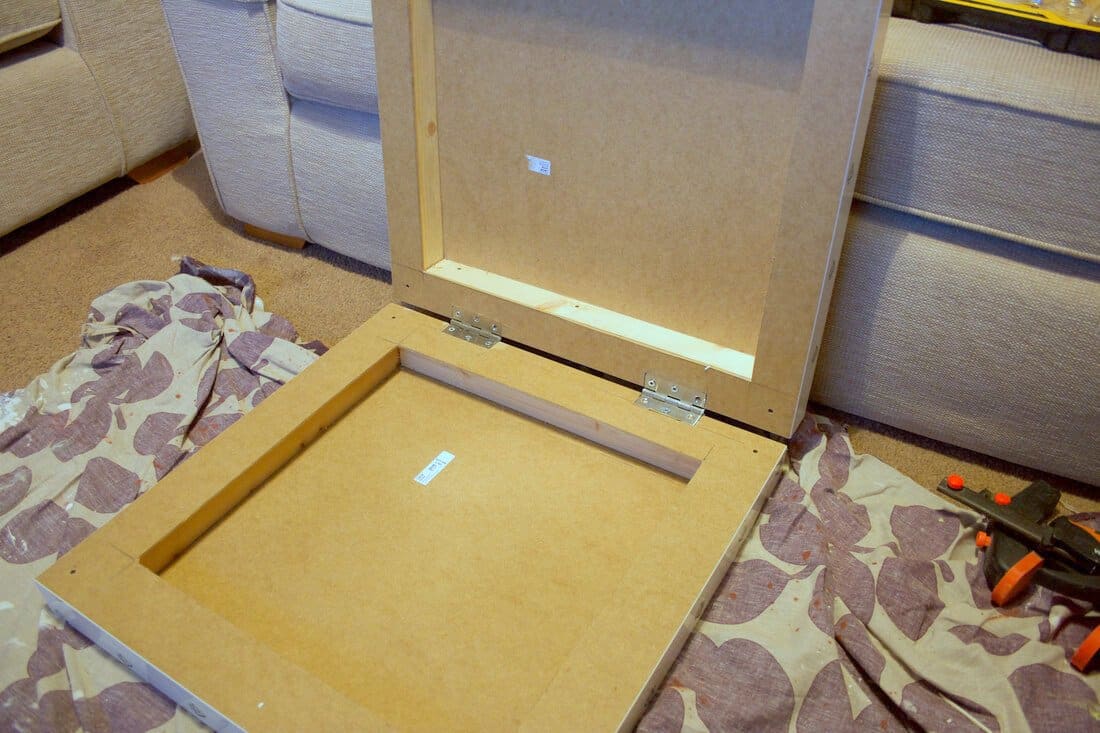
I then took my door hinges, measured them equally apart and again, used the Stanley Knife to cut them out. Because the frame inside the table top is very narrow, it’s important to make sure that the batons that you put in are pressed right against the inner frame as the hinges will screw into this.
Image may be NSFW. Clik here to view.
Image may be NSFW. Clik here to view.
I then attached the legs and one of the dampers ensuring the table top with the overhang is on the bottom. As you can see, there is a slight cutout for the damper to slot into when the top is closed. When happy, I added the second damper, and drilled/countersunk/screwed the batons in place, but on the base only as this is going to be covered.
Image may be NSFW. Clik here to view.
Image may be NSFW. Clik here to view.
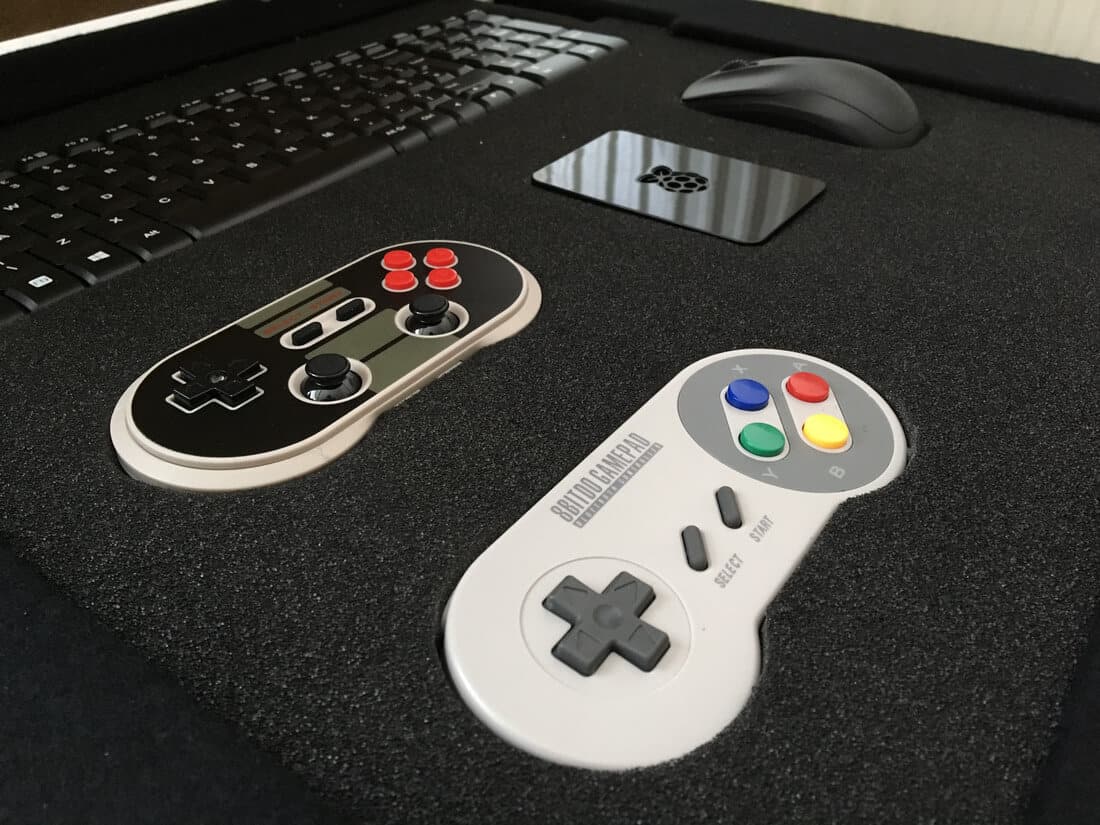
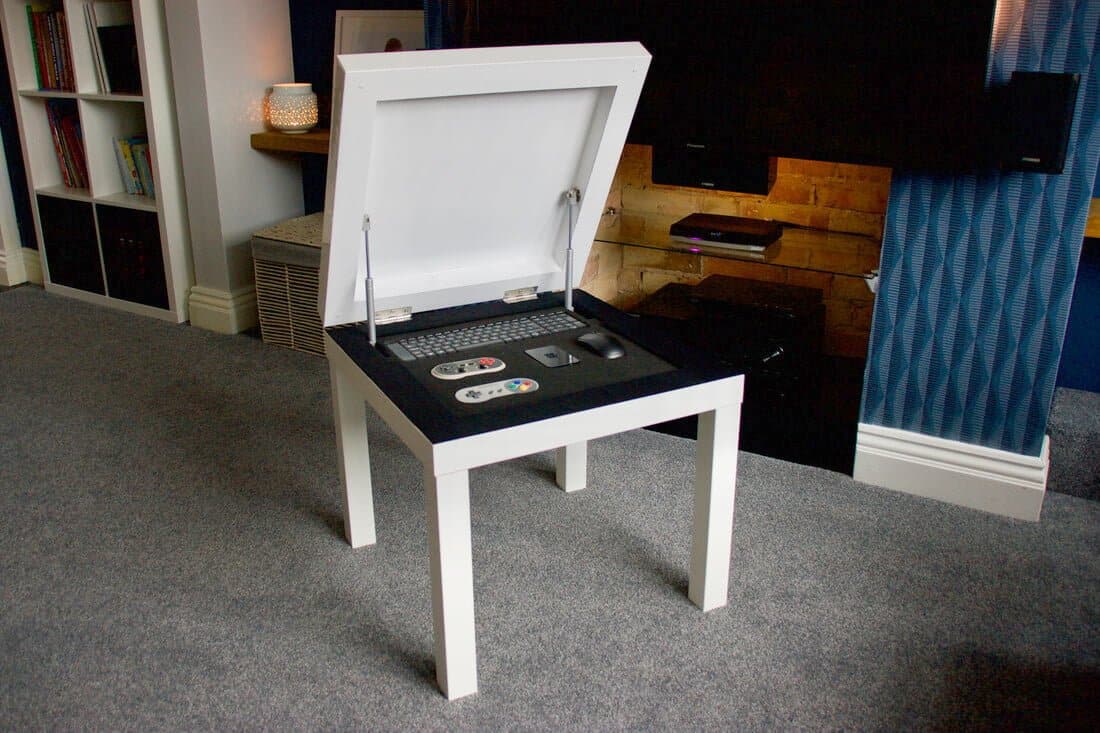
I then took the self adhesive fabric and covered the surface of the bottom table, tucking it underneath to make it look neat. I then added the Shadowfoam, by tucking it under the overhang of the bottom table (this is why the cutout on the bottom table was slightly smaller). I then added my Raspberry Pi and accessories and cut them into the Shadowfoam. Once I was happy with how it looked, I removed the top and sanded/sprayed white to match the exterior. Once dry, I reattached and put in place.
Image may be NSFW. Clik here to view.
Image may be NSFW. Clik here to view.
Image may be NSFW. Clik here to view.
Image may be NSFW. Clik here to view.
Image may be NSFW. Clik here to view.
And there you have it, one storage table for my Raspberry Pi, hidden away from little fingers! If attempting yourself, it is important to make sure you reinforce the table top using the part you cut out as the table top isn’t as strong as it was (in one picture you can see I used some white hardboard that I had knocking around as I accidentally chucked my cut out away!).
I recently got myself an open studio loft, so I finally had a chance to get creative. I wanted to share my massive IKEA KALLAX room divider, but more specifically, my hide-away TV that doubles as an art piece (with the added feature of allowing me to choose to watch TV in the living room or the bed room).
Ingredients:
KALLAX 5×5 (primary)
2x KALLAX 2×4
KALLAX 2.5×4
KALLAX 4×4
BESTÅ 2×1
Various KALLAX accessories
Room Divider
The first goal of the project was to make a room divider to divide the living space from the bed area and utilize the height of the apartment. Overall the concept was easy and mostly just required me to go on several Craigslist runs to acquire my Tetris pieces. The core is a standard 5×5 KALLAX with other KALLAX pieces anchored to it. Having each piece anchored together along with the right-angles they form makes the structure safe and sturdy despite its height.
Image may be NSFW. Clik here to view. View from living room
Image may be NSFW. Clik here to view. View from bedroom
TV Insert
I knew I wanted my TV to be embedded in the KALLAX, but the 5×5 model that IKEA sells with a TV cut-out is centered, which would not work with the arrangement I wanted for the KALLAX components. I was able to find a good deal on a standard 5×5 and then it was as simple as selecting the one shelf to cut and removing the spare shelves from that region.
Image may be NSFW. Clik here to view.
Image may be NSFW. Clik here to view.
Image may be NSFW. Clik here to view.
Image may be NSFW. Clik here to view.
Hide-away TV (& Viewing in 2 rooms)
Now that I had the spot for my TV cut-out, I wanted a way to hide my TV so it wasn’t the center-point of the living space as you walked in. In addition, I was looking for an easy way to switch between playing video games on the couch and watching movies from the bed — so the only natural thing was to build in a swivel that would let me do both!
1. I acquired a standard low-profile lazy susan from Amazon and centered it on the shelf that the TV would rest on.
2. Then, I re-used the leftover shelf piece that was cut and I trimmed it further so that it could spin on the lazy susan without hitting the edges of the nook.
3. A 1-inch diameter hole was then drilled through the center of both shelves to pipe the various cords through the center of the rotation point to make things spin cleaner.
4. A cheap wall bracket was mounted to the TV, and I used an extra piece of thin plywood to act as a backing “wall” for the TV and art to go on the other side.
5. The final step was to adjust the mounting bracket and hang the art up on the back of the TV to make sure it all spins correctly and it was properly aligned. The addition of this bracket makes alignment and access to wires behind the TV a snap if needed.
See how it works in this video.
Lots of fun doing this project, plus it looks great and is functional for my living space — all I was hoping for. Hope you like the project and please let me know if you have any questions!
We have awkwardly placed plugs in the lounge in our new build house, they’re a little higher than normal and so are on show, which isn’t very pretty.
I decided the HEMNES console table would suit what we needed in terms of storage and height and with a little tweaking would have the right look for our home.
I bought the HEMNES console table in light brown (wood effect) and when putting together I purposefully left out 2 of the top shelves so I had space for the Sky box and Xbox. It was a little tricky to do this as you assemble upside down so you need 2 people.
Image may be NSFW. Clik here to view.
I filled in the dowel holes with wood filler and sanded smooth. I painted the unit with Valspar paint (a £3 b&q sample pot!) the shade is Hazy Earth. I left the top of the unit plain to give it that farmhouse look. I then sealed the whole unit with a finishing wax.
Image may be NSFW. Clik here to view.
I bought some mdf sheets, painted them in the same colour as I had painted the unit and then nailed to the back. This ensured that the many plug sockets and cables were completely hidden. We drilled a hole either side of the top shelving to enable the cables to come through to the back.
I used the KNIPSA boxes and have attached a black felt inside so the hole doesn’t show what mess there is inside them!
Image may be NSFW. Clik here to view.
We carefully sawed the legs on the unit so only an inch was left, that way the extension cable (which you can see in one of the pictures after painting) wasn’t visible and it made it look less like a console table.
And that’s it, the unit has the storage space IKEA always gives us and has the height we needed whilst tying in with our “modern farmhouse” theme in our new home, without the high price tag we would have had to otherwise to pay!
On first seeing the NORDLI range I was instantly drawn to the design. But on seeing them in the flesh there was an annoying gap as the top piece does not properly cover the drawers. I also wanted the piece to fit under the eaves in my loft space with some storage space for electrical equipment behind. It had to fit into the room’s design and look more like a piece of furniture rather than a modular section. It needed a hack.
First the drawers were assembled as per the instructions.
The unit was put roughly into place and leveled with the floor.
The top used some spare pieces of the flooring in the room. However even if you have to buy a pack of flooring it will be a lot cheaper than a solid wooden top.
These were cut down to match the height with a circular sawImage may be NSFW. Clik here to view.. The original 62cm depth was kept to provide a hidden recess behind the unit for cabling.
Notches were cut out to enable the sides to fit around the skirting board.
The sides were placed against the NORDLI unit and it moved until the sides were flush with the front of the drawers. This was easier than trying to measure it!
The side position was then marked as shown. The sides where then attached to the NORDLI using the screws provided. Remember to clamp the sides to the unit as you screw them on.
Holes were drilled through the NORDLI top to enable the wooden top to be fixed later.
The oversize top was placed on the unit to determine a pleasing overhang. This was about 2.5 cm each side.
The flooring was then cut upside down using a straight line template made from a piece of ply and timber. This ensures a perfect straight line. Cutting upside down ensures a clean finish with no ripping of the good side.
The finished top was then screwed on through the holes drilled previously through the NORDLI top
To finish an oak trim piece was mitred, pinned and glued to the front and sides. This is deep enough to cover both the flooring top and the original NORDLI top. I creates the illusion that the top is solid wood.
A quick wipe over with some Tung OilImage may be NSFW. Clik here to view. completed the piece.
A small gap was left at the rear of the top to feed the cables down. Alternatively a hole could be cut over the hidden area.
The finished unit looks much more expensive than the original – yet even if you needed to purchase a pack of wooden flooring it is a really inexpensive enhancement.
Follow the instruction and make your own by laser cutting a wood panel.
What you need:
Wood panel 6mm thickness, at least 320×390 mm for the short drawer and 320×790 mm for the long one. I’m using poplar panels, you can use any material that can be cut by your machine.
Access to a laser cut machine to cut the wood panel. Fablabs are a global network of local labs and they provide access to tools for digital fabrication: fablabs.io/labs/map
Design files, you will find both the designs files for the short and the long drawers: IKEA-Nordli-hack.zip
Wood glue
Instructions:
Use the downloaded file to cut the panel with the laser cut machine.
First drill a hole. Then insert a nibbler into the hole to start cutting an opening for the first fan.
I used a nibbler tool to cut the opening for the 120mm fans, with a cardboard template as guide. However the cardboard didn’t allow for a nice cut. I used a wooden “template” for the other side. That was a lot better.
Sketched the holes for all kinds of connectors like USB (two on each side), sound, main switch, etc.
The fans are protected by a fine mesh. The mesh is from a (new) trash bin. It was very easy to cut it to shape with the nibbler. I have used the fan itself to be the template. The right fan was also fitted with a standard fan grid to give some stiffness to the mesh.
Both fans are PWM controlled, to make it quiet when the PC is not loaded. They provide a constant draft through the case. No other fans are needed.
The rear is cut to fit the I/O shield. (The hole is somewhat bigger due to my mistake, oops). The power connector is also placed on the back and connected to the supply by custom wiring.
My system configuration is listed below:
The GA-H77n-WIFI board has all the connectivity and power to play some fullHD stuff with 7.1 audio; CPU: Intel Celeron G1620; RAM: 4GB (dual channel); HDD 120GB SSD; Data has to come from a external HDD, or streamed from internet, or your NAS as there is no big HDD inside.
As you can see I removed a divider to make space a while ago. And added shelf on rails. Now I was getting a bit tired of its big and bulky look, so I decided to completely upgrade.
The Ingredients:
1) Expedit TV storage unit.
2) Expedit (box of 1×1) – IKEA stopped offering it in the new Kallax series.
a) The top piece, I use it as a stand up 1×4 book storage (length 150cm)
b) The one below is the base for the new media unit (length 180cm)
Instead of 5 compartments like the old one, I decided to merge the 3 middle compartments to 2 larger ones, in order to fit my receiver, which is longer than the Expedit compartment size.
So I drilled new holes for the divider to fit in the middle.
I decided also to raise the media storage and created 4 legs from the leftover panels of the original. And so my cleaning robot will be happy to clean underneath.
Bought from IKEA sale section, some melamine white shelves and cut them be the middle section doors, bought flat hinges and fixed them so it will open downward.
The door handles are also IKEA Blankett.
Then I installed drawer rails to the shelves, so I can put my equipment on shelves with easy access. Now I am happy with my setup.
1. Check that your record player and amp can fit in the shelf space provided with a little room to spare so that you can slide them out without difficulty. The backboard can be cut to accommodate the depth of the record deck, if required.
2. Buy 2 drawer sliders from a carpentry shop (should cost about € 5)
3. If sliders are white paint to match color of unit, paint does not have to be a perfect match as they are not seen most of the time. (In my photos I have left the sliders somewhat visible for demonstration purposes. They will now be touched up)
4. Buy a “D” handle to pull sliding shelf out and form “rail” in front of equipment.
Ikea items used: 12 pieces of white EKBY ÖSTEN shelves (79cm x 19cm x 1.8cm)
Image may be NSFW. Clik here to view.
Photo: IKEA.com
I used 12 pieces of IKEA white EKBY ÖSTEN shelves to make the pair of speakers and the center unit to house the old car stereo system and PC power supply.
Step 1
I cut the EKBY shelves to match the width of the car stereo. I used 2 full EKBY shelves to hold the cut pieces together. Same for the speakers, I cut the EKBY shelves to size, cut holes to fit the speaker drivers.
Image may be NSFW. Clik here to view.
Step 2
I drilled holes on the edge of cut pieces and the 2 shelves and fastened them with wood dowels and glue. Same process for the speakers.
Image may be NSFW. Clik here to view.
Step 3
This unit was assembled to house the car stereo on top and PC power below. I used a plastic polystyrene sheet as backing for the center unit. I ran a power cord to connect the car stereo to the PC power supply.
Image may be NSFW. Clik here to view.
Step 4
Final assembled IKEA Stereo System with shelving.
Here we used one wide and two narrow Stolmen drawers. The frame is built from wooden counter tops which I did not buy from IKEA. To keep things movable the drawers are only screwed tho the frame. And the frame itself is also only held together by wooden lamella anchors. But the top countertop is heavy enough to keep things in place.
To bring the TV stand up a bit from the ground we screwed two old wardrobe doors from IKEA I had left over underneath it.
Image may be NSFW. Clik here to view.
The hack was build by my sister and my brother-in-law.
Materials:
1 x Pallet cage that held wood for wood burner – Free
1 x Ikea BESTÅ TV bench – £40
4 x Hairpin legs – £25
Glue, panel pins, stain, beeswax etc – £15
Total:
£80
Time:
16 hours approx
We had an ugly pine cabinet that held our amp, cd player etc that HAD to go.
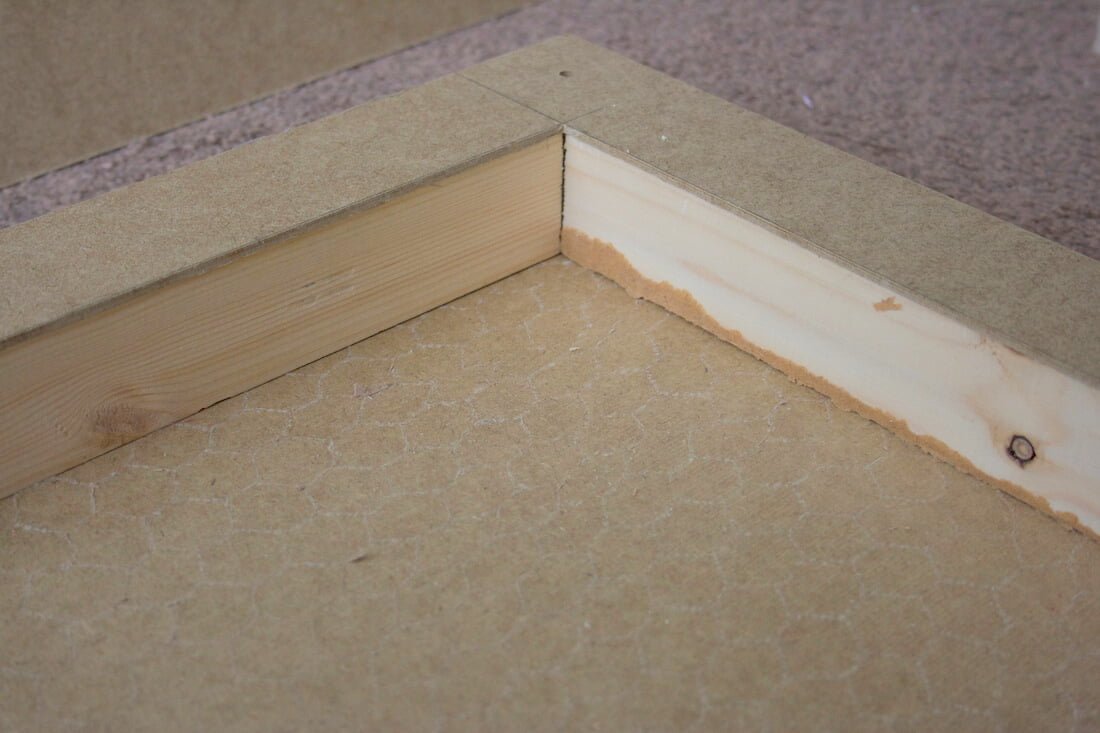
I dismantled the pallet wood cage, removed the nails and sorted it into same lengths.
Measured the BESTÅ unit and cut the wood to length.
Stained using Medium Oak then Dark Oak Colron Danish Oil then beeswax.
Image may be NSFW. Clik here to view.
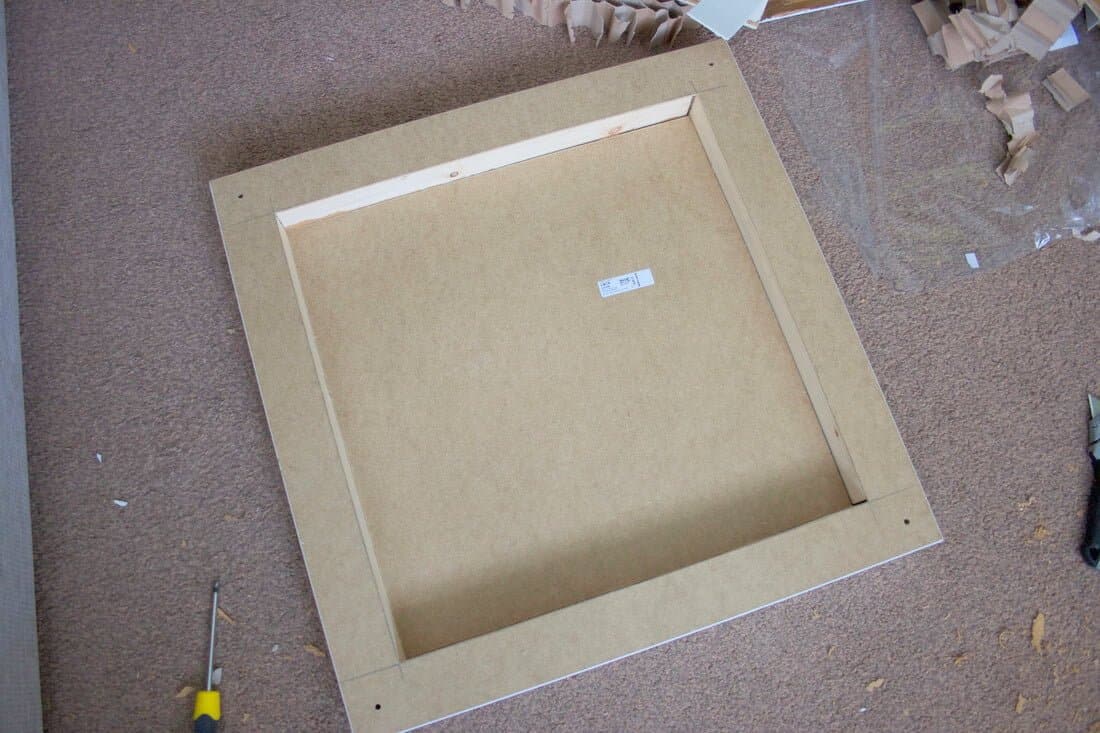
I put 4 heavy duty hairpin legs on and put it in place to make sure it was level.
For the time being I have used the BESTÅ door but I am making a door from pallet wood with a grill in it to allow air through onto the amp.
But it doesn’t look that bad with the BESTÅ Door.
The other door was cut down to make the shelf.
Image may be NSFW. Clik here to view.
Image may be NSFW. Clik here to view.
Image may be NSFW. Clik here to view.
I put a plug board on the back and cable-tied all the cables up as well so very little was visible underneath the cabinet. Drilled some access holes for the cables in the hardboard backing. Popped amp, cd player and records in and Bob’s your Uncle.
Image may be NSFW. Clik here to view.
Just got to tidy those cables up and replace the skirting board.
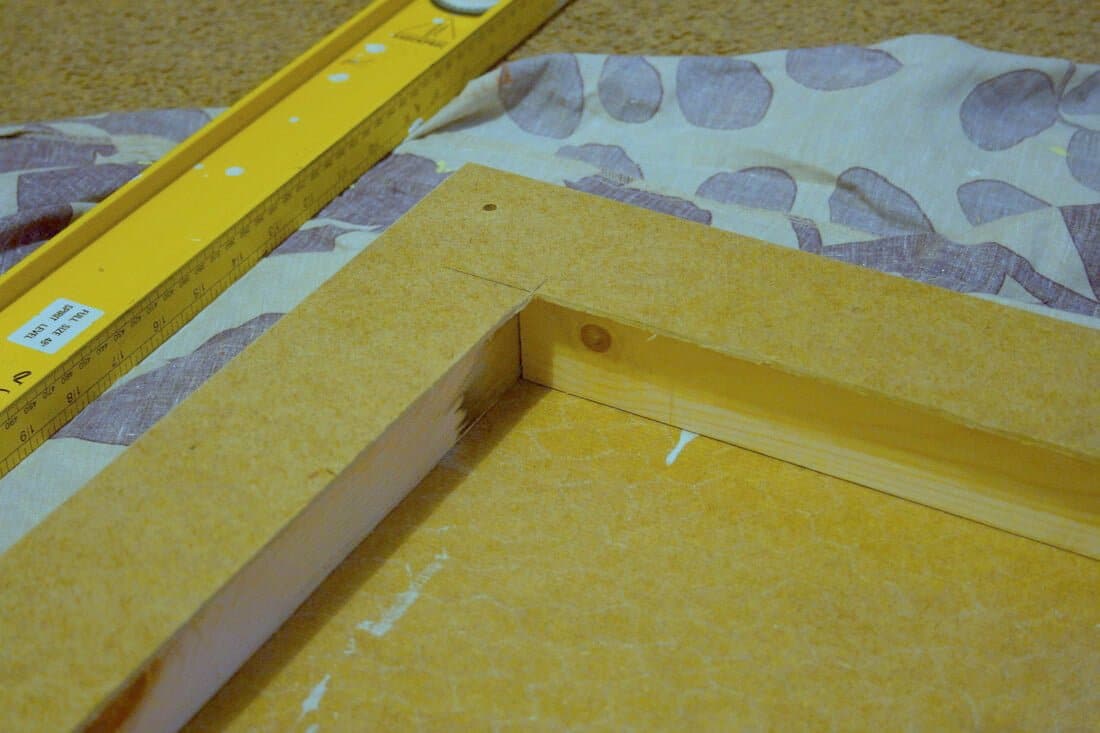
What would I do differently next time?
Have a 2cm overhang on the top at the front so the door is flush
Get the OTTEBOL door and cut it into 4 pieces like shown on the graphic:
Image may be NSFW. Clik here to view.
Be careful with the cut edges. They tend to break after you cut it. This was the hardest part.
2. Making the shelves:
After that, you just take the oak plank and cut 3 pieces of 20 x 36.4cm for the base, and two inner shelves.
Lastly, cut the top with a little overhang (if you want to). I did it at 20 x 42cm.
3. Mesh for IT equipment:
Cut the mesh plate to 41 x 20cm. Smooth the edges after cutting to prevent sharp edges.
Now take both side panels (right & left), be sure that the nice side is facing front. Mill two slots (5mm deep, 20,5cm high) on the inside. That’s the spot where the mesh plate will sit.
Image may be NSFW. Clik here to view.
4. Assembling the unit:
Frame:
For the top and bottom planks I used wooden plugs. Drill them in, add some glue and assembly them.
Now add the mesh plate, because it is thin, you can slightly bend it to insert into the slots.
For the two shelves, I used a small L-profile (I’m lazy), but you can also do it with wooden dowels.
Image may be NSFW. Clik here to view.
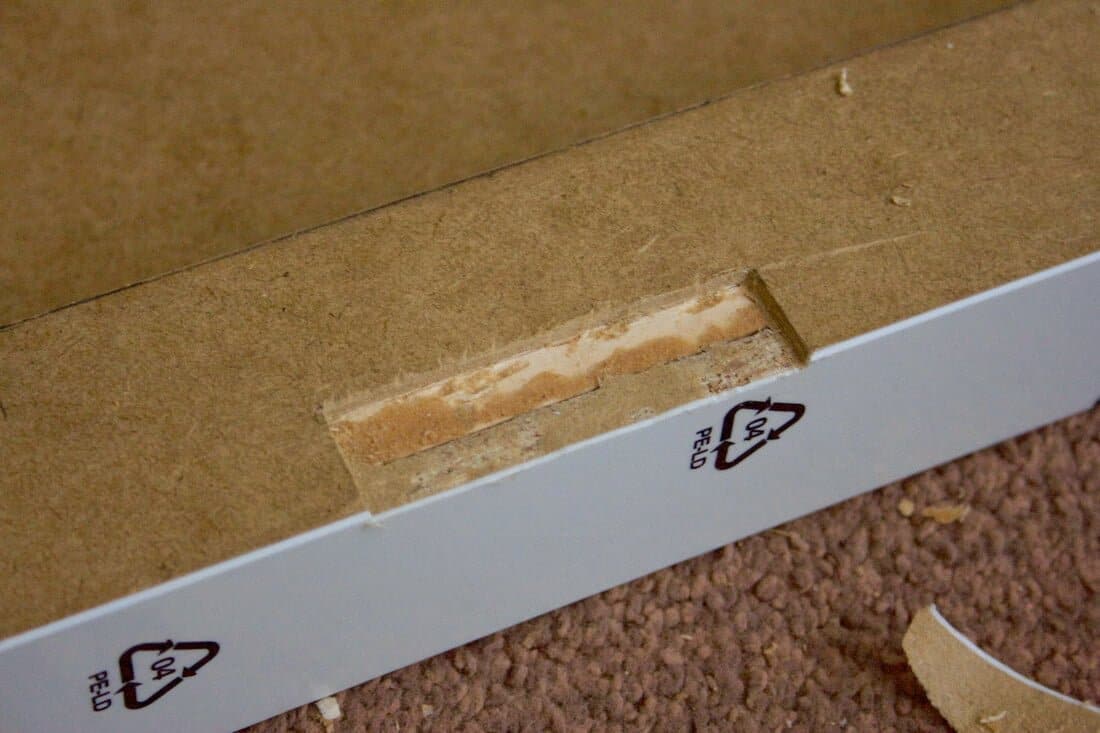
Fortunately, OTTEBOL comes with predrilled holes for the hinges. But because of the cutting, you have only one left on each side. But that’s no big deal. Measure the existing hole and copy it to bottom section of your new door.
To cover the existing holes on the inside, I just mounted the hinges over the inner holes.
For the rest of the holes, IKEA did us a favour and added some white plastic covers you can use.
5. Installing the IT sideboard:
Because I wanted it to float, I used three brackets for the wall mount. Why three? At first I also just used two on the top, but because of the weight of the door it got a little bit wonky while using the door. So I just put a third at the bottom and the problem is gone.
Image may be NSFW. Clik here to view.
That’s pretty much all there is to it. Of course I did some touch ups and sanded down the edges of all shelves, as well as cut small slots at the back of each shelf (even the bottom and top) to allow for some air flow for the IT equipment.
First hack
– BRIMNES headboard with storage
– MOSSLANDA picture ledge
– Screws
– Saw
Our bedroom is not that big, so the BRIMNES that we had in there was not that useful. We couldn’t access the side shelves and it was a bit deep. We still needed the shelf but didn’t want to spend to much money on something new. I had two left over picture ledges that I could use as a bed shelf, but it would be nice to have a head board. So, in comes my first IKEA hack.
Image may be NSFW. Clik here to view.
I removed everything except the front of the BRIMNES and then I measured and sawed off the MOSSLANDA so both of them were the same width as the BRIMNES. I then screwed them on to the BRIMNES, up side down almost all the way to the top. I liked the little edge so things like frames don’t fall off so easy.
I attached the left over piece of the picture ledge, right way up, a bit further down on the MOSSLANDA so that it stays straight when the bed is pushed in. It doubles as a shelf for the power plugs.
I don’t really have a good photo of this one, didn’t think about taking photos during the build…
One problem with this hack, it is now too narrow for my NORDMÄRKE wireless charger. Besides, I don’t like that I sometimes miss the center with the phone leaving my phone uncharged. So, I had to do another IKEA hack.
I decided that I wanted a vertical holder for the NORDMÄRKE wireless charger. We had a DRAGAN soap dish that we didn’t need. Bamboo is very easy to cut and it was sort of the right size.
Image may be NSFW. Clik here to view.
I cut one of the bars so that the whole construction got a bit loose (it helped that it was used for a while). Now I could disassemble it and cut pieces so it fitted my phone (width and depth) as well as the chargers depth. I needed to sand down the depth of some pieces and used a bit more glue between some other pieces to get the right fit.
Image may be NSFW. Clik here to view.
Once everything was glued and dried I sanded it down a bit and filled the gaps with some more glue.
I don’t have a picture of the phone being charged, it’s hard to take a photo of the phone that has my only camera! Image may be NSFW. Clik here to view.
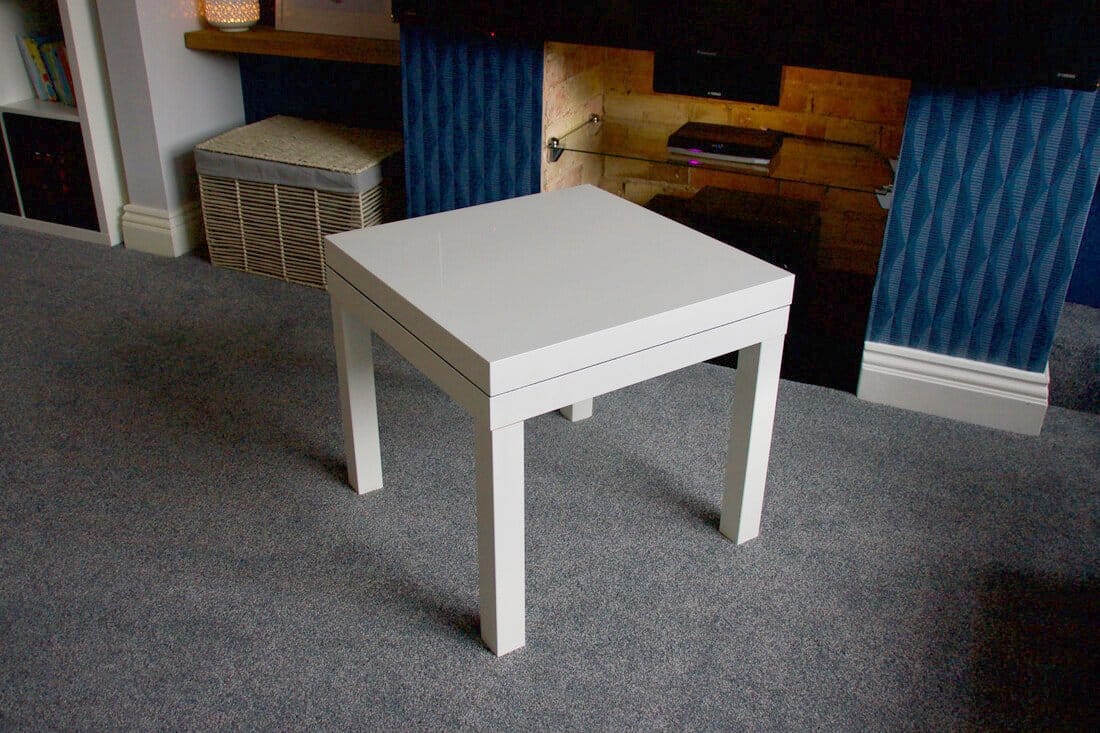
I became the owner of a Raspberry Pi late last year which was going to be used for casual retro gaming. I like my AV setup quite neat, so wanted somewhere I could keep the Pi whilst it wasn’t in use, and away from my toddler’s hands! I’d seen the LACK hacked for storage a few other times, but was inspired by an old hack I’d seen years ago whereby the LACK had a sliding top. Due to the space it was going in, I needed a hinged top to make the contents accessible.
In addition to the LACK tables, I also used:
Wooden batons x 8 (about £8 at my local timber merchant)
Gas dampers (50NM) x 2 (approx £4 on eBay)
Small door hinges x 2 (about £1.50 at my local timber merchant)
Optional:
Soft self-adhesive fabric (£5, eBay)
Shadowfoam (about £25)
White gloss spray paint (One can, local shop, £4)
I started by taking the wooden batons and drawing around them on the underside of both tables. These are to strengthen the table top as the innards were coming out. I measured an extra 10mm over on what was going to be the bottom table as I wanted a slight overhang once the batons were pushed in to place. Once marked up, I cut the square out very carefully with a sharp Stanley knife. It’s important to keep the edges straight as these will be on display when the table is open, but it is also important to keep the section whole as you’ll be needing this later on. Once cut out, remove all the honeycomb filling making sure that the surface is as flat as you can make it.
Image may be NSFW. Clik here to view.
Image may be NSFW. Clik here to view.Image may be NSFW. Clik here to view.
Image may be NSFW. Clik here to view.
Once removed, cut your batons to size. I squeezed some wood glue all around the innards of the table and pressed the batons in place (the wood I purchased was the exact fit for the gap — I did a trial on an old LACK a few days before so I didn’t mess this one up!). I did the same for the other table top, but as you can see from the picture, this one has the slight over-hang. Once pressed in place, I squeezed loads more wood glue into the centre and put in the piece of the table I’d cut out (this is to strengthen the table top). I left it over night with weight on it to ensure it glued properly. I did this to both parts.
Image may be NSFW. Clik here to view.
Image may be NSFW. Clik here to view.
Image may be NSFW. Clik here to view.
I then took my door hinges, measured them equally apart and again, used the Stanley Knife to cut them out. Because the frame inside the table top is very narrow, it’s important to make sure that the batons that you put in are pressed right against the inner frame as the hinges will screw into this.
Image may be NSFW. Clik here to view.
Image may be NSFW. Clik here to view.
I then attached the legs and one of the dampers ensuring the table top with the overhang is on the bottom. As you can see, there is a slight cutout for the damper to slot into when the top is closed. When happy, I added the second damper, and drilled/countersunk/screwed the batons in place, but on the base only as this is going to be covered.
Image may be NSFW. Clik here to view.
Image may be NSFW. Clik here to view.
I then took the self adhesive fabric and covered the surface of the bottom table, tucking it underneath to make it look neat. I then added the Shadowfoam, by tucking it under the overhang of the bottom table (this is why the cutout on the bottom table was slightly smaller). I then added my Raspberry Pi and accessories and cut them into the Shadowfoam. Once I was happy with how it looked, I removed the top and sanded/sprayed white to match the exterior. Once dry, I reattached and put in place.
Image may be NSFW. Clik here to view.
Image may be NSFW. Clik here to view.
Image may be NSFW. Clik here to view.
Image may be NSFW. Clik here to view.
Image may be NSFW. Clik here to view.
And there you have it, one storage table for my Raspberry Pi, hidden away from little fingers! If attempting yourself, it is important to make sure you reinforce the table top using the part you cut out as the table top isn’t as strong as it was (in one picture you can see I used some white hardboard that I had knocking around as I accidentally chucked my cut out away!).