Quantcast
Channel: Media Storage – IKEA Hackers
Viewing all 194 articles
Browse latest View live

KALLAX Hide-away TV & Cascading Room Divider

$
0
0

I recently got myself an open studio loft, so I finally had a chance to get creative. I wanted to share my massive IKEA KALLAX room divider, but more specifically, my hide-away TV that doubles as an art piece (with the added feature of allowing me to choose to watch TV in the living room or the bed room).

Ingredients:

  • KALLAX 5×5 (primary)
  • 2x KALLAX 2×4
  • KALLAX 2.5×4
  • KALLAX 4×4
  • BESTÅ 2×1
  • Various KALLAX accessories

Room Divider

The first goal of the project was to make a room divider to divide the living space from the bed area and utilize the height of the apartment. Overall the concept was easy and mostly just required me to go on several Craigslist runs to acquire my Tetris pieces. The core is a standard 5×5 KALLAX with other KALLAX pieces anchored to it. Having each piece anchored together along with the right-angles they form makes the structure safe and sturdy despite its height.

KALLAX Hide-away TV & Cascading Room Divider
View from living room

KALLAX Hide-away TV & Cascading Room Divider
View from bedroom

TV Insert

I knew I wanted my TV to be embedded in the KALLAX, but the 5×5 model that IKEA sells with a TV cut-out is centered, which would not work with the arrangement I wanted for the KALLAX components. I was able to find a good deal on a standard 5×5 and then it was as simple as selecting the one shelf to cut and removing the spare shelves from that region.

KALLAX Hide-away TV & Cascading Room Divider

KALLAX Hide-away TV & Cascading Room Divider

KALLAX Hide-away TV & Cascading Room Divider

KALLAX Hide-away TV & Cascading Room Divider

Hide-away TV (& Viewing in 2 rooms)

Now that I had the spot for my TV cut-out, I wanted a way to hide my TV so it wasn’t the center-point of the living space as you walked in. In addition, I was looking for an easy way to switch between playing video games on the couch and watching movies from the bed — so the only natural thing was to build in a swivel that would let me do both!

1. I acquired a standard low-profile lazy susan from Amazon and centered it on the shelf that the TV would rest on.

2. Then, I re-used the leftover shelf piece that was cut and I trimmed it further so that it could spin on the lazy susan without hitting the edges of the nook.

3. A 1-inch diameter hole was then drilled through the center of both shelves to pipe the various cords through the center of the rotation point to make things spin cleaner.

4. A cheap wall bracket was mounted to the TV, and I used an extra piece of thin plywood to act as a backing “wall” for the TV and art to go on the other side.

5. The final step was to adjust the mounting bracket and hang the art up on the back of the TV to make sure it all spins correctly and it was properly aligned. The addition of this bracket makes alignment and access to wires behind the TV a snap if needed.

See how it works in this video.

Lots of fun doing this project, plus it looks great and is functional for my living space — all I was hoping for. Hope you like the project and please let me know if you have any questions!

~ by Blake Reeves

The post KALLAX Hide-away TV & Cascading Room Divider appeared first on IKEA Hackers.


HEMNES console table restyled to TV unit

$
0
0

IKEA item used:
HEMNES console table

We have awkwardly placed plugs in the lounge in our new build house, they’re a little higher than normal and so are on show, which isn’t very pretty.

I decided the HEMNES console table would suit what we needed in terms of storage and height and with a little tweaking would have the right look for our home.

I bought the HEMNES console table in light brown (wood effect) and when putting together I purposefully left out 2 of the top shelves so I had space for the Sky box and Xbox. It was a little tricky to do this as you assemble upside down so you need 2 people.

HEMNES console table

I filled in the dowel holes with wood filler and sanded smooth. I painted the unit with Valspar paint (a £3 b&q sample pot!) the shade is Hazy Earth. I left the top of the unit plain to give it that farmhouse look. I then sealed the whole unit with a finishing wax.

HEMNES console table restyled to TV unit

I bought some mdf sheets, painted them in the same colour as I had painted the unit and then nailed to the back. This ensured that the many plug sockets and cables were completely hidden. We drilled a hole either side of the top shelving to enable the cables to come through to the back.

I used the KNIPSA boxes and have attached a black felt inside so the hole doesn’t show what mess there is inside them!

HEMNES console table restyled to TV unit

We carefully sawed the legs on the unit so only an inch was left, that way the extension cable (which you can see in one of the pictures after painting) wasn’t visible and it made it look less like a console table.

And that’s it, the unit has the storage space IKEA always gives us and has the height we needed whilst tying in with our “modern farmhouse” theme in our new home, without the high price tag we would have had to otherwise to pay!

HEMNES console table restyled to TV unit

~ by Lauren Blake

The post HEMNES console table restyled to TV unit appeared first on IKEA Hackers.

Custom Built-in Entertainment Center hacked from HEMNES units

$
0
0

We wanted a built-in entertainment center / wall unit in our basement that we were finishing. Custom cabinetry was considered but it was way out of our budget. Then, we came across examples of others using HEMNES cabinets as a starting point and loved the idea.

IKEA Item:

  • HEMNES bookcase (903.717.65) x 2
  • HEMNES bookcase (403.717.63) x 2
  • HEMNES TV unit (603.392.20)

Other Materials:

  • MDF
  • Moulding
  • Primer
  • Paint

Full disclosure – a tradesman (who did all the trim work in our whole basement) did all the work. If you are looking for someone to do it, the skill you would likely want is a custom kitchen cabinet installer – which is this guy’s trade. It took him only a few hours to do the wood work (he is awesome).

Making the HEMNES Built-in Entertainment Center

We bought 5 cabinet pieces and while the walls were still open we made sure the electrical and wood supports for the eventual TV mount were in the right place. This also allowed us to correctly position a fake wall on the right side. This gives the wall unit an edge to build into and also provides a separation to the two sides of the rather long room.

Test Fitting (to position electrical and support for TV mount, etc)

Using wood studs, MDF sheets and a lot of cutting of small trim pieces he built up the boxes on top and added trim wherever the cabinets didn’t meet correctly. All seams were caulked or drywall mudded to get rid of any lines between the cabinets and mouldings. A lot of sanding and then priming and it was done.

Custom Built-in Entertainment Center hacked from the HEMNES

Cabinets in place and building out boxes and mouldings

Custom Built-in Entertainment Center hacked from the HEMNES

Closer up

We used the same paint as the basement doors, trim and baseboard. It was sprayed on at the same time as everything else and all the shelves and doors were painted as well. Spraying is the only way to go for something like this – it just looks so perfect. I couldn’t imagine trying to match the paint and only paint selectively – I just can’t ever see it matching well enough. Also, I like the higher gloss and whiter white that we ended up with.

Custom Built-in Entertainment Center hacked from the HEMNES

Primed

We ended up buying ceramic handles off Amazon (similar, here). They came from India apparently and were about $40 total.

Custom Built-in Entertainment Center hacked from the HEMNES

Completed!

It ended up costing about 1/3 less than we were quoted for a custom built-in entertainment center. Your costs will vary greatly depending on if you do it yourself or hire. If you do it as part of a basement reno like us it doesn’t add a heck of a lot to your overall trimwork or paint costs in the end… of course, that depends on your contractor and we had an awesome one.

Custom Built-in Entertainment Center hacked from the HEMNES

I am extremely happy with it. It ended up exactly what we were hoping for and I honestly wouldn’t have done anything different.

~ by Cory

The post Custom Built-in Entertainment Center hacked from HEMNES units appeared first on IKEA Hackers.

A BESTÅ sideboard worthy of any record player!

$
0
0

After getting a record player for Christmas, it was clear it couldn’t be assigned to the floor of our living room forever. A solution, therefore, was to find a record player console – or similar – that would hold it along with the rest of my HiFi system and records. A quick scan of Google and Pinterest led me to a rather beautiful wooden sideboard which looks classically Scandinavian and has that vintage feel.

A bit of further research led me to the IKEA Hackers website and a post of the record player console by a contributor in September! See more of the record player stand here.

Record player console hacked from BESTÅ cabinets

Having seen how much a good quality sideboard would cost me, I determined that if I want something similar I would simply have to build it myself. (Just to make clear, I have very little experience with DIY apart from woodwork at school and a general sense of enjoyment for getting my hands dirty.)

Hacking a record player console from BESTÅ frames

IKEA items used:

  • 1 x IKEA BESTÅ frame bench: £25
  • 2 x IKEA BESTÅ shelf: £5 each

Other items Used: (£50 overall)

  • 2 x standard pallets: free
  • 4 x hairpin legs: £5 each from eBay
  • Wood glue
  • Hinges
  • Nails (40mm)
  • Sandpaper / sanding block
  • Colron Danish Oil & Beeswax (both Georgian Medium Oak)

Time:

  • About 10 hours

Cost:

  • £100-110

I purchased the BESTÅ cabinet and sourced wood from local businesses. Once BESTÅ was built, I measured and cut down the two pallets to fit. Four long pieces fitted perfectly for the top and four more for the bottom. Four smaller bits for each of the sides and finally a total of four further pieces on the top and bottom which boxed in the longer top / bottom pieces. But any configuration could work!

BESTÅ cabinets BESTÅ cabinets


Related: Easiest record player stand DIY ever. See it here.


Using 40mm nails and Gorilla Wood Glue, all the wood was attached to the cabinet. At this point I would recommend ensuring your wood is fully dried out so that it doesn’t warp after you’ve fixed it to the unit. I left some of the pallet nails in the wood as felt this added character – just used a metal file to minimise their sharpness.

Record player console hacked from BESTÅ cabinets

Once the glue had dried, I used a “Stanley Surform Shaver” to smooth most of the rough edges, imperfections before sanding. For this I used a cheap sanding block and then medium sand paper. Pallet wood is often pine, i.e. soft, so this actually didn’t take long to get a decent feel.

Record player console hacked from BESTÅ cabinets Record player console hacked from BESTÅ cabinets

With a smooth finish achieved I moved onto applying 3 layers of Danish Oil and then 2 layers of Beeswax.

I buffed the Beeswax after each application. The Beeswax gave the unit a lovely smooth feel and was, a pricey but crucial purchase.

Record player console hacked from BESTÅ cabinets Record player console hacked from BESTÅ cabinets


Related: DIY wooden turntable plinth. See the tutorial.


Record player console hacked from BESTÅ cabinets

With the unit finished, I fitted the shelf and will – in time – add the hairpin legs and door. But at the moment it actually looks immense on some dark bricks we had in the garden. The door will also look great once fitted although we’re in no rush. Drilled a hole in the BESTÅ backboard for wires.

Properly chuffed with this record player console. Once the speakers were placed on, and within it, the bass that is kicked out is fantastic! Finally the record player has something worthy to sit on!

Record player console hacked from BESTÅ cabinets

Couple of points:

– Be careful when oiling and sanding that you don’t damage the BESTÅ unit itself as it’s easily done.

– I would recommend cutting a hole in the back board BEFORE you build the unit. I realised too late, so had to drill through rather than neatly creating a space for wires etc.

– Lastly, take time with the sanding stage. Effort at this stage really brings out the wood’s grain and will pay you back once you’ve oiled it.

Took about 10 hours overall but worth it. Immensely satisfying and would totally recommend to anyone unsure of trying something like this!

~ by Alex Thomson


The post A BESTÅ sideboard worthy of any record player! appeared first on IKEA Hackers.

Rolling TV stand for 55″ flat panel TV

$
0
0

My girlfriend wanted a rolling TV stand for her new 55 inch flat panel TV and Bose speakers. At IKEA, we located an affordable table the perfect size but without wheels.

Materials:

  • IKEA 403.492.63 LACK Nesting Tables $29 each x 2
  • IKEA 002.886.57 KALLAX Rail with 2 casters $15 each x 2
  • 4-inch x 1/4 inch lag screws and washers x 4
IKEA LACK nest of 2 tables

LACK nest of 2 tables | IKEA.com

So we bought a second table to form a base and also bought some IKEA casters.

KALLAX rail with 2 casters

KALLAX rail with 2 casters | IKEA.com

Rolling TV stand for 55


Related: One TV in 2 rooms? Here’s how to hack a rotating TV panel and room divider.


We turned the table upside down, drilled new holes, and screwed the casters and base into the table legs.

Rolling TV stand for 55

The resulting rolling TV stand can be tucked away against the wall, or rolled around to face the sofa-bed, the couch, or the kitchen as desired.

Rolling TV stand for 55


Related: A TV bench with “doors” that won’t block your remote control signals. See more.


~ by Bill Atkinson


The post Rolling TV stand for 55″ flat panel TV appeared first on IKEA Hackers.

Wireless Charging Pad Hidden in IKEA bedside table

$
0
0

I had this idea to add wireless charging to my nightstand. This only cost me the price of the Nokia wireless charging pad as I had everything else, so less than £20/US$25. Total time taken approx 1.5-2 hrs.

Materials:

  • MALM Chest of Drawers
  • Nokia DT-900 wireless charging pad
  • PVA glue
  • Panel pins
    Optional:
  • Wire
  • Surface mount LED

Tools Required:

  • Router (or Circular saw with adjustable depth)
  • Drill with small bits
  • Chisel
  • Plastic pry tool
  • Sharp craft knife
  • Soldering Iron

How I hid a wireless charging pad in my bedside table

I carefully removed the top to my drawers and marked out on the underside where I wanted to place the charger. Take into consideration the overhang on the front and the depth of the side panel.

Wireless Charging Pad Hidden in IKEA bedside table

I don’t have a router so I used my circular saw set to a depth approximately 5mm less than the overall depth of the cabinet top. I ran the saw in lines approx 5mm apart then broke the strips of chipboard out. If you’re not sure what I mean … like this. I also ran the saw right to the back for the power cable to feed to the back of the drawers. Please be very careful if you choose this method.

Wireless Charging Pad Hidden in IKEA bedside table


Related: Vertical stand for NORDMÄRKE wireless charger.


I tidied up the recess using my chisel and knife. Then coated the inside in PVA glue to stop sawdust and particles falling into the drawer.

I picked the Nokia DT-900 wireless charging pad specifically for a few reasons. It’s QI compatible meaning it works across many manufacturers including Apple. It’s been around a while and still get good reviews. But the most important is the fact it has 3 induction loops in it, and three sensors (circled in Yellow) to communicate with the phone to instigate the charge. This means it doesn’t have to be placed exactly in the right place. There is a bit of wiggle room of approximately 70mm up and down.

Wireless Charging Pad Hidden in IKEA bedside table

Making the charging status light visible

Now I would deem the next steps as optional as it is a bit tricky unless you have the correct equipment and experience.

Open the charger using a plastic pry tool. This is quite tricky but once opened there is an LED (Circled in blue) on the DT-900 that gives the status of whether it is charging or not.

I decided to try and move this so I could see it on the surface of the cabinet. I removed the LED — I would say this was impossible without destroying it — and attached a new LED. For that, I used another surface mount type with a bit of two way ribbon cable.

LEDs are directional so it will need to be connected the correct way round. I’ve marked the polarity on the drawing. This is very fiddly as it is incredibly small. Please only attempt if you are handy with a soldering iron. Cut a hole in the top of the DT-900 case before you clip it back together to allow for the wires.

Wireless Charging Pad Hidden in IKEA bedside table


Related: Fitting a MORIK wireless charger into a BESTA unit


I then very very carefully drilled from the bottom side of the cabinet top with a small drill bit without breaking the top surface. Do not be too greedy with the hole size, the smaller the better 1mm-1.25mm max. Place tape on the drill bit as a depth gauge.

Remove the debris from the hole using the same drill bit but by hand and by flipping and banging the wood. You may need to make the opening of that hole slightly bigger to sit the LED in before securing it. As you can see I used electrical tape to hold the LED in place.

Wireless Charging Pad Hidden in IKEA bedside table

Notice the tiny light to indicate charging

I secured the wireless charging pad into place under the drawer top using panel pins/small nails very much like some pictures frames would hold the pictures in. I did consider glueing it in but wanted to reduce materials between the phone and the charger as much as I could.

Test it all and reassemble. Voilà!

A video of it in action.

I also did something similar in my car

~ by Dylan

The post Wireless Charging Pad Hidden in IKEA bedside table appeared first on IKEA Hackers.

Barn doors to close up an entertainment center

$
0
0

I don’t like my TV as a focal point in my living space. So, I decided to take 2 IKEA BRIMNES bookshelves and make barn doors for them in order to hide the TV. I googled many, many “How-To’s” and combined various ideas other people had. And here it is!!!

Barn doors to close up entertainment center

Closed

Barn doors to close up entertainment center

Open

Items for Barn Doors:

  • 2 hollow core doors
  • 4 V-pulleys
  • 1″ nylon spacers (I used 5)
  • Lag screws to attach header to bookshelves
  • Hex head screws #14
  • Flat Aluminum Bar 1″ x 1/8″ x 96″
  • Hex bolts
  • Washers to fit screws
  • 2 x 6 x 8 boards (2 pieces) for the top of the bookcase to make a header (you could use 2 x 12 x 8 but I liked the other look)
  • Rustoleum black paint
  • Cedar boards
  • Liquid nails

Because I was doing a project like this for the first time I learned the hard way with many trips to Home Depot, Lowes, and Ace Hardware.

Ace Hardware is my favorite because they can cut the Aluminum bar for you AND drill the holes for the hardware.

Steps to hack barn doors for your entertainment center

Attach the bookcases to the wall studs to secure. Then I used two 2″ x 6″ x 8″ boards over the top of the bookcase. I liked how it looked versus the 12″ board. Secure the boards with screws.

Then I went to a local steel company and bought an aluminum bar. It came 20ft in length. I had them cut it into 2 sections — one 8ft and another at 4ft.

Painted the bar, spacers, screws, washers, and bolts blacks. Drilled 5 holes in the bar to attach to the header. I used spacers and washers.

Barn doors to close up an entertainment center

Bought 2 hollow core doors and painted them black. Added cedar boards to give it a barn door look, glued on with Liquid Nails. Measured how long I wanted the door and that was about 1/2 inch off the floor.

Barn doors to close up an entertainment center


Related: Make farmhouse barn doors for an IKEA cabinet. See how.


Now for the hardware. That was my challenge. After wasting my saw blades, drill bits, cutting crooked lines trying to cut aluminum strips, I found out Ace Hardware sells the aluminum in 3ft lengths. And they will cut the bars and drill holes with a drill press for you. I needed 4 strips so I bought 2 of the 3’ strips. They were the best help ever. I even brought them cookies at the end of my project.

Figure out where you want your hardware to hang and mount it. I used this diagram to help me figure it out.

Barn doors to close up an entertainment centerth=


Lessons learned: Having the appropriate cutting and drilling tools for metal is the key. I did not and had many mistakes. But it was a fun project and I learned a lot.

Now I’m making a barn door between my kitchen and laundry room.

~ by Janet

The post Barn doors to close up an entertainment center appeared first on IKEA Hackers.

One charging station to rule them all

$
0
0

Even though our household is just two-person-and-one-cat big, our kitchen desk was often messed up with USB-cables and chargers for our phones, tablets and camera batteries. So I decided to do my first IKEA hack — a KVISSLE + OSTBIT charging station — to make a bit less messy.

This is the end result:

One charging station to rule all them all

IKEA items used:
  • KVISSLE – Cable management box

One charging station to rule all them all

  • OSTBIT – Plate holder, bamboo

One charging station to rule all them all

  • FIXA – 114-piece cable management set
Optional:
  • ISBERGET – Tablet stand
  • GRUNDTAL – Container, stainless steel
Non-IKEA Material:
Alternative options from IKEA:
  • KOPPLA – 5 outlet power strip & 2 USB ports
  • KOPPLA – 3-port USB charger
Tools:
  • Mini saw
  • Carpet knife
  • Screwdriver
  • Glue
Steps to construction charging station:

Since the OSTBIT Plate holder was a bit wider than the lid for KVISSLE, and it was possible to dissemble OSTBIT, I used a small saw to make OSTBIT about 18 mm narrower.

One charging station to rule all them all


Related: Hack a wireless charging station into a BESTÅ unit. See how.


I used small pieces of velcro tape to attach OSTBIT to the lid for KVISSLE, leaving then a possibility to remove it if needed.

One charging station to rule all them all

My first attempt looked like this, with just an the USB-charger attached to the side wall of KVISSLE velcro tape, plugged into an extension cord. The USB-cables were then pulled through the hole in the lid. After a day I realized this was not the optimal solution, as it wasn’t very easy to unplug the USB-cables.

One charging station to rule all them all

So, I bought a surface mounted socket outlet and a switch with a led indicator, and used a power cord and a plug I had lying around, to do the needed connections. I mounted the outlet and switch with a double-sided tape.

One charging station to rule all them all

One charging station to rule all them all

I used Velcro tape to attach two camera battery chargers to the outside.

One charging station to rule all them all

…and the USB-charger to the inside.

One charging station to rule all them all


Related: Charge while you sleep with a hidden bedside wireless charging pad


I glued some cardboard to the underside of the KVISSLE cork lid, to make it stiffer.

One charging station to rule all them all

Then I used a carpet knife to cut the cork lid, so that the USB-charger can be used without opening the lid.

One charging station to rule all them all

I used some cable ties and cable clips to attach some cables to the back of the box.

One charging station to rule all them all

And this is the final result of my charging station:

One charging station to rule all them all

But then I also used 3 GRUNDTAL, Containers with a magnetic back, to use as easily accessible storage for USB-cables or in-ear headphones.

One charging station to rule all them all

~ by Stefan Sahlander

The post One charging station to rule them all appeared first on IKEA Hackers.


How to hack speaker fabric doors for BESTÅ TV unit

$
0
0

I wanted an easy to make a solution that would conceal my hardware; surround receiver, DVD player, front center speaker consoles and paraphernalia. In case I would come to own a front-firing sub (my current one is down-firing), I opted for a BESTÅ TV unit with 3 sections, so I would be able to conceal the sub also and still have space for the mentioned hardware. Instead of installing active cooling behind glass panels and having the problem of having a visible front center surround speaker (and sub), I wanted a TV unit with speaker fabric doors.

Speaker fabric is a good choice as it lets sound pass without (too much) muffling. It also allows IR signals to pass through from the outside, allowing remote controls to function on the devices inside the TV unit.

IKEA items used:
  • BESTÅ TV unit
  • 3 SINDVIK doors with glass panels
Other materials and tools:
  • Speaker fabric (white)
  • Wood fillets with the approximate thickness of the glass of the SINDVIK doors

Hack instructions for speaker fabric doors:

1. Assemble the media table following the instructions. Buy any number of shelves that suits your needs.

2. Break the glass of each door. Note that the glass is very strong. I used one of those hammers you can keep in your car for breaking windows in an emergency, to break the glass. I recommend breaking the glass in the cardboard wrapping that the doors come in, to contain most of the shards. Caution: Wear gloves and safety glasses.

BESTÅ TV unit with speaker fabric doors BESTÅ TV unit with speaker fabric doors


Related: Unnu-inspired media bench


3. Remove all glass from the doors. Take care not to scratch the doors, when you remove the glass that is still attached with glue.

BESTÅ TV unit with speaker fabric doors BESTÅ TV unit with speaker fabric doors

4. Cut the wood fillets to size, so they will fit (length and height) in the grooves that held the glass in the doors.

BESTÅ TV unit with speaker fabric doors

5. Place the door with the front facing down on a clean and/or soft surface, so it won’t be scratched.

6. Measure and cut the speaker fabric to the size of the hole left by the glass, plus a little extra for fastening (5cm or 2,5″).

7. Fasten the speaker fabric by folding the edge evenly around a wood fillet, and squeeze the fillet with the fabric into the bottom “glass”-groove of the first door. Repeat for the sides and top, making sure that the fabric is evenly stretched.

BESTÅ TV unit with speaker fabric doors BESTÅ TV unit with speaker fabric doors


Related: BESTÅ speaker box enclosure


BESTÅ TV unit with speaker fabric doors

8. Repeat the process for all doors.

9. Mount the doors. I can recommend installing the hardware in the furniture before mounting the doors, to avoid damaging them.

Cost:

The price was the “IKEA stock price” of the TV unit, shelves and doors, plus a negligible amount for the wood fillets and speaker fabric. I had the fabric left over from another project, but I guess it would be 5-20 dollars depending on your local prices and availability.

What was hardest:

This hack is very simple, allowing novices like me to end up with a pretty and usable result. Except the breaking of the glass, no irreversible changes have been made to the furniture (and you can replace the doors).

The hardest part of the hack was finding the right wood fillets that allow for just enough tension that the fabric will not come loose over time, while still making it possible to insert and extract by hand.

Pay attention to these particular elements:
  • Getting proper speaker fabric.
  • Getting the right thickness (and length) on the wood fillets.
  • Not scratching the doors when removing the glass.
Other considerations:

I considered wrapping the speaker fabric around a metal grille before inserting it into the doors, to make it sturdier to children and a dog’s wagging tail. However, with a metal grille, I would have to disassemble the doors themselves and to me, that added too much complexity. On the bright side of that solution, you might be able to extract the glass without breaking it.

~ by Chris

The post How to hack speaker fabric doors for BESTÅ TV unit appeared first on IKEA Hackers.

DIY Server Cabinet using IKEA parts

$
0
0

My hack is a DIY server cabinet using IKEA STUVA and BESTÅ frames. Obviously, the first thing I needed to do was to get an equipment rack but the more important consideration here is the WAF.

IKEA items used:
  • IKEA STUVA frame (60x50x128 cm)
  • IKEA BESTÅ frame (60x20x64 cm)
  • IKEA GLASSVIK doors
  • Soft close hinges for GLASSVIK doors
DIY IKEA Server Cabinet
Other materials:

I took a trip to IKEA and found out that the IKEA STUVA range is actually quite perfect for what I need. I bought the larger cabinet for AUD $70 at that time. This comes in white. Matches the wall colour. Wife is happy.

I also chanced upon 2 of the IKEA GLASSVIK doors with smoke glass at the “As-Is” corner, selling for AUD $28 each. The GLASSVIK doors are intended to fit the BESTÅ frames but these will also perfectly fit the STUVA.


Related: Forget metal. Here’s a wooden server closet


Then I needed the hinges as the doors do not come with one. These cost me $10 for a 2-pack. So total cost for 2 doors is $20.

The IKEA STUVA with dimension 600mm (W) x 500mm (D) x 1280mm (H) is just nice for me to insert the Samson universal rack into the cabinet. But alas it is not quite deep enough. With doors fitted to the STUVA, I can just close the door but it is just too tight for comfort. I would like another 150mm spare space at the back of the cabinet for cablings and the like.

To add depth, I bought 2 of the BESTÅ frame 600mm (W) x 200mm (D) x 640mm (H). I figured if I could stack these 2 frames one on top another, I will get 1280mm (H) which is exactly what the STUVA frame is. So I reckon I could Frankenstein the 3 pieces together to fit the rack better. So rightly or wrongly that is what I thought at the time.

DIY IKEA server cabinet instructions

First thing I did was to cut a piece of laminated pine board to size. The plan was to fasten the STUVA frame and the BESTÅ frames on the same level footing.

Next, I fastened the BESTÅ frame base and STUVA frame base onto the pine wood board and assembled the rest of the wall pieces to the bases.

DIY IKEA Server Cabinet

I also reinforced the internal side walls using some flat metal brackets.

DIY IKEA Server Cabinet

The back panel particleboard did not fully cover the bottom part of the rack. That turned out fine because that is where my cables enter into the rack.

I drill a 20mm hole at the top left for the cabling connection to my router which I wanted to place outside of the rack.

DIY IKEA Server Cabinet

Then, I installed the GLASSVIK doors.

The last thing was to insert the universal rack stand into the server cabinet.

DIY IKEA Server Cabinet

See complete tutorial of the DIY server cabinet here.

~ by Joseph Lo

The post DIY Server Cabinet using IKEA parts appeared first on IKEA Hackers.

Stripped down these IKEA items and the results are fab

$
0
0

I started with two HEMNES pieces — a bedroom end table and the wooden TV stand in black. I picked the TV Console for the size and storage. It also fit my wall proportions perfectly and the drawers give me ample room to keep DVDs, games, controllers as well as extra cables and other sundry items.

IKEA HEMNES in black

I call it the “Rustic Hemnes” hack. It isn’t world changing or revolutionary but I did it because I wanted my wooden TV stand and end table to have a different feel to it than others with the same series from IKEA.

The bedroom end table I picked because all the other end tables I looked at were just way too short for my purposes. I wanted a good height that I could keep next to my sofa and be usable. A nice cup of tea and a place to put my tablet or Chromebook. Since I had also always kept my phone on my old end table with an older IKEA Nordemarke wireless charger I decided that I would add one into the end table to make it a bit more sleek and aesthetically pleasing.

Starting with the end table I took the IKEA hole saw set FIXA and drilled out the spot for the RALLEN charger. Do this before any other sanding so that when you take off the finish you will have a nice smooth edge.

HEMNES end table

Next, I sanded down through the finish on both the tops and the drawer faces making sure to leave the edges untouched. This leaves a nice finished edge to the project. Once the factory finish is gone I resanded the tops down again with a high grit paper to give it a nice super smooth surface. To make this easy I used a belt sander starting with a 60 grit then a 100 grit belt for the final sanding. Follow each step with a wipe down to get rid of any loose dust or grit.

HEMNES end table

I picked a Minwax stain color called Ipswitch to put some light coloring into it. This is because the next upgrade to my place will be the installation of hardwood floors, most likely an Ash color so I think the coloring will go well with it and if not then it’s just a re-sand and restain!

HEMNES end table

Apply stain with a foam brush in light coats letting dry between coats till you get the color you want. Remember you can add more color but you can’t take it off.

Two coats of Minwax Semi-gloss Polyurethane later letting each coat FULLY dry. Between coats, sand with some 220 grit sandpaper using a palm sander to smooth out the finish and get rid of any air bubbles and high spots. Again, follow each step with a wipe down to get rid of any loose dust or grit.

HEMNES end tableHEMNES end table

The finished product is something I am very happy with. Very happy indeed. Rustic HEMNES looks great visually but I am not done with the project yet!

wooden TV stand IKEA HEMNES

Now comes the issue of the rat’s nest of cables I had behind the TV stand. TV, cable, Nintendo, Google Chrome cast, Kindle Fire Stick, HDMI switch, router — that makes for a lot of cables to wrangle!

wooden TV stand IKEA HEMNES

I can’t stand clutter and things being out of place (no matter what my Mother says) so I came up with a very simple way to power everything with just a single cable leading from the unit to the outlet in the corner.

I went to my local computer store (you can get the same at a Home Depot or other hardware store) and picked up a 4’ long 12 outlet power strip. This I mounted to the back frame of the HEMNES frame just below the openings.

Once mounted I was able to simply use cable ties to shorten and run all the power cables to the plethora of outlets now available. After that, I took the time to cable tie all the other video and sound cables to make it a much neater area. Best of all when you look at the unit instead of several cables running to the outlet I have just the single one.

wooden TV stand IKEA HEMNES

wooden TV stand IKEA HEMNES

wooden TV stand IKEA HEMNES

So far the response from my friends that have come over has been great! One of them just put the same unit into his new house’s living room. He loves the idea but is upset since I did it he feels that he can’t now. Even my folks like the results. Mom said she couldn’t envision what I had in mind when I was telling her about the project but she says she really likes the results.

wooden TV stand IKEA HEMNES

Also, I guess IKEA is also liking the results as they have JUST released a white stained bottom with a natural wood top in the HEMNES line!

wooden TV stand IKEA HEMNES

After doing all this work I would change one big thing. I would do my sanding outside!! Due to weather, I was forced to sand the wooden TV stand inside and I am STILL (weeks later) cleaning dust up!

Basic steps to follow

I did my sanding BEFORE I built the end table but the TV console was already built when I sanded the top.

I recommend using a belt sander with 60 grit paper to take off the original finish followed by 100 grit to smooth it out.

IMPORTANT TIP!

Make sure you keep everything clean!! Any dust can cause issues in the stain and especially in the finish stage!!

Apply stain with a foam brush in light coats letting dry between coats till you get the color you want. Remember you can add more color but you can’t take it off.

Apply polyurethane with a foam brush as well to help minimize air bubbles. Let it FULLY DRY then sand with a high grit like 220 wipe clean and then proceed to the next coat. I did two coats.

Overall the project should take 3 days. Sanding only takes about an hour but waiting for the stain and polyurethane to dry can not be rushed.

IKEA Item/Parts list:
  • RÄLLEN Integrated wireless charger, black $12.99 Article Number: 403.602.17
  • FIXA 5-piece hole saw set $4.99 Article Number: 203.023.32
  • HEMNES Nightstand, black-brown $69.00 Article Number: 901.212.34
  • HEMNES wooden TV stand, black-brown $199.00 Article Number: 303.345.06
  • Inland 4’ long 12 outlet power strip $20 Home Depot
  • Sandpaper assorted grits $8.00
  • Assorted foam brushed $5.00
  • Minwax Stain $5.00
  • Minwax Semi Gloss Polyurethane $12.00

Already own the belt and sheet sander so not an extra cost!

~ by Finn

The post Stripped down these IKEA items and the results are fab appeared first on IKEA Hackers.

But Wifey Boss, I NEED a gaming table

$
0
0

I love DnD, card games, and quick board games. However, with a 2-year-old, space is at a premium. Selling this “set-up” as a storage place and part-time gaming table is a good win with the Partner.

The hack took a day, give or take a few hours. It costs around $300. The 2 KALLAX units were the biggest expense, so get those on sale, if you can.

What I like most about this gaming table is it’s got some good space. It’s tall, so the bar stool height encourages people to move and be active. Storage is KEY.

IKEA items:
  • IKEA KALLAX 2×4 (two of them)
Other materials and tools:
  • 4 large, wide casters/ wheels
  • Base wood board (I used a heavier wood composite since most of the stress will be on this area. Can be whatever, as it’s mostly unseen. See below for sizing)
  • Long table top (I used an IKEA table top, would suggest against this. Too flimsy to cut. Local Lowes or Home Depot will have a better selection)
  • 10 toggle latch clamps
  • 12 (ish) Screws (3-4 inches)
Tools:
  • Drill
  • Screwdriver
  • Saw

How to hack a gaming table:

Build the 2 Kallax, put aside.

Cut the base board to the size of the width of the Kallax times 2, plus double the thickness of your top table. Base board should be flush with the Kallax when assembled.

Match the corners of the Kallax to the corners of the base board. Drill and screw down. Attach the base board to the top of the Kallax for ease of build.

gaming table IKEA hack


Related: Make an arcade coffee table


gaming table IKEA hack

Screw on casters to the “bottom” of the base board (which will be the top while upside down right now)

GET A BUDDY: Flip the build over onto the casters. Be sure they are LOCKED to avoid rolling. The Kallax is super light, but the base board should NOT be, thus the buddy system.

Cut the table top to the width of the Kallax, and the desired length. I matched the length of my table top to the depth of the Kallax + width of the table top. This means that, when stored, it will slide down even with the Kallax.

gaming table IKEA hack

gaming table IKEA hack

If you are looking for longer table top, just know the table top will not lay flush in “storage mode”, but there could be cool applications for a sticking up section.

Test your build so far by sliding your table top into the open space between the Kallaxs (Kallaxi?). They should be secure, but not scraping. A little wiggle is ok.

Place your table tops as desired (likely connected, but I’m not the boss of you) and mark centerlines for toggle clamps. Two on each Kallax, each side (so 4 total on each side) and one across each side of the table divide. (This holds the table top to the Kallax and then to each other)

Screw on the toggle latch clamps. The hooks should be on the table tops’ sides, the clamp parts on the side of the Kallax. These NEED to be tight when secured. The table to table clamps can be any combination you want. Getting the clamps lined up and screwed on straight while avoiding the screws already involved in the Kallax system is tricky.

And there you have it! A gaming table that has storage for kids toys (on the front) and your gaming books and boxes (in the back, facing the wall).

gaming table IKEA hack

Looking back, I would have loved to add a large TV in the middle of the table top (for DnD maps), but the framing would have added width to the table and not have been as compact (which I needed). I wish I knew enough of building to maybe have a way to allow more of an edge on all 4 sides, not just 2. The clamps made this impossible, but I am still looking for future builds.

Also: would have loved to use swing arms to slide the table tops out from their storage space instead of having to lift them up and lock in place. But I’m not a smart man and this task was too technical for me (is that even possible?)

gaming table IKEA hack

This hack has a lot of expanded potential. This is a great jumping off point, and I’d love to see if anyone can use it to make a more simplified/ extra version. Cause I’d love to make another one with a bit extra.

Besides this gaming table, I also made this feeding and water stand for my rather large dog.

~ by Nick Thomas from Bel Air, Md

The post But Wifey Boss, I NEED a gaming table appeared first on IKEA Hackers.

TV Stand gets new look aka get rid of scratches on the bench top

$
0
0

LIATORP series is nice, but it has a problem with the finishing – the surface scratches easily etc, especially for the pieces, like the TV stand, with tabletops.

TV Stand gets new look aka get rid of scratches on the bench top


Related: Affordable contemporary wooden top TV bench


So one day I decided to repair the original tabletop of my TV stand. I sanded off all original paint, repainted it. But the quality of the repainting made it even worse than it was before. It was then that I got the idea to completely change it.

TV Stand gets new look aka get rid of scratches on the bench top

IKEA items used:
  • LIATORP TV stand
IKEA LIATORP TV stand

LIATORP | IKEA.com

Other materials and tools:

How I gave a new look to the old LIATORP TV stand

I purchased solid oak edge glued panel. (It was slightly thinner than the original LIATORP tabletop – 20 mm against 23-24 mm). Then I cut it in the same dimensions as the original, made a nice edge with a wood router, sanded it with 150 grit.

Then I stained it with Danish oil + Mixol Universal Tint #23. The first photo was taken with artificial light, so it’s not true to color. You can see the actual color in the next photo.

TV Stand gets new look aka get rid of scratches on the bench top

TV Stand gets new look aka get rid of scratches on the bench top


Related: Made to measure oak and BESTÅ TV stand. See the tutorial.


After that, I drill all the holes for screws on the underside as per the original tabletop, and secured the new top to the bench.

TV Stand gets new look aka get rid of scratches on the bench top

Next, I’ve wanted to change the drawer fronts as well. So, I disassembled the boxes, measured the fronts, and made new ones from the same solid oak as the table top, and finished them with the same oil.

I’ve also changed the handles to metal ones, and here is what I have now:

TV Stand gets new look aka get rid of scratches on the bench top

~ by Alexandr

The post TV Stand gets new look aka get rid of scratches on the bench top appeared first on IKEA Hackers.

Behind the couch storage and charge station

$
0
0

This behind the couch storage and charge station was made from leftover IKEA parts after we moved to another place. The core components are obviously IKEA, what I did add on top were some wheels and some plain white boards which serve as covers eventually.

IKEA items used:

IKEA items for behind the couch storage and charge station

Other materials and tools:
  • Wheels
  • Wooden boards for cover
  • Socket strip
  • Cable passage

How to make a behind the couch storage and charge station

1. Cut 3 equally long cover boards and 1 for the front panel.
2. Use a jigsaw to make a proper slot in order to place the cable passage.
3. Attach the wheels to the bottom side of the BESTÅs.
4. Bolt all components together.

Behind the couch storage and charge station Behind the couch storage and charge station Behind the couch storage and charge station

5. Assemble the 3 top covers by using IKEA door hinges and push openers

Behind the couch storage and charge station

6. Add the handle to the front panel
7. Plug in the socket strip

Behind the couch storage and charge station

8. Enjoy

~ by BigBonsai


You may also like these charging stations

#1 Feed all your devices at one charging station
charging station

Even though Stefan’s household is just two-person-and-one-cat big, their kitchen desk was often messed up with USB-cables and chargers for phones, tablets and camera batteries. So he decided to do his first IKEA hack — a KVISSLE + OSTBIT charging station — to make a bit less messy. See the tutorial.

#2 Hide a wireless charging pad in your nightstand (or any other table)

hidden wireless phone charger

Dylan had this idea to add wireless charging to his nightstand. This only cost him the price of the Nokia wireless charging pad and took approximately 1.5-2 hrs to complete. Get the details.

#3 Equip the LACK side table as a charging station

Lack coffee table with built in charger

Tanja’s extended family has grown quite a bit over the years to include Cousin iPad, Auntie iPhone, Grannie Kindle, and that crazy Uncle Android. It’s a full house, and they’re hanging out on the kitchen counter, in the home office, and especially in the living room. Wall plugs are always at their limit, jammed up with our smart “relatives”. We want more space for ourselves yet don’t want to be without our beloved family of devices. See how it’s done.


The post Behind the couch storage and charge station appeared first on IKEA Hackers.

Shiplap Entertainment Center from IKEA kitchen cabinets

$
0
0

Here’s a little hack I made from IKEA GRIMSLÖV kitchen cabinets, turning them into a shiplap entertainment center.

We initially wanted our favorite carpenter friend to build a custom wall unit for us, but he was too busy at the time. We looked for prefab wall units at IKEA, Amazon, Wayfair, etc., but couldn’t find just what we wanted. My wife wanted the speakers hidden, and we both wanted a built-in look, so I know I would have to do some hacking.

Having built two IKEA kitchens in the past, I thought maybe I could use IKEA kitchen cabinets and modify them. I bought the 15-inch deep variety, as opposed to the usual 24-inch deep cabinets typically used in a kitchen. (Caution, some A/V receivers won’t fit in a 15-inch deep cabinet, so be sure to measure your components.) I think using the 15-inch deep cabinets makes it look more like an entertainment wall unit; nobody suspects it’s actually modified kitchen cabinets.

We found some custom wall units online that used shiplap, which we liked. We thought that adding shiplap would give it a more custom look. Initially, I planned to use smooth, white shiplap for a more formal look, but then I came across the gray “barn wood” shiplap with the somewhat “distressed” look. I thought that would be perfect since it was going in a lake house. Definitely glad I went with the gray; gives it a nice contrast and custom look.

IKEA items used:
Materials:
  • 1 in. x 6 in. x 8 ft. Barn Wood Grey Pine Shiplap Board from Home Depot
  • Behr Ivory Palace paint from Home Depot
  • Off-White speaker grill fabric from Amazon
Tools:
  • Finish nailer
  • Stapler
  • Impact driver
  • Drill

How to hack a shiplap entertainment center

Build IKEA cabinets per IKEA instructions. Add trim to sides and tops to give it that built-in look. For the sides, I just bought some primed 1x4s and cut them to fit. Attached them with L-brackets. For the tops, I just cut some of the same 1x4s and nailed them in place with a finish nailer, then caulked. I painted those pieces with Behr Ivory Palace paint which perfectly matches the off-white of the IKEA GRIMSLÖV cabinets.

Shiplap Entertainment Center from IKEA kitchen cabinets Shiplap Entertainment Center from IKEA kitchen cabinets

Installing shiplap was simple. Just cut to width and nail in place with finish nailer. Cutting the doors for the speaker openings was simple, too. I used a circular saw and just did a plunge cut until I got near the corners.

Shiplap Entertainment Center from IKEA kitchen cabinets

There I finished the cut with a sabre saw/jigsaw. For a smoother cut, use a circular saw blade with a high tooth count. You’ll need this to cut the countertop, too.Shiplap Entertainment Center from IKEA kitchen cabinets

To make things perfect, you should probably sand after you cut. I didn’t, but after painting where I cut with the Behr Ivory Palace paint, it blended it nearly perfectly. Shiplap Entertainment Center from IKEA kitchen cabinets

I initially bought pure white speaker fabric from Amazon.com. But as you can see from the photos, it didn’t match well with the off-white of the IKEA GRIMSLÖV cabinets. They ended up looking gray instead. So, then I bought some off-white speaker fabric from Amazon, and they match pretty well. After putting the speakers in the cabinet, it made the fabric darken somewhat.

Shiplap Entertainment Center from IKEA kitchen cabinets

Doubling-up on the off-white fabric did the trick visually and didn’t impact the sound quality. Shiplap Entertainment Center from IKEA kitchen cabinets

How long and how much did the shiplap entertainment center cost?

About $1500 for the IKEA stuff, $100 for the shiplap and $15 for the speaker fabric.

What do you like most about the hack?

The shiplap, the hidden speakers, and the built-in look. I was worried about the sound quality with the speakers in the cabinet, but the sound is great!

What was the hardest part about this shiplap entertainment center?

Keeping everything plumb and level. When you put in the trim pieces between the unit and the wall/ceiling, you find out that your wall and ceiling are not perfectly plumb and level!

What to pay special attention to?

Be careful when cutting the doors for the speaker openings. I kind of messed up on one, but found that the paint hid the blunder pretty well. If you screw it up too badly you can always buy another door.

Looking back, would you have done it differently?

Initially, I cut out a space in the shiplap for the TV mount, but later realized that made it too recessed to hang the TV. So, I had to reinstall the TV mount on top of the shiplap. Also, don’t just cut several shiplap boards the same length. You may find out that your tall cabinets are not perfectly plumb. Measure each board as you go. Ideally, you want to measure the height of the boards so you don’t have a really small one on top or bottom. I screwed up my measurements (not accounting for the gap in the shiplap), so it didn’t turn out perfect. But I can live with it!

Shiplap Entertainment Center from IKEA kitchen cabinets

Very happy with it, and we’ve received lots of compliments on it. My carpenter buddy asked me if I wanted a job! 😉 Of course, he can build stuff from scratch, whereas I can only hack IKEA stuff!

~ by Mike M.

The post Shiplap Entertainment Center from IKEA kitchen cabinets appeared first on IKEA Hackers.


Video Games Table for less than 100 euros

$
0
0

I love to play ’80’s arcade games, so I wanted a video games table — something cool and compact for my living room to play in my spare time using my TV. So I got the idea to create something to be used both as a table and video game console too. I spent less than 100 euros to build it, the hardest part was to build and connect everything without damage to the table or making it weaker.

IKEA items used:
Other materials and tools:

Video games table hack instructions

Create 3 holes on the bottom of the LACK side table — 2 for the controllers, 1 for the computer.

Drill matching holes on the surface for joystick and buttons.

Video Games Table for less than 100 euros


Related: Bamboo arcade game controller set


Drill also a hole on the side for power supply, HDMI connection for the TV and an extra USB connection (eg. for wifi keyboard)

Video Games Table for less than 100 euros

My first thought was to embed the monitor into the table, but then I thought it would not be comfortable to play with it. We have a big flat TV at home, so I thought It would have been better to use the flat screen TV. Besides, the video games table would be less expensive.

Video Games Table for less than 100 euros Video Games Table for less than 100 euros


Related: Arcade Video Games booth in a Micke desk


Video Games Table for less than 100 euros

See more photos of my video games table here.

~ by Luca Enei

The post Video Games Table for less than 100 euros appeared first on IKEA Hackers.

IKEA TV stand + the LACK range extension that IKEA didn’t produce

$
0
0

I have a LACK TV unit, but I have also a lot of devices that cannot fit into it. And IKEA does not provide other LACK products that can suit with the TV unit (as the BESTÅ can.) This is my version of the IKEA TV stand and LACK range extension.

IKEA items used:
IKEA Lack TV stand

IKEA LACK TV stand | Photo: IKEA.com

Other materials and tools:
Instructions for IKEA TV stand and LACK extension

Assemble the LACK side tables.

Cut as many wood boards as you need to fit your electronic devices. These wood boards will become the lower tier shelves on the LACK side table.

IKEA TV stand + the LACK range extension that IKEA didn't produce

Set a suitable height to fit the height of your device and fix the shelf support brackets into the leg of the LACK side table. Place the cut wood boards on top of the shelf support brackets.

IKEA TV stand + the LACK range extension that IKEA didn't produce

To finish the top, I used self-adhesive floor planks with a wood grain.

IKEA TV stand + the LACK range extension that IKEA didn't produce

The LACK side table can fit 2 or 3 additional shelves, which is the perfect height for my devices.

Cost:

The cost is the best part of this IKEA TV stand hack! 5 euro for each LACK side table, 1 or 2 euro for each wood board!

IKEA TV stand + the LACK range extension that IKEA didn't produce

Now my IKEA TV stand and media storage look seamless with this simple and easy range extension.

~ by Alex


You may also like these IKEA TV Stand hacks

TV stand twice the lengthLove the LACK TV unit but it falls a little short? Here’s how to double its length and make yourself a sleek TV console. See the hack.

ikea lack tv stand vintage styleLove the LACK TV unit but not the style? How about turning it a little more vintage? Here’s how to give a totally different spin to your LACK TV stand.

IKEA LACK TV unit with wood

Love the LACK TV unit but find it a tad sterile? Warm it up with wood and some new legs. You’ll never guess what they were originally. Take a look at the tutorial.


The post IKEA TV stand + the LACK range extension that IKEA didn’t produce appeared first on IKEA Hackers.

There was a METOD to my madness

$
0
0

When I moved to Singapore around 5 years ago I created my first IKEA hack by combining two LACK TV Benches and the sides from a LACK TV Side Table to create a larger tv unit. Having recently moved into a new apartment it was time for a new TV cabinet.

I looked at several TV cabinet options in Singapore but could not find anything that was just what I was looking for in terms of size, design, and price. Therefore, I decided to create another IKEA hack.

Initially, I was planning to combine four fridge top cabinets similar to the hack posted by Med Venlig Hilsen. However, after further research of the IKEA catalogue, I decided to use a single high kitchen cabinet placed on its side rather than joining four fridge top cabinets together. Here’s how I hacked a TV cabinet out of a METOD high cabinet.

IKEA items used:
  • IKEA METOD High cabinet 200cm
  • IKEA KUNGSBACKA Door 140x40cm
  • IKEA KUNGSBACKA Door 60x40cm
  • IKEA UTRUSTA Shelf 40x60cm (Pair) x3
  • IKEA UTRUSTA Ventilated Shelf 60x60cm
  • IKEA UTRUSTA large hinge for horizontal door in black (Pair) x2
  • IKEA UTBY stainless steel legs (Pair) x4
  • IKEA BLANKETT Handles 595mm (Pair)
Other materials and tools:

Hack instructions for METOD high cabinet to TV cabinet:

Before starting the project I put together a quick 3D sketch to help me visualize the finished TV cabinet.

TV cabinet from IKEA METOD kitchen cabinet

Base Preparation:

Once assembled this TV cabinet was going to be a sizable and heavy piece of furniture. Therefore, I tried to build it as close to the final location in my living room as possible so as to minimize the number of times that I would need to turn it or move it.

As a result, I started building the TV cabinet from the ground up. The first task was to drill a hole in the base for cable entry. I drilled a 64mm diameter hole in the center of the base with the IKEA FIXA hole saw set. This 64mm hole is large enough that a stranded UK three pin plug can pass through it.

If your country has more compact power plugs you could drill a smaller diameter hole. I drilled the hole through from both sides to minimize any break outs. I then pained the cut edge with black paint for a more pleasing aesthetic finish.

TV cabinet from IKEA METOD kitchen cabinet

Leg Installation:

The next task was to turn the base over and to install the four IKEA UTBY stainless steel legs at the corners of the cabinet base.

As I would be placing a significant amount of equipment inside the cabinet and a large 60″ television on top of it I also installed four additional IKEA UTBY stainless steel legs in the middle.

The front legs are set back so that they would be hidden and the finished TV cabinet would have a clean and sleek appearance.

However, these additional legs provide the required strength to support the weight to be placed inside and on top of the cabinet and are positioned directly under the columns that would support the top.

TV cabinet from IKEA METOD kitchen cabinet

TV cabinet from IKEA METOD kitchen cabinet

Shelf Preparation:

I started by opening all of the IKEA UTRUSTA shelves and laying them out the six pieces on the floor.

I then used post-it notes to label the inside face and front/top edge of each panel for easy reference.

In order to ensure that I drilled the holes in these six shelves correctly, I created a table and diagram to document which shelf required each set of holes.

TV cabinet from IKEA METOD kitchen cabinet

I then created a template showing where all of the different holes should be drilled so as to ensure consistent alignment across all of the shelves. The light grey box in the upper left-hand corner represents the UTRUSTA hinge. There was just enough space above the hinge for the corner block to be installed.

TV cabinet from IKEA METOD kitchen cabinet

Preparing the Shelves – Part 1 (Cable Holes):

In order the provide additional strength to the cabinet and support the weight of the TV I used pairs of IKEA UTRUSTA shelves located around 60cm in from the left and right end of the cabinet. To enable cables to pass between the three compartments I drilled a 64mm hole in the lower part of each shelf. I then used back paint to cover the inner edges of the holes.

Preparing the Shelves – Part 2 (Equipment Shelf):

For most of the cabinet, I would use the full height due to the size of my equipment and the requirement for good cooling in the warm climate of Singapore. However, I decided to install one horizontal shelf on the right-hand side to maximize internal storage for slimmer equipment.

For this, I used the IKEA UTRUSTA Ventilated Shelf as this had a gap at the back allowing me to route cables between the upper and lower sections without making modifications to another full depth shelf. This shelf would be supported on four black corner blocks.

Preparing the Shelves – Part 3 (Supporting Columns):

Shelves 2 & 3 and 4 & 5 were fixed together using wood glue to create strong columns capable of supporting the weight of the television to be placed on top of the finished cabinet. I would also add an extra vertical shelf to each end of the cabinet for greater strength that would be attached during the assembly using wood glue.

Preparing the Shelves – Part 4 (Hinge Holes):

For my design I wanted to the doors to open upwards rather than sideways, therefore I needed to use the IKEA UTRUSTA large hinge for horizontal doors. However, as the high cabinet was designed to have regular hinges installed on the sides (now top and bottom) I needed to mount these hinges to the vertical IKEA UTRUSTA shelves. I had previously purchased an IKEA METOD fridge top cabinet so I used this as a template to measure the location of the required mounting holes.

Preparing the End Panels:

Unfortunately, the end panels of the cabinet have a number of holes drilled in them that would in the original vertical orientation have had adjustable legs attached to them. This would look ugly if left exposed on the ends of my TV cabinet. Therefore, I reversed the panels so that these holes would be on the inside of the cabinet. The outside was clean with the exception of a vertical recess that the back panel would normally slot into. I painted this recess with black paint so it would be almost invisible once installed in the finished cabinet.

Installing the Shelves (aka Columns):

I worked from right to left adding the shelves. I used the horizontal ventilated shelf to correctly position the right-hand column. An additional shelf was placed inside the right-hand end panel to ensure the correct positioning. The horizontal shelf would be installed later after the top had been installed to provide better access. Then the left-hand column was installed. Each column was installed using 4 black plastic corner blocks.

TV cabinet from IKEA METOD kitchen cabinet

Top Preparation:

You could feed the cables to your TV through the back of the cabinet. However, I want the finished TV cabinet to sit flush against the wall so this was not an option. Therefore, it was necessary to make holes in the top of the cabinet.

I purchased a black metal cable outlet from eBay in Germany: SO-TECH Cable Pass-Through Table Duct (200 x 70 mm). After drilling a series of holes using a 4mm drill around the outside of the cutout I used a fret saw to remove the wood between the holes and some sandpaper to smooth off any edges. There was only a 5mm overlap on the cable outlet so I had to be careful not to make the hole too large. Then I used some black paint to hide the inner edges of the hole.

Installing the Back Panel:

As I had reversed the end panels to hide the holes the recess that the back panel would normally slot into is now on the outside of the cabinet. Therefore, I had to reduce the width of the back panel so that it would fit. With the intention to have my cabinet positioned flush against the wall I needed to make some extra holes in the back panels to accommodate the plug sockets and in particular my bulky power line network extender.

I marked up the back panel and drilled a 10mm hole in the corners. I then used a fret saw to cut out the sections to be removed. The back panel was installed using a combination of the supplied nails and wood glue to provide additional strength to the cabinet.

Top and Horizontal Shelf Installation:

The cabinet top panel was installed using the standard parts. Then an additional shelf was glued inside each end panel to provide greater strength and to cover up the leg holes in the end panels. The two supporting columns were also attached to the top using more black plastic corner blocks.

The IKEA UTRUSTA Ventilated Shelf was installed using a single screw in the front corner blocks to prevent it being pulled out if I needed to remove any of my equipment. At this point, I had a good view of how the final cabinet would look.

TV cabinet from IKEA METOD kitchen cabinet

Putting everything together:

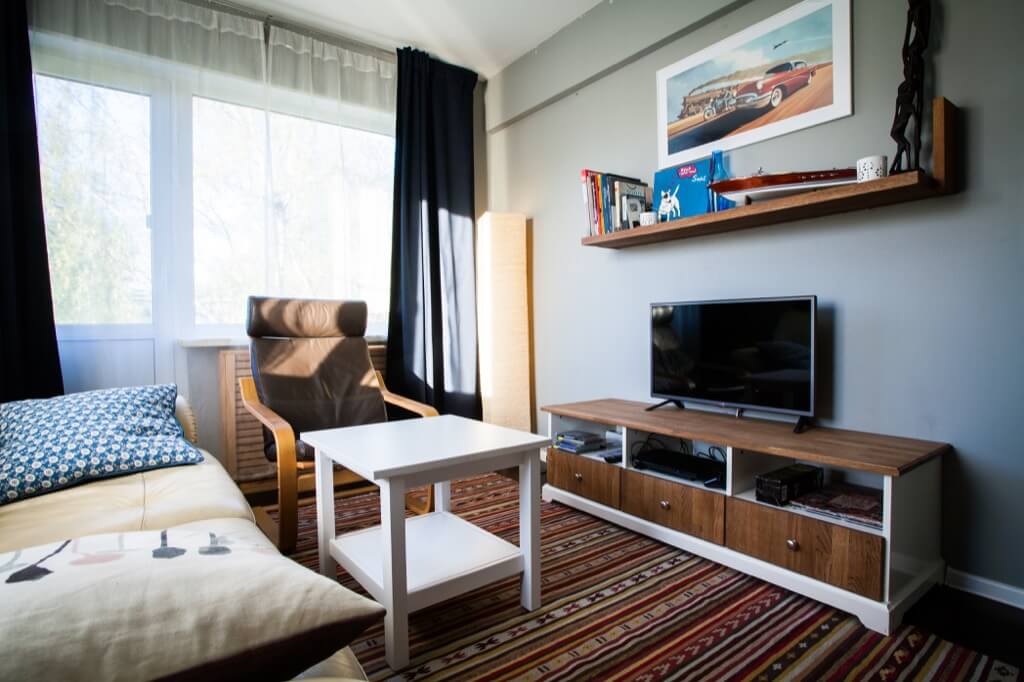
The doors were attached to the UTRUSTA large hinge for horizontal door with the black covers fitted. The hinges supporting the longer door on the right of the cabinet required the tension to be increased so that they could support the weight of the door. To improve the visual appearance of the cabinet doors I added the BLANKETT metal handles to the bottom edges of the doors. I went for the longest versions that would fit my smaller cabinet door (595mm) to emphasize the long and low design of my TV unit. The final step was to install all of my equipment and to place my TV on the top.

TV cabinet from IKEA METOD kitchen cabinet

See more of the METOD turned TV cabinet on my blog.

~ by James Evans

The post There was a METOD to my madness appeared first on IKEA Hackers.

Alert! You’ll want to hack IKEA drawers after this

$
0
0

Mike shows us how to make custom fronts for IKEA drawers, which in his case, is the 4-drawer NORDLI dresser. His plan was to use his NORDLI hack as a combination dresser/ media center in his bedroom and wanted something that was not too obviously IKEA.

This is before:

IKEA NORDLI dresser

NORDLI 4-drawer dresser | IKEA.com

And AFTER! Insanely gorgeous IKEA drawers

Alert! You'll want to hack IKEA drawers after this

While the hack may appear intimidating with the use of CNC machines and all, this project that can be as easy or as difficult as you want it to be. The concept is applicable to any style of custom drawer fronts you wish for your IKEA drawers.

The soundwave pattern across the front of Mike’s NORDLI dresser was created using Easel software, and cut out using a CNC machine at a local maker space.

IKEA items used:
  • IKEA dresser — Nordli with 4 drawers
Other materials and tools:

Making custom fronts for IKEA drawers

First, Mike prepared the boards. The NORDLI drawer fronts are about 9.25” tall but he did not have boards of this size, so he had an additional step of gluing 3 boards together to get the required size.

After the boards were glued, he cut them to the correct size. To cut the drawer front to the right height, he used the original IKEA drawer front to set up the table saw.

Then, he moved on to creating the soundwave pattern. He first found a vector file of a soundwave pattern he liked (which was free to use). He then imported it into Easel (a software) that allowed it to be carved onto wood, via a CNC machine. If you don’t have access to a CNC machine, you could still carve the pattern with a router and a simple jig.

Alert! You'll want to hack IKEA drawers after this

After the soundwave was carved, he cleaned it up and finished it with Waterlox.

Alert! You'll want to hack IKEA drawers after this

Alert! You'll want to hack IKEA drawers after this

Next, he used the original drawer front as a drill template for the holes at the back of the panel.Alert! You'll want to hack IKEA drawers after this

Once that’s done, Mike installed the drawer fronts as per IKEA instructions.

The finishing touch was finger pulls and custom fronts for the IKEA drawers were done.

Alert! You'll want to hack IKEA drawers after this

Alert! You'll want to hack IKEA drawers after this

See the full build process from start to finish in the video below.

Full instructions are written up on Instructables.

Alert! You'll want to hack IKEA drawers after this

~ by Mike Clifford

The post Alert! You’ll want to hack IKEA drawers after this appeared first on IKEA Hackers.

Kudos to the moody makeover of this popular IKEA TV cabinet

$
0
0

Our white IKEA TV cabinet, the BESTÅ, was the perfect size for holding our Sky box, sound bar, DVD player and hiding an assortment of junk in the drawers. It had served us well for many years in our old house, which was light and modern, but when we moved to an older house and redecorated the sitting room we felt it no longer fitted in. It is such a perfect size and so functional that we were reluctant to just get rid of it.

IKEA TV Cabinet - BESTA

before

IKEA products used:
  • White BESTÅ TV bench with drawers
Other materials and tools:

How I chalk painted my IKEA TV cabinet

I had painted other wooden furniture in our house with chalk paint (chest of drawers, side table, bedside cabinets) but hadn’t thought that chalk paint could work on the shiny laminate surface of our BESTÅ until my husband suggested it. I started looking through IKEA Hackers and found that lots of people had updated their IKEA laminate furniture, like KALLAX and EXPEDIT, in this way and so thought I’d give it a go.

We chose Annie Sloan chalk paint in a lovely teal-blue shade, called Aubusson Blue, as we felt this fitted with the décor of our sitting room. I also bought some more clear wax for sealing (I only had a bit left over from other projects). My husband sourced some leather drawer pulls from eBay and I found some raw steel hairpin legs online from the Hairpin Leg Company (via Amazon) that I felt gave the same mid-century feel as the colour.

IKEA TV cabinet gets a mid-century update

I lightly sanded the unit all over to provide a better surface for the paint to adhere to (just using regular sandpaper that we had in the shed). Then I cleaned it with soapy water, rinsed and left it to dry it thoroughly. I removed the drawers and shelves but left the drawer runners in place figuring I would just paint around them. (This area is not visible when the unit is assembled so I wasn’t worried about it being too neat!).


Related: How to hack speaker fabric doors for the BESTÅ TV unit


I used a foam roller and paint tray to do the majority of the painting. The goal was I didn’t want to see any brush strokes and wanted as smooth a finish as possible as I wasn’t planning to distress the unit.

For some of the more awkward areas, like around the drawer runners and in the corners I had to use a brush. The paint went on surprisingly well, even on the drawer fronts which seem to be made from a shinier material. But I had to be patient and wait for each coat to dry thoroughly before the next one as otherwise, I found the roller would take off the existing paint in patches.

“I intended to leave it a week to cure before using it but I was too impatient to see it in my sitting room!”

I did 2 coats of paint all over and then an extra one on the top. Then, after waiting 24 hours, I started waxing. I used a lint free cloth to apply and wipe off the excess wax, following the instructions on the side of the tin. Most of the unit got two coats of wax (with 24hrs in between coats) but I did an extra coat on the top and the drawers where I felt there would be most risk of scratching.

Finally, 24 hours after the final coat of wax, I buffed the unit with a clean lint free cloth and left it to cure for a couple of days. I intended to leave it a week to cure before using it but I was too impatient to see it in my sitting room!

IKEA TV cabinet gets a mid-century update


Related: IKEA TV cabinet made from 4 fridge top cabinets. See more.


I think if I were to do this project again I would use some sort of a primer before painting, just so I would be less paranoid about any paint scratching off with normal use. Alternatively, using a varnish instead of wax might offer more protection but it’s holding up well so far, fingers crossed!

Our IKEA TV cabinet hack wasn’t particularly cheap. I used nearly a whole tin of paint (£20) quarter of a tin of wax (they are £10 each), the drawer pulls were £10 and the hairpin legs were £20. However, I’m glad we decided to ‘upcycle’ rather than buy something new as we now have a piece that’s uniquely ours and hopefully we’ll love it for a long time.

~ by Claire King

The post Kudos to the moody makeover of this popular IKEA TV cabinet appeared first on IKEA Hackers.

Viewing all 194 articles
Browse latest View live