I used a black horizontal KALLAX shelving unit for hifi set-up with a subwoofer cabinet. I had to remove an interior floor to place the subwoofer while retaining the original KALLAX design. With the small tweak, it perfectly integrates into the KALLAX compartments.
To give character … I used wood imitation tiles, glued onto the KALLAX. I added aluminum rods to strengthen the furniture design. The result is a discreet hi-fi set-up, refined and perfectly integrated.
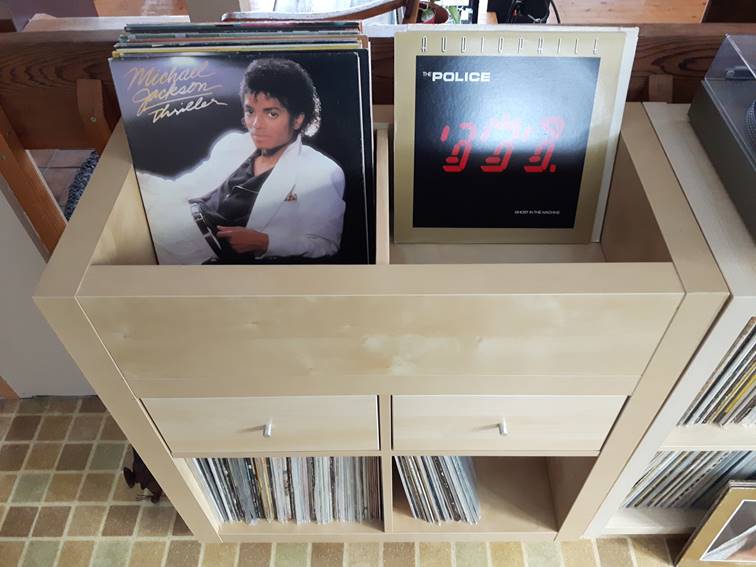
I collect vinyl records and I use the IKEA KALLAX as a vinyl record storage cabinet. They are inexpensive, look and work great but they have a limitation.
I like the way record stores display their records on top, covers facing forward, so you can quickly flip through the records and find what you are looking for.
So:
I decided I would try to make my own …
… it takes a bit of time but I think it worked out pretty well.
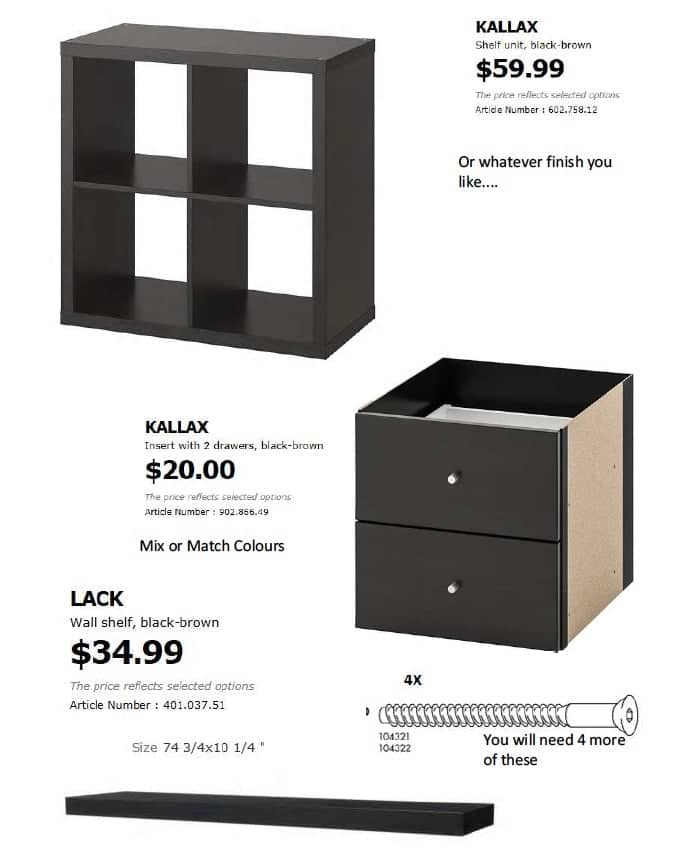
You will need a 2×2 KALLAX storage shelf and a KALLAX drawer kit. You will also need some extra parts for the front and back of the upper storage bin.
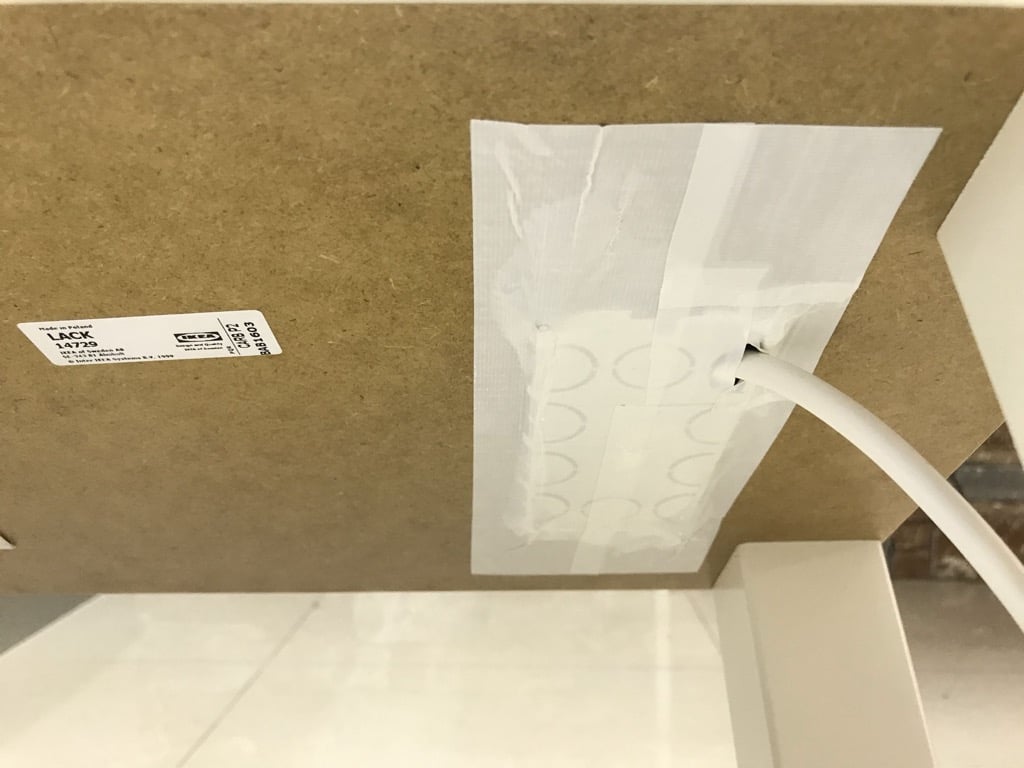
Most IKEAs have an “as is” area. I scored some extra pieces there. If not, look at the LACK shelving, which comes in similar colours. IKEA also has extra hardware in bins near the Customer Service area. Score some extra screws as well.
The tough part of this hack is making accurate cuts. So you should have some reasonable shop skills and access to a table or chop saw and a drill.
Now:
Let’s move on to the vinyl record storage cabinet, IKEA hack edition.
How to hack a front-facing IKEA vinyl record storage cabinet
Step 1. Partially Assemble KALLAX Shelf
Start by assembling 2 Sides and Bottom along with long horizontal divider and short vertical divider.
Step 2. Modification of the Drawer Insert
The KALLAX drawer insert must be cut in half as accurately as possible to provide 2 identical drawer inserts. An inaccurate job will cause assembly issues later.
Use a tape measure, a carpenter’s square or good straight edge and sharp box cutter. Measure twice, cut once.
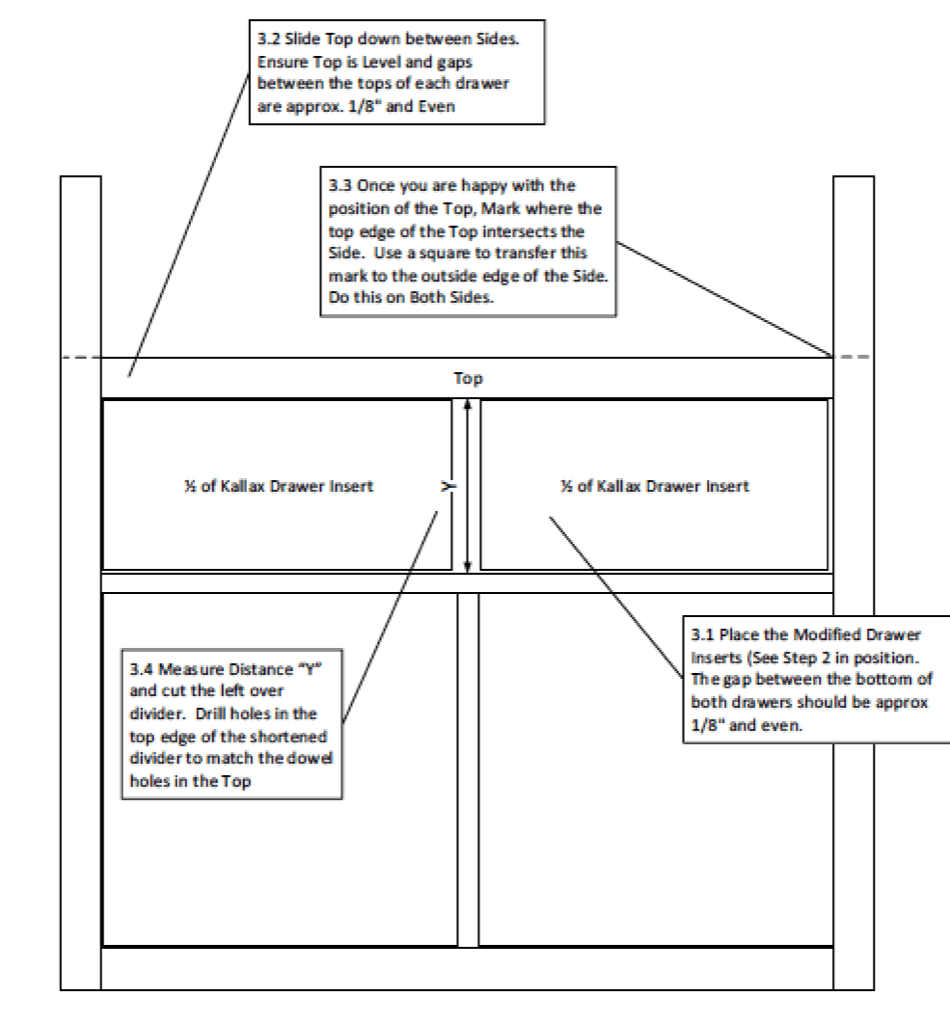
Step 3. Temporarily Install the Modified Drawers and the Top
3.5 After completing all steps, disassemble the shelf.
Step 4. Drill 2 New Holes in Each Side Panel
Step 5. Final Assembly
5.1 Re-Assemble and install the drawers. Check for alignment and adjust as needed. Use the short screws provided with the Drawer Kit to fasten the inserts in place.
Hack instructions for DIY multi-device charging station:
Outline the slots for the socket outlet, and for the electronic devices (Tablet/Laptop).
Drill a hole in each of the corners of the outlined slots (these holes will be used as an entry point for the electric saw).
Cut out the outlined slots using the electric saw.
Wire the electrical cable to the socket outlet.
Cover the rough sides of the cut-out slots using the plastic corner guards; Cut out a frame (similar to the shape of a picture frame) from the plastic corner guards; Use glue to attach them to the TV bench.
Measure the height of your electric devices, allow the shortest device to extend about 6-8cm (3 inches) from the top of the table.
Remove the bottom shelf of the TV bench; measure and mark the new height and reinstall the shelf.
Cover the shelf using the foam (the electric devices will rest on this foam).
Multi-device charging station done!
The station is not visible from the main areas of our living room.
Quietly filling up our devices with juice in the corner.
More info:
If you have access to a 3d printer – then you should print the cover frame for the slots – this will save you tons of time cutting them accurately from plastic corner guards.
Since this project involves electricity, please make sure you know what you are doing; if in doubt – use a professional to wire the outlet socket.
… shall we try a cheap but functional DIY version?
I know our taste and needs can change, so I choose IKEA because it’s easy to customize, cheap and I know I can change it whenever I want!
My ideal solution should have light colors, almost 70 cm height, and almost 50 cm depth.
It should have simple lines, a glass cabinet for media devices, no visible cables, and many drawers. Better if they were hidden behind the doors/fronts.
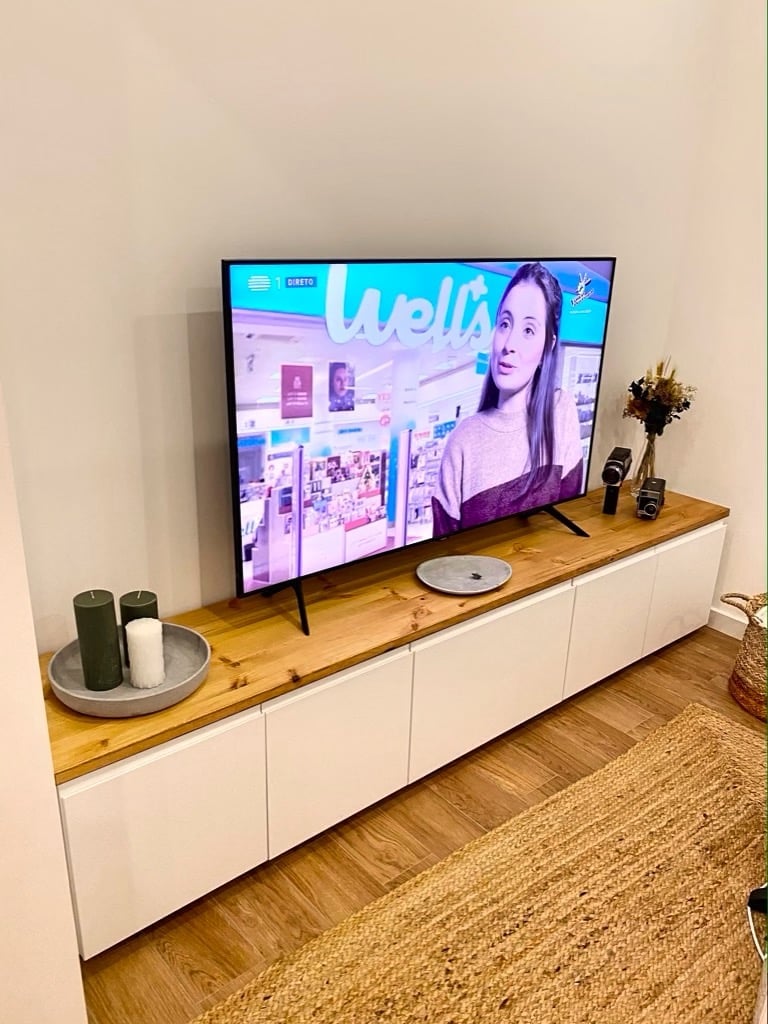
The result is this IKEA white TV stand with honeycomb design
This project is a combination of STUVA structures and inner accessories + BESTÅ Vassviken/Glassvik doors (used as drawer front) = it costs 323 €
This is an IKEA hack for 3 reasons:
My white TV stand combines frames and drawers from the STUVA series (50 cm depth, 10 cm more than BESTÅ!) with BESTÅ Vassviken and Glassvik doors.
On the left section of the TV cabinet, the BESTÅ doors are not fixed with hinges but used as drawer fronts, fixed directly to the drawers. Pushing the door opens the lower drawer.
One door has been cut and fixed on the right end side of the stand as a cover panel. This gives the TV stand a more finished style.
Original holes and connections of STUVA drawers and BESTÅ doors/fronts are NOT compatible, but I used simple L-brackets and shortened the bottom of the drawers to solve this!
Here the steps for my DIY white TV stand:
Build the two STUVA frames but do not add the back panels yet.
Shorten the bottom panel of the STUVA GRUNDLIG drawer, assemble the drawer (without front) and nail the bottom to the sides
Add L-brackets to the sides and bottom of the drawer.
Fix the drawer guides to the STUVA frame.
Insert the drawer.
Next, place on the floor the BESTÅ door with the front facing down. I placed it on my carpet to protect it from scratches.
Then put the STUVA frame on the back of the door. As you can see from the photo below, the back of the frame is open and facing upwards. It’s like the stand is already completed but turned down.
Check with care the centering of the frame on the door and mark the bracket hole positions on the door with a pencil
Remove the frame from the door and extract the drawer.
Then, proceed to add the back panel to the STUVA frame.
Place the drawer on the door referring to the marked points and screw the brackets to the door
Now that you’ve fixed the STUVA drawer and BESTÅ door together, put the drawer on the guides in the frame to test it.
I added the push opener system: pushing the door, the lower drawer opens. If you rather not use push openers I think handles on the door can work well too.
I made these deep drawers for the last two units on the left of the TV cabinet. This leaves more room for larger items like pillows, blankets and games storage.
I’ve added removable wire drawers, one in each unit, to use also the upper space for VHS and smaller stuff.
Completing the IKEA white TV stand
Once you have completed the drawer + door/front process, take the drawers out and fix together all 4 STUVA frames with screws.
Before fixing them, pay attention to adjust the feet of each unit while all 4 frames are placed in their final position.
In my case, the floor was not perfectly flat.
After that insert again the drawers on the left, and complete the assembly of the right part of the TV stand.
On the last right unit, I preferred to use 3 STUVA wire drawers to store only DVD discs, and the door has hinges. Here you can follow IKEA standard instructions.
In the glass cabinet, I made holes in the back panel to allow the cables to exit just behind the shelves. I attached the glass door with hinges. Here you can follow IKEA standard instructions.
Adjust the hinges to align the doors of the right part of the stand.
Finally, I shortened a Vassviken door and fixed it to the right end side of the structure, to give a uniform look.
Choose carefully the screw length to avoid damages to the visible side. Drill the screw from inside the cabinet outwards.
The USB charging station organizer originally came with plastic separators to hold each device. But they were flimsy and broke off. Furthermore, the gap spacing was too narrow to fit my devices.
I was also looking for a headphone stand, so this charging station organizer hack killed two birds with one stone.
It took me about 30 minutes to get it done. And my new charging station organizer costs me $AUD9.99.
2. File rough edges on basket where arms were attached. (Optional, use a grinding wheel on a Dremel to do this step more quickly).
3. Use hot-glue gun to stick the holder onto the charger base.
As a bonus, one can stick the 2 suction cups, which come in the IMMELN packet, to the wall and use as stands for rechargable wireless headphones, as shown in photo.
I like that it’s tough and shiny stainless steel, which I think will last a long while.
The hardest part of this hack was filing the surface to remove the sharp edges.
It took some work but it worked out great.
~ by Yingwee
You may also like these charging station hacks
#1 Wireless charging station in BESTÅ bench
The finished result looks great, a wireless charger which sits seamlessly in my unit underneath my wall-mounted TV. The MORIK also has an in built USB port underneath it which is still accessible from within the BESTÅ unit – I complimented this with a GLIS box full of USB cables for charging devices that currently don’t have wireless charging. See more of the wireless charging station.
#2 LACK table with built-in USB charger
Our extended family has grown quite a bit over the years to include Cousin iPad, Auntie iPhone, Grannie Kindle, and that crazy Uncle Android. It’s a full house, and they’re hanging out on the kitchen counter, in the home office, and especially in the living room. Our wall plugs are always at their limit, jammed up with our smart “relatives”. We want more space for ourselves yet don’t want to be without our beloved family of devices. See more of the built-in LACK coffee table USB charging station.
First, I drafted my painting plan on the KALLAX assembly sheet.
After I had the preliminary plan, I started choosing paint colours for the finish.
These were the acrylic colours I chose.
Then I started to painstakingly paint the entire KALLAX shelving unit according to my plan.
The smaller designs like the crosses were all done freehand with a brush.
For the striped and argyle design, I masked the areas to be painted with the painter’s tape before applying paint.
As for the tiger stripes on the red background I did that with a stencil.
First, I traced by hand a photograph of a tiger skin onto a craft sheet. The surface of the KALLAX was lightly sanded and treated with primer before I applied the paint.
I painted all the visible sections except the bottom, which will not be seen, unless you flip it over. With all the pieces done, I sealed them with a coat of transparent resin. I used a brush with synthetic bristles, as recommended in the instructions.
After the sealant has dried, the next step was to add castor wheels to the unit.
I used a drill driver, wood screws to secure two plywood planks to the two edges, to reinforce and strengthen the KALLAX.
Last step is to assemble it according to IKEA instructions.
Here’s the final form:
A shelving unit transformed into a mobile KALLAX TV bench.
~ by Maria Teresa Mema Carreri – MoiMema
You may also like these TV unit hacks
#1 Modern TV stand from KALLAX and FROSTA legs
A TV unit made via combining the shelving unit with legs from the FROSTA stool. See the modern TV stand tutorial here.
#2 Easy minimal TV stand with decals
This is a basic white unit with walnut vinyl stickers and tapered legs. Looks clean and classy. Read more here.
They use the HEMNES, which are objectively nicer units, but also more expensive. I tried to make up for it with my own trim and finishes.
The previous owner of this house had a large freestanding unit. This is split level house, and a countertop bar adjacent to the kitchen overlooks this room.
When I toured the house before buying, this room had such a nice expansive presence, it sold me on the house.
Once I moved in and had little furniture and a “tiny” 42″ TV on the wall, it was just lacking in every way. Now, it is how I always envisioned it. I love the presence it brings to the room.
First, I demolished two rows of floor tile. I could have built on top of the floor tile, but I plan on one day replacing all of the tile in the house.
So by removing the tiles below, this hack will not stand in the way of that effort years down the road.
Then, I built a false wall that would provide structure for the stacked stone, TV mount, and allow for hiding all wires and cables.
The wall was tap-conned to the floor, lag bolted to the ceiling joists, and tap-conned to the exterior wall for good measure. This part was challenging due to the warping and bowing inherent to the 2×4 studs, but I was able to compensate for this as I went.
Framing the BRIMNES units
Next, I built a 2×4 frame to lift the BRIMNES unit 3.5″ off the floor. This both provided a stable platform that could be leveled to compensate for uneven surface, and allowed room for a chunky baseboard in the finished product.
The floor frame is tied to the false wall with a combination of pocket screws and conventional screwed joints.
The BRIMNES units were placed on the platforms, then a frame was constructed on top of the units to tie them to the ceiling and the outer walls. At this point, the BRIMNES units were 100% tied to the structure.
With the frame complete, the structure was skinned in MDF panels. Crown molding was applied, as well as baseboards. The seam where the BRIMNES units met the MDF skin was covered with casing.
Extra framing was added to mount the TV. This was not due to a TV of some incredible weight, but so that the mount would be flush with the combination of the stacked stone and backer board.
The false wall was then covered in concrete backer board, and stacked stone applied.
All that was left from there on was paint and to mount the TV. Amazon supplied some bias lighting for the TV, as well as under cabinet lights for the BRIMNES glass door units.
And the entertainment wall is complete. (Pending the replacement of the removed strip of floor tiles)
How long and how much did it cost?
Around 3 weeks, though I still have some of the original floor tile to go back and replace.
I don’t usually do so, but for this project I kept a very detailed cost sheet. Total cost was $1328.38.
This does not include the TV which happened to be new and the impetus for the whole project, or the replacement of the original tile which is still pending.
What was the hardest part about this hack?
Building the false wall, especially with the relatively warped and twisted 2x4s available at the big box stores was a real challenge. Also, removing 2 rows of tile was unpleasant.
What to pay special attention to?
With this project I felt that alignment and level was key. The floor and walls rarely cooperate, but it’s amazing what shims and latex caulk will conceal!
Looking back, would you have done it differently?
With so much of the TV area covered in, well, TV, there is not a lot of visible stacked stone. I might have chosen something cheaper in retrospect, but I can’t deny the look is stunning.
IKEA TRYSIL wardrobe saved from landfill and converted into a retro arcade games machine.
We were dismantling our son’s TRYSIL Wardrobe to remove it from his room. It had been good wardrobe but the backing had started to continuously fall away.
It had some slight damage during dismantling and would have become landfill apart from a last minute idea….
A retro arcade machine!
It actually looks pretty retro, and it plays like a real arcade machine.
First, dismantle the wardrobe (if it is already assembled).
Separate the 2 tall side pieces (Important! Leave hanging rod brackets ON! 2 x shelf pieces, 2 x drawer fronts, and any assorted bolts and screws. Dowel rods can be removed – I didn’t use them)
Mark out the side pieces to make 2 cuts.
Side Panel cutting Guide
This allows the cabinet to lean back at a neat angle. Ensure you identify the top and bottom correctly and take care to use the nicely edged side to stand towards the front. Cut with circular saw if possible. I used a jigsaw so cut is quite rough.
Mark out and drill pilot holes through sides to attach shelves between the 2 side panels. Use the long IKEA hex bolts that came with the TRYSIL to secure the shelves.
2. SHELF FOR CONTROLS
On mine the middle shelf for controls is fitted at 93cm high and slopes very slightly toward the front.
Once it is standing up use additional screws to fit the drawer fronts at the top.
These are actually a little wider than the shelves but I squeezed mine in without cutting. But if you are better with a saw than I am you may wish to cut these down slightly to fit.
I also fitted the rear one at an angle and only used 1 screw on each side so it can flip up to access the TV.
Check that everything is holding together nicely then use 4 L-brackets to reinforce the structure.
I added an extra 2 brackets to the middle shelf for extra sturdy controls.
Now, if you left on the hanging rod holders and measured correctly I found that the TV sat at the perfect height to support the 30” TV we had, donated by my in-laws.
I then fitted 2 screws in each top corner to allow TV to rest at the perfect viewing angle.
And that’s all I did for the cabinet.
If you want there are many other pieces that could be used to enclose the back of the cabinet and under the TV as well. (Again – I didn’t cut too much as I only had a jig saw and it cut this stuff very rough!).
3. ARCADE GAMES SETUP
There are many instructional on Youtube on how to build an arcade games machine with a Raspberry Pi computer and Retro Pie.
But here are the basic steps to fitting the joysticks and buttons to the USB controller, then connecting those to your Raspberry Pi mini computer.
First, search for a button layout online or design your own on a piece of paper.
Use this as a guide to drill holes for joystick and large buttons (28mm drill bit worked for me. Also some smaller buttons were 18mm I think – check your button sizes as they may vary). I did all this with the cabinet assembled.
The buttons should just drop in and screw tight and the joystick requires placement and a couple of short screws underneath.
The joystick kit comes with cables to attach to the USB board. These can also be fixed with a small screw or two.
Then, take care to wire both player 1 and player 2 buttons in the same order as this will make the joystick configuration in the Retro Pie interface much easier.
How long and how much did it cost?
Joystick Button Kit: $50
Raspberry Pi computer starter kit: $99
L Brackets and other hardware: $20
The cabinet build took me about 3-4 hours, but I was making it up as I went along. Fitting in the joysticks and buttons took me about 2 hours. Programming Raspberry Pi computer was easy to do with lots of online tutorials. That took about 1 hour.
What was the hardest part about this hack?
Fitting the cabinet parts together. You may need another person to assist holding pieces in place while assembling the cabinet.
What to pay special attention to?
Cutting the large pieces so that the rubber edging remains in-tact for front edges of cabinet, which makes a nicer finish.
Be careful fitting the shelves as they are not particularly thick. They definitely need support with L-brackets.
Looking back, would you have done it differently?
No, it actually turned out almost exactly as I envisaged. I am still working out how to finish the cabinet with some more trimming beneath TV and control panel.
I decided to create this audio rack because my old rack was very short and that made it very difficult for me to push buttons or change a CD. etc.
The total cost was around 70£ (local currency equivalent). I worked at this project for 3 days (during the evening after work). On the 3rd day I shortened all the electric cables for units on the back and I did a little cable management in the back, etc.
What I liked most is the matching black paint of the rack with my audio line (black both). I also like the industrial style of the rack.
Furthermore, I own another FJÄLLBO (hacked) unit for my tv-set so I keep the same style for video and audio furniture.
Optional a wood panel (360x510x18 mm) if you don’t like the softwood received from IKEA. I didn’t liked it so I used an oak panel and IKEA SKYDD oil to treat the wood.
Optionally you can use sandpaper (fine grit) if your new board is not enough sanded.
Also for electric supply a block of sockets was attached with screws on the back of the rack.
DIY Audio Rack
Shorten one of the shelving unit using a hand saw. The other unit will be a donor for supplementary shelves, screws and 90 degree steel corners.
My brief calculation shows that if I keep the positions of the second and third shelves, I’ll need to intercalate equally between another 2 levels of shelves. And the distance between the shelves should be around 120 mm.
This height is enough for most of the audio units in the market.
Also the wood top of the rack should be placed at 120 mm above the top shelf.
This is the distance where you have to cut the 4 legs in order to shorten the unit. Measure twice and cuts once.
Another 28 holes should be done for placing in the right location the new shelves and also the top of the unit. Again, check twice before drill once.
The lower shelf in original configuration was not mounted.
One of the two remaining shelves was used as a door for the lower compartment. I used the same black M5 screws to mount the hinges. I drilled the holes in the right position (with a 3,5 mm drill) and used a M5 tap to create metric thread in steel.
What to pay special attention to?
Pay special attention to measuring the exact of position of the holes in each of the 4 feet.
What would I have done it differently?
Well, I realized at the end that mounting the hinges on right side would have been much better for me but it works also on left side.
Discreet arcade games cabinet built into the IVAR system.
I recall the loud humming sound. The base resonating from numerous heavy wooden cabinets. Plastic buttons clicking. The smooth surface of a marble ball at the end of a stick. Four Coin tokens inserted. I take my stance.
For the next minute or two this cabinet and I will become more than the sum of our parts.
It is the essence of good design and the reason that I decided to embark on the task of hacking the IVAR into my own arcade cabinet hack.
Why hacking?
Well, I live in a small flat and already made a cat walk bookcase combo out of a set of IKEA IVAR shelves.
Cat walk + bookcase combo
When IKEA came out with the IVAR table add-on it only made sense to combine it to my existing unit and further complicate what is already a rather multifunctional piece of furniture.
Assemble the IKEA IVAR table add-on except for the table legs.
Cut out a third of the table and save for later. (I used a small electric garden saw).
Copy the holes from the small cutout part of the table to the newly resized piece and connect the legs and mechanism.
Cut the legs so they will fit inside the bottom frame of the table. (This will allow the legs mechanism to fit neatly inside the frame.) Keep the cut out piece.
Reconnect the cut out piece using a seperate piece of scrap wood
While the table is fully open secure the legs in a 45 degree angle using the IVAR wall attachment cloth. This will allow weigh transfer from the table surface to the floor / IVAR shelf while providing adequate leg room.
Attach the knife holder to to the original cabinet inner shelf and the matching scrap metal pads to the table so it could lock in when closed.
Connect all cables and docks. Position the monitor and screen shield inside the cabinet and secure the arcade sticks firmly in place.
I used the remaining table piece and IKEA kitchen horizontal door hinges to make a door for the remaining cavity in the cabinet.
Here’s an overview of how it all fits together in my living room.
That’s it.
You can decorate the cabinet with stickers and feel free to drop me any comments on how to improve on my design. Cheers.
We can’t go to the cinema for now, but can it come to us? Oh yes, movie nights are well and alive, right at home. See how you can easily set up a projector and screen for the perfect shelter-in movie night.
Set up the movie night projector
Big screen — that’s the first thing that differentiates a cinema experience from watching TV at home. And you need a projector to achieve that.
#1 Hidden home cinema
A clean white wall is great for a home cinema screen. A combination of wall mounted IKEA BESTÅ units hides a projector.
Having a drawer and a flip-up table next to the sofa or bed ensures a table for popcorn and drinks.
If mounting the projector to the ceiling or wall is out of the question, do this! Use 2 ELVARLI posts and a shelf to hoist the projector up. You may still need to secure the posts with screws to prevent any accidents. Read more.
Emilie hacked a video projector that stands behind the couch. She used the top, bottom and long side pieces of the KALLAX plus EKBY STÖDIS brackets to make a C structure, which is held in place by the weight of the sofa. See the no-drill projector stand.
A MALM nightstand hides a projector, behind the modified drop down drawer front. All cables and wires go into the unit too. Neat and tidy. See the stealth projector.
Pierre’s apartment features a stone wall, so he can’t drill holes into or project onto the wall.
And he was looking for a light, discrete, easy to use and affordable (yes to all of them) video projector screen.
He bought a FRIDANS block out roller blind (200cmx195cm) for €38 and installed it.
It took him 15 minutes and it does the job perfectly.
The FRIDANS seems to be discontinued, but the TUPPLUR blackout blind works just as well. TUPPLUR is available from 23″ wide all the way to 48″. In this case, the bigger the better.
I wanted a new MCM media console, but didn’t want to shell out $1400 for one.
This is my first time making anything like this. I came in with no skills, a little will and hours and hours of Youtube videos which helped me complete the project. I’m so happy with how it turned out.
I’ve been reading IKEA Hackers for years now, and FINALLY pulled the trigger and made my own hack.
1. Take your HEMNES TV stand, remove the shelves and drawers, and flip it on its top so the legs are facing the ceiling. Using a saw, cut the legs flush with the bottom edge of the TV stand.
2. Using a 3/4″ sheet of cabinet grade plywood that is 4′ x 8′ in size, cut it down to two strips that are 18 inches x 96 inches (8 feet). You will not need the remaining 12″ x 96″ feet length.
Make two cross cuts on the two 18″ x 96″ boards so that you have two 18″x73″ boards, two 18″x16.5″ boards, and two 18″ x 6.5″ boards that will not be used. (I used mine to test stain colors).
3. Using screws and wood glue, connect your two 18″x73″ boards (the top and bottom) and two 18″x16.5″ boards (the sides). The longer pieces will sandwich the shorter side pieces. Once they are connected, you should have a box that is 73″ x 18″.
Assembling box
4. Lightly sand the face and edges of the plywood, taking care to not sand through the thin veneer. Start with 220 grit sandpaper and then move to 400 grit. Sand by hand, an orbital sander can be too aggressive. Remove all sawdust using a vacuum/wet rag/tack cloth.
Test your stains
5. Choose a stain color you like, making sure to check how the color of the stain looks on the type of wood you picked when you picked your plywood. My stain is English Chestnut by Minwax on white oak. Using gloves to protect your hands, rub on your first coat of stain. Wait 5-15 minutes and rub off any remaining stain. Let the stain dry and repeat for a second coat. Let dry again, over night is best.
Stain choices
Box stained
6. Paint the inside top of the box you made white, because you will see the inside top in the finished product.
White paint on underside of top panel
7. Remove any dust from your unit and apply a thin layer of polyurethane to all surfaces of your unit. Let dry and apply again. After the second coat, lightly sand the whole unit with 400 grit sandpaper and wipe clean of all sawdust. Continue applying light coats of polyurethane until you are happy with the finish. My unit has 6 coats of Minwax Wipe On Poly.
Polyurethane on top of stain
Add hardware
8. Decide on hardware. You will need 4 legs and 3 drawer pulls. I chose legs from Amazon that I thought looked like they would match my unit, but they didn’t and I needed to sand them and stain them the same color. When the stain dried, I applied two coats of polyurethane to the legs.
Sanding and attaching legs
9. If you want to replace the drawer pulls, you will need to remove the old ones. You can find simple single knob pulls (like the kind that are pre-drilled on the HEMNES) at any hardware store, but if you want a different style of pull, you’ll need to fill the holes that are on the HEMNES drawer fronts.
Filling holes in drawers and repainting
Using wood filler, over fill the hole, let dry, and sand level using 120 grit sandpaper moving up to 220 grit and then 400 grit to make the surface smooth.
Then, clean the drawer free of sawdust and paint the face with white paint. You can then add a top edge drawer pull or a drawer pull that requires two holes, just drill the holes at the appropriate locations on each drawer and attach the hardware.
10. Remove the top that comes with the HEMNES unit, and slide the unit into the box you have created. Then replace the drawers and shelves, and attach the legs.
And your MCM media console is done!
How long and how much did it cost?
It took 7 days, but most of that was not knowing how to do things and then making mistakes. I spent $60 on plywood, $8 on stain, $10 on paint, $10 on polyurethane and $60 on legs and drawer pulls. The cost of a new HEMNES TV stand is $229.
What do you like most about the hack?
I love the color and the grain of the wood, and the shine on the top. Frankly I can’t believe I am responsible for it.
What was the hardest part about this hack?
Definitely the exposed plywood edges. They absorbed stain in a very uneven way, which required a lot of sanding to get rid of the splotchy-ness.
What to pay special attention to?
I removed the existing drawer knobs, filled the holes with wood filler, sanded and painted the drawers so I could add edge drawer pulls at the top instead. It gives it a cleaner look.
Looking back, would you have done it differently?
I would have sealed the exposed plywood edges with poly before staining so that they didn’t absorb the stain.
We had our boards cut at Home Depot so that they would be more precise. Each door needs to be 14.5 inches in width and 30.5 inches in height. So that’s why we used both 1x5x6 and 1x6x6 pine boards, so no ripping would be required.
When picking your wood, place them on the ground to make sure the pieces fit together and no warping has occurred. We also picked wood that didn’t have any huge knots that would stick out once stained.
We used z-clips to attach the doors to the frame of the KALLAX unit so that we wouldn’t have to mess with hinges, but if you know how to attach hinges to have a full overlay with the frame, go for it!
The z-clips allow the doors to just be picked up off the frame and easily put back on, so while it is a bit more work than just opening doors, we were able to get the look we wanted while storing things in the console that we wouldn’t need to access all the time.
Step 2: Glue the panels together to make each door
Take 2 of the 1×5 pieces and one of the 1×6 pieces, placing the 1×6 piece in the middle. Determine which side you like more and flip it over so that the bottom of each piece is facing up.
Glue the pieces together using wood glue, clamp, and make sure to wipe the other side to make sure that no glue has dripped through.
Attach a brace (1×2 piece) about 6 in from the top and bottom using wood glue and a few wood screws. Make sure it is centered so that it doesn’t hit the sides of the cubes when attached.
Step 3: Sand, stain, and polyurethane
Next you want to sand using 3 different types of sand paper. Use the heavier grit sand paper first to make sure each board is level with the next, and finish with extra fine to smooth out each door.
We stained our doors with Special Walnut stain because we liked how it brings out the grain in the pine. We finished by applying two coats of satin polyurethane using a nice brush so that no hairs got stuck in those top coats.
Step 4: Attach legs to frame and flip over
Flip the KALLAX over and screw in your legs. Ours wobbled a little bit at first since the cubes are not solid wood, but when you flip the unit back over the weight prevents it from wobbling too much.
Step 5: Attach Z-clips or Hinges
Since we didn’t want to mess with hinges and wanted the full-overlay look from the front, we used Z-clips, which you can find on Amazon or at Home Depot.
You just screw one side into the middle divider on the cubes and the other side onto the door. Our clips came with a level, but if yours don’t you should make sure each side is level when you attach them.
While this may seem very unconventional, they ended up being very functional since we don’t keep things in the unit that we need to access every day.
When we need something out of the cabinet, we just lift the door right off and it slides back on when we are done!
Step 6: Add your handles
We picked out some bronze handles from Home Depot, but you could add any you want! Make sure you line them up on each side before screwing them in.
This hack took us about 3 days to make, including the time to let things dry.
While we absolutely love how our KALLAX media console turned out. If we were to do this again we would have made thinner braces for the doors and worked harder to implement hinges into the design.
There’s a room in the house called the Marty Cave. It’s like a Man Cave, but for Marty. And that’s me (phew) so that’s all good.
And in the Marty Cave is my PS4 sitting on a shelf in my BESTÅ unit. One side is a solid glass door, with things like a networking switch and controller dock, and on the other side is a drawer for game storage, and a shelf for the PS4.
Before
In November, that PS4 will become a PS5, and in total first world problems, it doesn’t actually fit on the shelf with the drawer in place. What to do, what to do.
I have a spare glass door I could use, but then I don’t really want to be running electronics with a closed solid door. (Consoles can get hot and need some ventilation). And with a door open, the monster kitten known as Zack likes to explore.
I needed something breathable, yet neat and fitting.
So, I browse the IKEA website to see if there are suitable alternate doors available with fabric fronts, and that’s a no. But a Google search shows how others have hacked IKEA doors for this very purpose.
Here, Chris uses the SINDVIK doors – a timber frame with a glass inner. In the comments, others had recommended HANVIKEN doors instead, which look the same but have a timber inner.
Looking at the IKEA website, both doors are available in the 60 x 38cm size, but HANVIKEN run $10 AUD cheaper per door. My approach to the hack also uses a different method for holding the speaker fabric in place.
I absolutely love the finished result of the speaker fabric doors, and am so impressed at the overall look. And unless you go and have a close look, you’d never know it is actually a fabric front.
What you’ll need
You’ll obviously need a BESTÅ frame of your choice – mine is the 120x40x38 cm (47 1/4 x 15 3/4 x 15″) in white.
And you’ll need doors for the unit, such as 2 x HANVIKEN doors, 60×38. Don’t forget you’ll also need a hinge set per door if they’re new. I upgraded my unit with the soft close versions.
5mm screen door spline, approximately 1.7m per door
Scissors
Hammer and towel
Wood glue, such Aquadhere
Screwdrivers, or other long handled pokey devices
A second set of hands can really help for one of the edges
HANVIKEN doors, black speaker fabric and 5mm PVC Spline
When picking your speaker fabric, make sure it has some elasticity to it, with the HANVIKEN doors, this is an absolute requirement.
Speaker fabric doors instructions
Let’s assume you’ve built your BESTÅ unit following IKEA’s instructions and are ready to go with the doors.
1. Remove the centre panel
Place the doors face-side down (to protect the front-facing edge).
IKEA HANVIKEN door, rear
Place the towel against the inside of one of the short edges – this is to protect the frame from the hammer. Using a hammer, gently tap to separate the frame.
It is just held together with some glue and 4 wooden dowels. Make sure your taps are even and straight so the edge comes off both sides evenly as to not damage the frame or dowel.
After some gentle hammer tapping, the short end should come off, and is held in place with 4 dowels and some glue
Slide out the inner timber, and set aside for measurements later.
The inner timber may be glued in on the short edge – one of my doors just slid out, but the other needed a bit of a tap with the hammer to break the glue. Even if there is glue, it’s not a lot and it’s not super strong, so should be fairly easy to remove.
2. Re-assemble the frame
Using a small amount of wood glue on the dowels, re-assemble the frame edge, and leave to dry.
After the inner timer is removed, use some wood glue to re-assemble the HANVIKEN
If you’re using glue like Aquadhere, if glue seeps out, a damp paper towel can be used to clean up any leaks. For other glues, check with the manufacturer instructions for how to clean up.
3. Cut the fabric to size
Place the fabric on a flat surface, and place the inner timber on top. Leave an edge of around 1cm to 1.5cm, and cut the fabric.
Use the inner timer sheet as a guide to cutting your fabric – allow a 1cm to 1.5cm gap edge. Too much, and you’ll have trouble in the corners, and not enough, it will be harder to fit.
4. Cut the spline to size
Before picking your spline, best to check your door gap size. With the HANVIKEN doors, the gap is just shy of 5mm, and the 5mm spline is a squeeze but fits very snuggly. And if you need to pull it back out, it comes out easily too (but not so easily that it will fall out).
Unroll the spline, and cut to size of each inner length of the frame.
The fabric can bunch up in the corners, and I found it easier if the spline was slightly shorter than the actual length – maybe half a centimetre. Nothing major, but just makes the corners easier to work with.
Cut the spline in to individual pieces for each edge. These should be the length of the edge, and then trim a very small amount off that
The spline may be rather stiff to work with. You may want to play with it a bit – roll it in the opposite direction for example – to help with straightening it.
5. Install the fabric in one of the long edges
This is where it gets fun. The HANVIKEN doors, along the long edge, have a timber lip that is on the back of the frame. This means that you’re working with a really awkward space.
When approaching the fabric install, I did the two long edges first, with the timber lip, and then the two short edges last. The short edges are a piece of cake compared to the long edges. That timber lip is really annoying. If I had a jigsaw I would have probably trimmed it down – but also see the “what would I do differently” section for another door consideration.
To install the fabric with the lip you will need to:
Place the frame with the front side up – so the lip is on the bottom
Figure out which side of your fabric is going to be the front facing side
Place the fabric then back side up (so front side down) as it will help with visibility
Place the spline against the long edge of the fabric, and fold the fabric over the spline. Start in one corner, and squeeze the spline in
Use a flat head screwdriver to help push the spline in
Bit by bit, keep easing the single edge in, using the tool to ensure the spline is completely in the groove
For the first edge, work with the frame facing UP, and the fabric with the final side facing DOWN, and using a screwdriver, wedge the spline between the fabric in the gap
By now you’ll have the door with a flap of fabric coming out of the front, with the back side of the fabric facing up.
The HANVIKEN with one long edge in place
6. Install the fabric on the other long edge
This was the tricky bit. Because of the timber lip on the long edge, you can’t keep the door flat – you’ll need to have it more upright as you need access to both the front and back to work around the timber lip.
It is awkward to find the balance of:
holding the door,
keeping the fabric tight, and
installing the spline
For the first door, I had an extra set of hands help hold the door up. But for the second, I somehow managed it myself, holding the door up on my lap. If you have the 60cm high doors, that may be harder, but the 38cm high doors can be done solo.
You need to make sure that you’re making the fabric taut enough that is isn’t saggy, and not too tight that you don’t have room to move.
I used two different tools to get the spline in – the elasticity of the fabric is key here as you’ll need the fabric to stretch a little so you can get your hands and tools in to place. On the back end, I used a large flat head screwdriver, and on the front, a blunter screwdriver head from my kit – no idea what it is called, but it was flat, round, and had no sharp edges. Basically something that can press from the front without damaging the frame or fabric.
The reason here is that on the back, you can press the flat head screwdriver on the actual spline. But on the front, when you’re easing the spline in, you’re actually pressing on the fabric – so something gentler for the fabric is needed.
The HANVIKEN with both long edges in place
7. Finish with the two short edges
The timber lip edges are the hard ones – the final two short edges are super easy to install. Take care, and bit by bit, work down each edge.
Getting ready to install the spline on the short edge – do these last as they’re really easy
8. Run on the front
Run your finger against the front of the door against the fabric and feel if you have any spline that isn’t quite in. Using the blunt smooth tool, ease the spline in from the front.
You may also need to do this for the corners as they can be very hard to reach because of the timber lip.
A finished HANVIKEN door with a speaker fabric front
9. Install as per IKEA instructions
Using the IKEA fixings, install your doors as per the instructions.
The HANVIKEN installed with the BESTÅ soft closing hinge
Before and After
Before: GLASSVIK door (left) with a gloss black drawer (right)
After: two HANVIKEN doors with speaker fabric fronts
How much did it cost?
BESTÅ and doors costs aside, assuming you have the tools and glue handy, the only new items needed are speaker fabric and spline.
The speaker fabric can vary in price based on quality – mine wasn’t the cheapest, but was from a reputable audio store who had a range of colours. I also ended buying far too much (just in case) and was $45AUD for 170cm x 100cm.
The spline is easy – just the stuff you put in a screen door. I used Cyclone Tufflite 5mm x 6.5m PVC Prepacked Insect Screen Spline from Bunnings, for $6.98 AUD.
Pay special attention to…
When cutting fabric, use the inner board as a sizing guide – allow 1cm to 1.5cm of extra fabric around the outside.
If you’re doing multiple doors, note that the fabric may have two subtly distinct sides. Make sure you match the same texture for the “front” side of each door.
You want to make sure that the fabric is taut – but not too tight that it pulls itself out – and free from bunching up along the edge. To avoid this, I found it easiest to edge in the spline bit by bit (rather than large steps along the entire length first). It’s more fiddly, but also produced a much cleaner finish.
Next time, what would I do differently?
I was disappointed when looking at the HANVIKEN doors that the inner frame on the long edge has a length of timber. With a solid door (as purchased), you’d never notice it, but when you remove that centre panel, there’s an extra bit of timber. Given the fabric is dark, you don’t notice it but it creates two considerations:
Getting the spline in the gap on those long edges with the fabric on the right side is damn hard and fiddly, and
This little bit of timber reduces the open area of the door
Sure, the difference in that open area is so small – but also on a small door, that few centimetres difference is still there. If I had gone for the SANDVIK doors, I’d have had an even timber all the way around, and an easier time putting the spline in the gaps.
These doors were ordered online, without seeing them in the flesh due to being in Stage 4 lockdown in Melbourne. If I had been in store, I may have noticed the difference in the doors, and gone for the SANDVIK. But while I’d have gotten even timber all the way around, I’d also have to deal with the risk of breaking glass which isn’t fun. So this is a minor point, but still one to consider.
What was the hardest part?
Getting the fabric in the groove on the long edges was definitely the hardest – very fiddly and tight to work with. You need to take care to not damage either the frame or the fabric with your screwdriver.
The first edge is fiddly but manageable – the second long edge is the really fiddly one. Thankfully, the two short edges – that I did last – are so easy to do.
If I had used the SANDVIK doors, that have that even timber edge, this difficulty may have been reduced.
IKEA’s popular shelving unit modded into flat screen TV stand.
Our house was built in 1957, when TVs were pieces of furniture. We wanted to be able to watch TV while sitting by the fire, but there was absolutely nowhere in the living room to put the flatscreen. (We are adamantly opposed to hanging TVs over the fireplace!)
The only place to put it was next to the room divider, however, this meant we needed a piece of furniture with *extremely* specific dimensions.
It had to a) hold the TV and b) be the right height and length to sit behind the built-in room divider.
Not too low (hard to watch TV on the floor) but not to high (can’t be above the divider).
We looked for months and months, and even if we could spend thousands, we weren’t going to find what we needed.
On a trip to IKEA, we measured this KALLAX and wow, with some legs on it, the dimensions were perfect!
We bought it and next tried to figure out how to make it look nice in the room.
We tried faking a wood stain, but this KALLAX is essentially covered with a wood-patterned sticker, so paint was called for.
Colorwise, we were inspired by some items from West Elm and Blu Dot. We added the antiqued brass legs and floating shelf (3″ thick) to raise the TV up as high as possible.
It fits perfectly, and is in line with the midcentury style of the room. The total cost was around $180.
1. We assembled the KALLAX only partially, to accommodate our TV’s dimensions plus a shelf for books. We had to reinforce the bookshelf with two wood screws because we weren’t installing all the shelves, so it wasn’t as strong as it would be (the shelves support each other).
2. Wipe the KALLAX down with Gloss-Off, following bottle instructions. Let dry thoroughly.
3. Fill in all the shelf-peg holes with wood filler. Let dry then sand flat.
4. Prime the KALLAX and the Hobby Lobby wood shelf. Some of the surfaces required two coats of primer (the walnut-effect is super fake and hard to cover with paint!).
5. Paint the KALLAX and the wood shelf. We had to do several very thin coats, letting dry thoroughly between.
6. Attach the brass legs. Do not use a drill! It will eat up the KALLAX. We reinforced some of the screw holes with wood glue, as the KALLAX just sort of disintegrates sometimes.
If you were to do this again, what would you do differently?
If I were to do this again, I would buy the matte white shelf instead (we thought we could “stain” the walnut effect, which is why we bought that one).
It was a learning experience, and we might do something similar in another room to hold our records and stereo.
I searched high and low for a TV unit as I wanted to put vinyl records and other stuff together in one media unit. After some research on the Internet and Pinterest I found some ideas with KALLAX and I wanted to make something with that.
I assembled the KALLAX units and then I connected them with HETTICH connection screws. Then, I bought extra 100mm screws and cut them to 60mm.
Step 2:
Next, I cut 3mm mdf boards 1 cm shorter than KALLAX units and attached them to the back of the KALLAX with nails. By this method, I closed the view to the cables and reflection of LED light.
Step 3:
When I bought the pine wood, they cut it through the middle and I had 2 pieces of 39.7 cm. The overhang in front is 7mm and from right and left, I let it hang out 1 cm.
First, I cut the long piece’s left side with a circular saw to 45 degrees. Then I cut other 35 cm piece’s both sides and finally cut the top piece last.
Step 4:
After that, I fixed the long piece with a drill. I opened holes from under KALLAX and also a little bit to the wood with Ø6 wood drill bit.
Then I made this wood hole bigger with Ø10 wood drill bit and fixed screw sockets. After that I repeated the same operation to the panel on the side and finally the top piece of wood.
Step 5:
Added LED light behind the unit.
Step 6:
Finally I put in the shelf for PS. I drew behind it with a pencil and opened a hole for cables and air.
How much did it cost?
The cost was:
KALLAX units €90
KALLAX drawers €15
LURVIG €12
Pine wood €62
MDF €4
LED light €39
other accessories total €20
Grand total around €240.
What I like most is it’s cheaper then all TV units for my needs and very compatible with the color of the wall.
The hardest part of the hack was cutting the 45 degree angles.
I follow a lot of reddit subgroups which showcase network racks and I was tired of my setup where all the switches were all over the place and not organised.
So I did some research and purchased a kitchen bridging unit and rewired my whole set up.
Ever since I first saw the remote-controlled, motorized window blinds at IKEA, I immediately had the idea of using them to build a large screen for my video projector.
The screen should be as big as possible.
Since the IKEA roller blinds are only available in a maximum width of 140 cm, the roller blind has to be widened.
For a premium look I chose parts made of anodized aluminum.
1 = IKEA KADRILJ roller blind, motor and bracket | 2 = Aluminum tubes | 3 = Aluminum profiles + end covers
Hacking IKEA roller blinds to fit a large projector screen
I cut the original aluminum profile from the KADRILJ roller blind in half with the saw. We won’t be needing the original aluminum tube and the fabric.
The aluminum profiles, which serve as the new housing, are shortened to the desired total width of the screen (in my case to 3 m). Additional space for the brackets has to be included.
Photo below shows the motor drive with battery compartment.


 and I use the